FastSwitch8 10/100 Fast Ethernet Unmanaged Switch Installation Guide PN 613-10784-00 Rev.
Copyright 1999 Allied Telesyn International, Corp. 960 Stewart Road Suite B, Sunnyvale CA 94086 USA All rights reserved. No part of this publication may be reproduced without prior written permission fro Allied Telesyn International, Corp. Ethernet is a registered trademark of Xerox Corporation. All company names, logos, and product designations that are trademarks or registered trademarks are the property of their owners. Allied Telesyn International, Corp.
FCC Compliance Statement This device complies with Part 15 of the FCC rules. Operation is subject to the following two conditions: 1. The device may not cause harmful interference and 2. This device must accept any interference received, including interference that may cause undesired operation. This equipment has been tested and found to comply with the limits for a Class B digital device, pursuant to Part 15 of the FCC Rules.
Table of Contents FCC Compliance Statement ....................................................................... iii Chapter 1 Product Description ...................................................................................... 1 Key Features....................................................................................................... 2 Physical Description........................................................................................... 3 Front Panel .............................
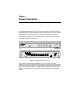
Chapter 1 Product Description The LanEdge FastSwitch8 is an eight-port switch that integrates 100 Mbps Fast Ethernet and 10 Mbps Ethernet network capabilities in a highly flexible desktop package. Figure 1 shows the front and rear panels of the switch. This product is a member of the LanEdge family, which includes hubs, fast hubs, and internet access products.
Product Description Key Features The FastSwitch8 provides the following features: 2 ❑ IEEE 802.3 and 802.3u compliant. ❑ Store-and-forward at full wire speed to support rate adaptation and ensure data integrity. ❑ Non-blocking data packet forwarding and filtering at full wire speed. ❑ 1 K active MAC address entry table per device with self learning and table aging. ❑ 4 MB packet buffer per device. ❑ IEEE 802.3 Auto-Negotiation on all ports.
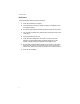
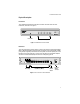
FastSwitch8 Installation Guide Physical Description Front Panel The LanEdge FastSwitch8 front panel consists of Power and Port LED indicators, as shown in Figure 2. Power LED Port LED Indicators Figure 2 FastSwitch8 Front Panel defined Rear Panel The rear panel of the switch (shown in Figure 3) contains seven 10/100 Mbps MDI-X (Media Dependent Interface with Crossover) ports and one MDI-X/MDI port (port 8). Eight dip switches on the rear panel are used to specify the “Link Mode” for each UTP/STP port.
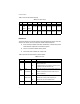
Product Description Table 1 lists the dip switch settings. Table 1 Dip Switch Settings Port 1 Port 2 Port 3 Port 4 Port 5 Port 6 Port 7 Port 8 Up 10 Mbps 10 Mbps 10 Mbps 100 Mbps 100 Mbps 100 Mbps 100 Mbps 100 Mbps halfhalffull-duplex full-duplex full-duplex full-duplex full-duplex full-duplex duplex duplex Down1 AutoAutoAutoAutoAutoAutoAutoAutonegotiate negotiate negotiate negotiate negotiate negotiate negotiate negotiate 1 Default setting for all ports.
Chapter 2 Installation Before you Proceed Before installing the LanEdge FastSwitch8, make sure you read “FCC Compliance Statement” on page iii. Use this section to verify your package contents, position the device, and configure it.
Installation Selecting a Site for the Switch Be sure to observe the following requirements when choosing a site for your Ethernet switch: ❑ Place the switch in a dust-free and moisture-free environment. ❑ Do not block the ventilation openings on the unit. The site should allow for proper heat dissipation from and adequate ventilation around the switch. ❑ Be sure that the site will allow you to easily access the cables and power cord.
FastSwtich8 Installation Guide To Place a Single LanEdge Product on a Desktop 1. Place the unit upside down. 2. Locate the round rubber feet and square rubber bumpers from the accessory bag. Remove the paper cover from the adhesive and press a rubber foot into each round receptacle on the bottom of the unit. Remove the paper cover from the adhesive and press a rubber bumper into each square receptacle on the bottom of the unit. 3. Put the unit on the desktop.
Installation Figure 4 Interlock Cap To Interlock a Group of LanEdge Products on a Desktop The interlocking feature of the LanEdge products makes it easy for you to install the units on a desk or table. You can place the units on top of each other and interlock them to form a stack. A stack can consist of any combination of LanEdge hubs. It is recommended that the heaviest unit be placed as the base (bottom) unit.
FastSwtich8 Installation Guide 3. Place the first LanEdge unit on the desktop as the base. If you are installing a FastPrintServer, place it as the base (bottom) unit, otherwise, place the OmniConnect as the base unit. 4. Pry off the interlock cap at each corner of the unit: From the side of the unit, insert the tip of a small straight-slot screwdriver into the opening of the interlock cap. Press down on the screwdriver to pry the cap off. 5.
Appendix A Technical Specifications Physical Characteristics Dimensions: 256 mm x 152 mm x 50 mm Operating temperatures: 0° to 55° C Storage temperatures: -30° to 60° C Relative humidity: 5% to 95% non-condensing C Number of ports: Eight 10/100Base-TX ports Media interface exchange: MDI RJ45 shared with port 8X Input power requirements: 3.3/5 VDC, 3/1 A Agency Compliance Standard: IEEE 802.3 10Base-T Ethernet IEEE 802.3u 100Base-TX Fast Ethernet ANSI/IEEE Std 802.3 Auto-Negotiation IEEE 802.
Technical Specifications Recommended Cables and Cable Specifications There are various grades of voice-quality and data-quality cables available. These can appear to be similar externally, although their high-speed data transmission characteristics are radically different. The identification problem is made worse by some suppliers selling voice-quality cables as data-quality cables. If voice-quality cables are used in a 100Base-TX network system, data movement may be slow, collision-prone or non-existent.
FastSwitch8 Installation Guide Port Pinouts Straight-through Cable RJ45 PIN RJ45 PIN TD + 1 1 TD + TD - 2 2 TD - RD + 3 3 RD + Not Used 4 4 Not Used Not Used 5 5 Not Used RD - 6 6 RD - Not Used 7 7 Not Used Not Used 8 8 Not Used Per IEEE 802.
Appendix B Technical Support Fax Order Name _________________________________________________________________________ Company______________________________________________________________________ Address_______________________________________________________________________ City ___________________________State/Province___________________________________ Zip/Postal Code ______________________ Country___________________________________ Phone __________________________________ Fax___________________________
Appendix C FastSwitch8 Installation Guide Feedback Please tell us what additional information you would like to see discussed in this guide. If there are topics you would like information on that were not covered in this guide, please photocopy this page, answer the questions and fax or mail this form back to Allied Telesyn. The mailing address and fax number are at the bottom of the page. Your comments are valuable when we plan future revisions of the guide.
Appendix D Where To Find Us For Technical Support or Service Location Phone Fax Americas United States, Canada, Mexico, Central America, South America 1 (800) 428-4835 1 (918) 628-3222 Asia Singapore, Taiwan, Thailand, Malaysia, Indonesia, Korea, Philippines, China, India, Hong Kong (+65) 3815-612 (+65) 3833-830 Australia Australia, New Zealand 1 (800) 000-880 (+61) 2-9438-4966 France France, Belgium, Luxembourg, The Netherlands, Middle East, Africa (+33) 1-60-92-15-32 (+33) 1-69-28-37-49 Ge