
User guide


Quality of Service (QoS) Network Management Example of an iMAP Device Class Policy
AlliedView NMS Administration Guide (Configuring Network Services)
6-110
6.11.9.2 Creating the QoS Policy Flow
The QoS Policy Flow will be used to create the names for these flows. Following are the steps to create a flow for qos_voice:
1. Click on the Network Services menu and select Create/Edit QoS Configuration -> Create/Edit Flows
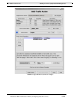
2. The QOS Policy Flow Dialog window appears.
3. Click on New Flow and enter qos_voice as the New Name, then Select.
4. The Edit QOS Device Class List appears. Select Telesyn only, then Select.
5. The default classifier (ETHFORMAT=ANY) appears in the Flow Classifiers list. Change this as follows:
1. In the Classifier attribute pull-down, select VID
2. A blank field appears next to VID with a default classifier number. Replace with 701.
3. Click on Click Here to Add or Replace Parameter. The default Classifier is replaced with the VID=701 classifier.
6. Click on Save Flow and OK to confirm. This saves the Policy Flow name qos_voice, and this will appear in pull-downs of
Flow Names where appropriate.
7. Repeat this and create qos_data, qos_video, and [All Packets]. When creating these, you can click on the Copy Flow
qos_voice tic box so that the VID attribute is copied over. You then replace the VID numbers.
6.11.9.3 Creating the QoS Priority Actions
The QoS Priority Action will be used to create the names for these actions. Following are the steps to create a priority action for
qos_voice:
1. Click on the Network Services menu and select Create/Edit QoS Configuration -> Create/Edit Priority Actions
2. The QOS Priority Action Form appears.
3. Click on New Action and enter voice_priority as the New Name, then Select.
4. The Edit QOS Device Class List appears. Select Telesyn only, then Select.
5. The default priority (FORWARD) appears in the Flow Classifiers list. Change this as follows:
1. In the Priority attribute pull-down, select SETVPRIORITY
2. A blank field appears next to SETVPRIORITY with a default number (0). Replace with 7.
3. Click on Click Here to Add or Replace Parameter. The default Priority is added to the FORWARD action.
4. Click on the FORWARD action and select Delete. Now SETVPRIORITY is the only action parameter.
6. Click on Save Priority Action and OK to confirm. This saves the Priority Action name voice_priority, and this will appear
in pull-downs of Priority Action where appropriate.
7. Repeat this and create data_priority, video_priority, and [No Action]. When creating these, you can click on the Copy from
Action voice-priority tic box so that the SETVPRIORITY is copied over. You then replace the SETVPRIORITY numbers.
6.11.9.4 Creating the QoS Traffic Actions
The QoS Traffic Actions will be used to create the names for these traffic actions. Following are the steps to create a traffic
action limit_voice.
1. Click on the Network Services menu and select Create/Edit QoS Configuration -> Create/Edit Traffic Actions
2. The QOS Traffic Action Form appears.
3. Click on New Action and enter limit_voice as the New Name, then Select.
4. The Edit QOS Device Class List appears. Select Telesyn only, then Select.
5. The default actions (RATE and BURSTSIZE) appear in the Traffic Action Parameters list. Change this as follows:
1. Rate and Burstrate parameters are initially in square brackets and colored red. This is because the default values will not
work for both 7000 and 9000 devices, but the parameters are required. This keeps the user from inadvertently saving the
Actions without looking at these parameters and consciously setting their values
2. With the RATE parameter, select RATE from the pull-down. In the blank filed, enter 1000.