
Installation guide


Chapter 5: Installing the AT-SBx81CFC400 Control Card and Ethernet Line Cards
96
Installing the AT-SBx81CFC400 Controller Fabric Card
This section contains the installation procedure for the AT-SBx81CFC400
Controller Fabric Card. You may install either one or two controller cards
in the unit. The chassis must have at least one controller card. The cards
must be installed in slots 5 and 6 in the chassis.
Caution
The electronic components on the AT-SBx81CFC400 Card can be
damaged by electro-static discharge (ESD). Follow the procedure in
“Protecting Against Electrostatic Discharge (ESD)” on page 82 to
guard against ESD damage when unpacking and installing the card.
This procedure requires the following tools:
#2 Phillips-head screwdriver (not provided)
#2 Phillips-head, 5 inch-lbs torque screwdriver (optional — not
provided))
To install the AT-SBx81CFC400 Card, perform the following procedure:
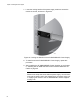
1. Choose a slot in the chassis for the AT-SBx81CFC400 Controller
Fabric Card.
The card must be installed in slot 5 or 6, shown in Figure 53. If you are
installing only one controller card, Allied Telesis recommends installing
it in slot 5.
Figure 53. Slots 5 and 6 for the AT-SBx81CFC400 Card
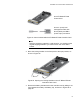
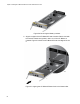
2. Remove the new AT-SBx81CFC400 Control Card from the shipping
package and verify the package contents, listed in Figure 54 on page
97.
If any item is missing or damaged, contact your Allied Telesis sales
representative for assistance.