
Installation guide


AT-8316F and AT-8324 Installation Guide
45
Installing the Switch in a Rack
To install the Ethernet switch in a standard 19-inch rack, perform the
following steps:
1. Remove all components from the shipping package and store the
packaging material in a safe location.
2. Locate a level, secure surface for the switch.
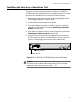
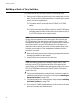
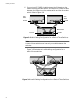
3. Remove the snap-on plastic feet from the bottom of the switch, as
shown in Figure 3-3.
Figure 3-3 Removing the Feet
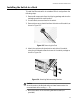
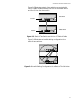
4. Attach the rackmounting brackets to each side of the switch,
using the six flathead screws that came in the switch package as
shown in Figure 3-4.
Figure 3-4 Attaching Rackmounting Brackets
Caution
Air vents must not be blocked and must have free access to the
room ambient air for cooling. " 13
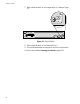
5. Mount the switch in the rack using standard screws (not
provided).
M
IR
R
O
R
P
O
R
T
R
S
-2
3
2
T
E
R
M
IN
A
L
P
O
R
T
S
T
A
T
U
S
LINK
X
R
E
S
E
T
F
A
U
L
T
M
A
S
T
E
R
R
P
S
P
W
R