AlliedWareTM OS How To | Create a VPN between an Allied Telesis and a SonicWALL Router, with NAT-T Today’s network managers often need to incorporate other vendors’ equipment into their networks, as companies change and grow. To support this challenge, Allied Telesis routers are designed to inter-operate with a wide range of equipment. This How To Note details one of the inter-operation solutions from Allied Telesis: creating virtual private networks between Allied Telesis and SonicWALL routers.
What information will you find in this document? This How To Note begins with the following information: z "Related How To Notes" on page 2 z "Which products and software version does it apply to?" on page 2 Then it describes the configuration, in the following sections: z "The network" on page 3 z "How to configure the Allied Telesis router" on page 4 z "How to configure the SonicWALL router" on page 12 z "How to test the tunnel" on page 29 z "How to use the CLI instead of the GUI" on page 30
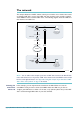
The network This example illustrates a NAT-T solution, which you need when one or both of the routers are behind a NAT device such as some xDSL and cable modems. In this example, an Allied Telesis AR415S router is behind a NAT device. The following diagram shows the LANs and their interfaces and addresses. Allied Telesis router vlan1: 192.168.1.1 eth0: workstation: 192.168.1.100 by 192.168.254.1/30 automatic address assignment 192.168.254.2/30 NAT device 100.100.100.1/30 100.100.100.
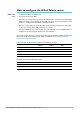
How to configure the Allied Telesis router Before you start 1. Install and configure the NAT device. 2. Access the router via its GUI. 3. Customise the router and set up vlan1 as the LAN interface. The site-to-site VPN wizard always uses vlan1 as the local LAN for the VPN connection, so you must make sure an IP interface is configured on vlan1 before running the wizard. 4. Create a security officer.
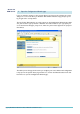
Create the VPN tunnel 1. Open the Configuration Wizards page Log in as either the manager or the security officer. If you log in as the manager, the router changes to secure mode when you finish the VPN wizard and at that stage prompts you to log in again as the security officer. The Site-To-Site VPN wizard is one of the options on the Configuration Wizards page. Make sure your browser’s pop-up blocker is disabled—the wizard needs to open pop-ups.
2. Start the Site-to-Site VPN wizard Click on the Site-to-Site VPN button. The wizard starts by displaying a welcome message. Click the Next button. 3. Name the VPN connection Enter an appropriate VPN connection name. Click the Next button. If you have multiple possible WAN interfaces configured on the router, the wizard next lets you select the appropriate interface. In this example there is only one WAN interface, so the wizard selects it automatically and moves directly to the remote site settings.
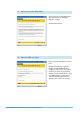
4. Enter the remote site’s WAN IP address Enter the public IP address of the other end of the tunnel. In this example, this is 200.200.200.1, which is the IP address of the SonicWALL WAN interface. Note that you can use the Tab key to move between fields when entering the address, but should not use the . key (the period). Click the Next button. 5. Enter the remote site’s LAN IP address Enter the SonicWALL router’s LAN subnet address and mask. In this example, this is 192.168.2.0 and a mask of 255.255.255.
6. Enter the shared secret key Enter the secret key, which is an alphanumeric string between 2 and 64 characters long. Both routers must use the same secret key. On the SonicWALL router, this is the Site-toSite Policy’s preshared key. Click the Next button. 7. Check the settings Check the summary. If necessary, use the wizard’s Back button to return and correct any settings you want to change. Once you are happy with the settings, click the Advanced Settings button to modify Peer ID settings.
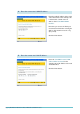
8. Specify Peer IDs Peer IDs enable the routers to identify each other when they exchange secret key information. By default, the Peer IDs are the router IP addresses. This does not work when one (or both) routers are behind a separate NAT device, because the NAT device changes the IP addresses. Towards the bottom of the Advanced Settings page, enter a local ID (to identify this router) and a remote ID (to identify the router at the other end of the link).
9. Check the settings again Check the summary. It now includes the Peer ID settings. If necessary, correct any settings you want to change. When all the settings are correct, click the Apply button. 10. Finish the wizard Security officer Page 10 | AlliedWare™ OS How To Note: VPNs with SonicWALL routers If you are logged in as the security officer, the GUI displays a completion message. Click the Finish button to finish the Wizard and save the VPN settings.
Manager If you are logged in as manager, the GUI displays a message to warn you that you will need to close your browser and re-login as a security officer (see below) once you have finished the wizard. Click the Finish button to finish the Wizard and save the VPN settings. The browser now indicates that you no longer have permission to view the GUI. The router configuration is now complete. If required, you can log in to the router again for further configuration or monitoring.
How to configure the SonicWALL router To configure the SonicWALL router, perform the steps in the following sections: 1. "Access the Router" on page 12 2. "Customise the router and set up the network" on page 15 3. "Define the LAN subnet of the peer" on page 20 4. "Create the VPN" on page 23 5. "Set the VPN IKE IDs and use Main Mode" on page 27 Access the Router By default, SonicWALL TZ 170 routers start up with a LAN interface IP address of 192.168.168.168 and mask of 255.255.255.0.
3. Browse to the router’s management GUI Browse to 192.168.168.168. If you are using a pop-up blocker, disable it for this address. If you access the Internet through a proxy server, set your browser to bypass the proxy for this address. The login dialog box opens. 4.
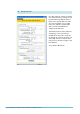
The first time you configure your router, the GUI opens at the Configuration Wizard page. After initial configuration, when you browse to the SonicWALL it may open at the System > Status page instead of the Configuration Wizard page. Click on the Wizards button in the left-hand menu to open the Configuration Wizard page.
Customise the router and set up the network The following steps use the Setup wizard to begin configuring your router. 1. Change the administrator password The first action in the Setup wizard is to enter a suitable password for access to the GUI. Click the Next button. 2. Set the time zone Select your time zone, and set the router to automatically adjust for summer time. Click the Next button.
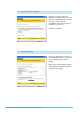
3. Choose the type of WAN address In this example, the SonicWALL router has a permanent fixed IP address, so select the Static IP option. Then click the Next button. 4. Enter the WAN settings Enter the WAN interface’s IP address and mask. For Gateway, enter the ISP’s address (see "The network" on page 3). For DNS Server Address, enter the address of the DNS server that your router will access. Then click the Next button.
5. Enter the LAN address Enter the IP address and mask of the SonicWALL’s interface to the LAN. Then click the Next button. 6. Set up the DHCP server In this step, you can set up the DHCP server on this router to service the office LAN you intend to connect to. Check that the wizard has chosen an appropriate range of addresses. Then click the Next button.
7. Check the settings Check the summary. If necessary, use the Back button to return and correct any settings you want to change. When all the settings are correct, click the Apply button. The wizard displays a message of congratulations. Click the Close button.
8. Log in again If you changed the router’s LAN IP address, you need to change the PC’s address. If you turned on the router’s DHCP server, set the PC to obtain its address automatically. Otherwise, give the PC an address in the new subnet. You may need to restart the SonicWALL router to force it to assign an IP address to the PC. Browse to the router’s new address and log in. The GUI displays the System > Status page.
Define the LAN subnet of the peer Before you can configure the VPN, you need to create an address “object”. The address object defines the LAN subnet of the VPN peer router—in this example, the Allied Telesis router. There is no wizard for creating the address object, so the following steps use the Network pages instead. 1. Open the Address Objects summary In the left-hand menu of the System > Status page, select Network, then Address Objects. The GUI displays a list of all the existing address objects.
2. Open the Custom Address Objects summary Select the “Custom Address Objects” view style, which displays lists of Address Groups and Address Objects. There will be no custom address objects defined yet, so both the Address Groups and Address Objects lists are empty. In Address Objects (the bottom section of the window), click the Add button. 3.
4. Check the settings Check that the object is correct. If you need to change the object, click on the icon of a note and pencil at the right of the object’s entry.
Create the VPN The following steps use the VPN wizard to create the SonicWALL end of the VPN. 1. Return to the Configuration Wizards page Click on the Wizards button in the left-hand menu to open the Configuration Wizard page, then select the VPN wizard. Click the Next button. 2. Start the Site-to-Site VPN wizard Select the Site-to-Site option. Click the Next button.
3. Create the Site-to-Site policy Name the policy. Enter the pre-shared key, which must be the same as the Allied Telesis router’s secret key. Enter the remote peer address, which is the SonicWALL-facing side of the NAT device in this example (see "The network" on page 3). Click the Next button. 4. Select the networks for each end of the LAN For the local (SonicWALL) end, select Firewalled Subnets.
5. Specify security settings You do not need to modify the default security settings. Click the Next button. 6. Check the settings Check the summary. If necessary, use the Back button to return and correct any settings you want to change. When all the settings are correct, click the Apply button.
The wizard displays a message of congratulations. Click the Close button. The GUI displays the VPN > Settings page.
Set the VPN IKE IDs and use Main Mode Solutions with a NAT device in the tunnel path need to have IKE IDs specified. For all solutions, we recommend using Main mode instead of the default Aggressive mode. This section describes how to set both of these. 1. Specify the Local and Peer IKE IDs On the VPN > Settings page, click on the icon of a note and pencil at the right of the AlliedTelesis policy’s entry. The VPN policy dialog box opens. On the General tab, enter the Local and Peer IKE IDs.
2. Specify IKE Main Mode Click on the Proposals tab. Set Exchange to Main Mode. This is the preferred mode because it is more secure. We also recommend that you change the lifetime for the IPsec (Phase2) Proposal to 3600 seconds, to match the Allied Telesis router. Click OK. 3. If necessary, restart the router You may find that you need to restart the router to allow all changes to take effect. To do this, select System > Restart from the left-hand menu.
How to test the tunnel There are several options for testing the tunnel. If these checks show that your tunnel is not working, see the How To Note How To Troubleshoot A Virtual Private Network (VPN). 1. Check the tunnel status On the SonicWALL router’s VPN > Settings page, look for a green dot in the VPN policy entry, and for an entry in the “Currently Active VPN Tunnels” section. 2.
How to use the CLI instead of the GUI This section gives an example of the Allied Telesis CLI commands that you need to enter for the IP, firewall, IPsec and ISAKMP aspects of this configuration. # IP configuration enable ip add ip int=vlan1 ip=192.168.1.1 add ip int=eth0 ip=192.168.254.1 mask=255.255.255.252 add ip rou=0.0.0.0 mask=0.0.0.0 int=eth0 next=192.168.254.
Appendix: Using this example if you don’t have a NAT device in the same position You can still use this example if you have no NAT device between the Allied Telesis router and the Internet, or if you have a NAT device between the SonicWALL router and the Internet. Simply change the peer addresses that you enter into the wizards, in the following ways: If you have... in the Allied Telesis VPN wizard, for Remote Site Public IP Address, enter... in the SonicWALL VPN wizard, for Remote Peer IP Address, enter.