AR700 Series Router Installation and Safety Guide AR750S AR770S
AR700 Series Router Installation and Safety Guide AR750S AR770S
AR700 Series Router AR700 Series Router Installation and Safety Guide Document Number 613-000051 Rev E. © 2004-2011 Allied Telesis Inc. All rights reserved. No part of this publication may be reproduced without prior written permission from Allied Telesis Inc. Allied Telesis Inc. reserves the right to change specifications and other information in this document without prior written notice. The information provided herein is subject to change without notice. In no event shall Allied Telesis Inc.
Installation and Safety Guide Table of Contents Models Covered By This Guide .................................................................................... 4 Package Contents ............................................................................................................. 4 Installing the Router ......................................................................................................... 5 Installing the router in a rack ........................................................
AR700 Series Router Models Covered By This Guide This Installation and Safety Guide includes information on these models: ■ AR750S ■ AR770S Documentation updates can be found at www.alliedtelesis.
Installation and Safety Guide AR770S package contents These items are included with the AR770S router: ■ One AR770S router ■ A set of AC power cords One of these is suitable for your region. If desired, you can return the extra cords to your authorised distributor or reseller.
AR700 Series Router Before installing ■ Read the safety information “Safety” on page 20. ■ Gather the tools and equipment you will need. To install an AR750S or AR770S in a rack (Installing the router in a rack) you will need: • the rack mount bracket kit included with your router • a Phillips #1 screwdriver • screws and cage nuts to attach the brackets to your rack.
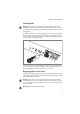
Installation and Safety Guide Installing the router in a rack 1. Check the rack. Ensure that the rack is safely secured and that it will not tip over. Devices in a rack should be installed starting at the bottom, with the heavier devices near the bottom of the rack. Ensure the rack has sufficient space for the router and its associated cables. The router is 1U high. 2. Unscrew the feet. 3. Connect the handles to the brackets (AR750S only).
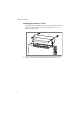
AR700 Series Router Installing the router on a wall 1. Screw the brackets to the AR750S router. Screw a wall mount bracket to the outer screw holes on each side of the router using the shorter screws supplied (see figure below). 2. Screw the wall brackets to the wall with the brackets at the top and bottom of the router, the feet against the wall, and the power inlet near the top.
Installation and Safety Guide Installing SFPs Warning Do not look into the optical ports of SFP cables or transceivers. Invisible laser radiation may be emitted from disconnected fibres or connectors. If you purchased optional SFPs for the AR770S, install them in the Ethernet SFP slots (leftmost). The SFP transceiver must be inserted the right way in the slot. To install an SFP into the Ethernet SFP 0 slot (lower, leftmost), make sure the hinge on the front handle is at the top.
AR700 Series Router Fit the power cord retaining clip to the AC power inlet on the router’s rear panel. Connect the provided power cord to the AC power inlet and clip it in place. Switch the router’s power switch to the ON position. The Power LED lights continuously and the System LED lights briefly. The Port LEDs also light briefly. If the LEDs fail to light, check that the router is receiving power.
Installation and Safety Guide 1. Connect the PC to a router switch port. The PC can be connected directly, or through your LAN. To connect the PC directly to the router, use a straight-through Ethernet cable to connect an Ethernet card on the PC to any one of the router’s switch ports.
AR700 Series Router 3. Browse to the GUI. If you access the Internet through a proxy server, set your browser to bypass the proxy for 192.168.1.1. Point your web browser at 192.168.1.1. 4. Log in and set the password. At the log in prompt, enter the log in name and password. Passwords are case sensitive. User Name: manager Password: friend The system status page appears and you can now use the GUI to configure the router.
Installation and Safety Guide Configuring with the CLI Caution If another device on your network already uses the router’s default IP address, 192.168.1.1, do not connect the router to the network until you have changed the IP address of the router’s default VLAN by using the command line. 1. Initiate router start-up.
AR700 Series Router 2. Log in and set the password. The login prompt appears on the terminal or PC. If the login prompt does not appear, press [Enter] two or three times. When the router boots for the first time it automatically creates an account with manager privileges. The account has the login name “manager” and the password is “friend”. Passwords are case sensitive. At the log in prompt, enter the log in name and password.
Installation and Safety Guide 5. Use the CLI to continue configuring the router. See the AR700 Series Router Software Reference for details about commands available for configuring the router (including a list of message definitions). To display a list of help topics, enter: help To display help on a specific topic, enter: help topic Alternatively, type a question mark at the end of a partially completed command to see a list of valid options. Default configuration The default configuration file boot.
AR700 Series Router Connecting Data Cables to the Router Connecting the router to your network: 1. Connecting to the LAN. If you have not already done so, use Ethernet patch cables to connect the devices on your private network (LAN) to the router’s switch ports. By default, all switch ports are members of VLAN1. 2.
Installation and Safety Guide LEDs on the AR750S LED State Function Status PWR Green The router is receiving power and the power switch is ON. Status SYS Off Normal operation. Amber Lit briefly during router start up, or the router is malfunctioning. Flashing The router fan has failed. PIC 0..1 Green A port interface card (PIC) is correctly installed and has been detected by the router. Ethernet 0..1 Green The Eth port has a 100 Mbps link. Amber The Eth port has a 10 Mbps link.
AR700 Series Router LEDs on the AR770S LED State Function Status PWR Green The router is receiving power and is switched ON. Status SYS Off Normal operation. Amber Lit briefly during router start up, or when the router system is malfunctioning. Flashing The router fan has failed. Green The SFP Eth port has a 1000 Mbps link. Green flashing Data is being transmitted or received. Amber There is an SFP installed, but there is no link.
Installation and Safety Guide LED State Function PIC 0..1 Green A port interface card (PIC) is correctly installed and has been detected by the router. Documentation and Tools CD-ROM The Documentation and Tools CD-ROM bundled with each router contains the complete Document Set for your router. The CD-ROM also includes tools for managing your router. The Document Set on the CD-ROM includes: ■ This Installation and Safety Guide.
AR700 Series Router Emission Compliance Statements STANDARDS: The AR700 Series routers meet the following standards: Category Approval Agency and Requirement Safety UL60950-1 CAN/CSA-C22.2 No. 60950-1-03 EN60950-1 EN60825-1 (for AR770S only) AS/NZS 60950.
Installation and Safety Guide WARNING: Class 1 Laser product. WARNING: Do not stare into the laser beam. CAUTION: Use of controls or adjustments of performance or procedures other than those specified herein may result in hazardous radiation exposure. ELECTRICAL NOTICES WARNING: ELECTRIC SHOCK HAZARD To prevent ELECTRIC shock, do not remove the cover. No user-serviceable parts inside. This unit contains HAZARDOUS VOLTAGES and should only be opened by a trained and qualified technician.
AR700 Series Router Sicherheit WARNUNG: Bei Verwendung zu Hause kann dieses Produkt Funkstörungen hervorrufen. In diesem Fall müßte der Anwender angemessene Gegenmaßnahmen ergreifen. WARNUNG Laserprodukt der Klasse 1. WARNUNG Nicht direkt in den Strahl blicken. ACHTUNG: GEFÄHRLICHE SPANNUNG Das Gehäuse nicht öffnen. Das Gerät enthält keine vom Benutzer wartbaren Teile. Das Gerät steht unter Hochspannung und darf nur von qualifiziertem technischem Personal geöffnet werden.
Installation and Safety Guide Lithium-Batterie - Sollte nur von einem geschulten qualifizierten Techniker ausgetauscht werden. VORSICHT: Explosionsgefahr bei unsachgemäßem Austausch der Batterie. Nur mit einer gleichen Batterie oder einem gleichwertigen Batterietyp nach Empfehlung des Herstellers ersetzen. Gebrauchte Batterien nach Anweisungen des Herstellers beseitigen. ALLE LÄNDER: Installation muß örtlichen und nationalen elektrischen Vorschriften entsprechen.
AR700 Series Router ELEKTRISK-OVERBELASTNING AF SPÆNDINGSKREDSLØBET Ved installation af produktet, bør der tages hensyn til den kumulative kapacitet der angives på navneskiltet, når udstyret forbindes med vekselstrømsledningen. ADVARSEL: MEKANISK OPSTILLING-Udstyret skal opstilles i stativet, på en sådan måde, at der ikke opstår fare p.g.a. ujævn opstilling. Lithium batteri - Bør kun udskiftes af uddannet og kvalificeret tekniker. ADVARSEL : Eksplosionsfare, hvis batteriet udskiftes ukorrekt.
Installation and Safety Guide OPGELET: De ventilatiegaten mogen niet worden gesperd en moeten de omgevingslucht ongehinderd toelaten voor afkoeling. BEDRIJFSTEMPERATUUR: AR750S, AR770S: De omgevingstemperatuur voor dit produkt mag niet meer bedragen dan 50 graden Celsius.
AR700 Series Router ÉQUIPEMENT DE CLASSE 1 ÉLECTRIQUE CE MATÉRIEL DOIT ÊTRE MIS A LA TERRE. La prise de courant doit être branchée dans une prise femelle correctement mise à la terre car des tensions dangereuses risqueraient d’atteindre les pièces métalliques accessibles à l’utilisateur. EQUIPEMENT POUR BRANCHEMENT ELECTRIQUE, la prise de sortie doit être placée près de l’équipement et facilement accessible”.
Installation and Safety Guide Turvallisuus VAROITUS: Kotiolosuhteissa tämä laite voi aiheuttaa radioaaltojen häiröitä, missä tapauksessa laitteen käyttäjän on mahdollisesti ryhdyttävä tarpeellisiin toimenpiteisiin. VAROITUS Luokan 1 Lasertuote. VAROITUS Älä katso säteeseen. SÄHKÖÖN LIITTYVIÄ HUOMAUTUKSIA VAROITUS: SÄHKÖISKUVAARA Estääksesi SÄHKÖISKUN älä poista kantta. Sisällä ei ole käyttäjän huollettavissa olevia osia.
AR700 Series Router Norme di Sicurezza AVVERTENZA: in ambiente domestico questo prodotto potrebbe causare radio interferenza. In questo caso potrebbe richiedersi all’utente di prendere gli adeguati provvedimenti. AVVERTENZA Prodotto laser di Classe 1. AVERTENZA Non fissare il raggio con gli occhi. AVVERTENZE ELETTRICHE ATTENZIONE: PERICOLO DI SCOSSE ELETTRICHE Per evitare SCOSSE ELETTRICHE non asportare il coperchio. Le componenti interne non sono riparabili dall’utente.
Installation and Safety Guide Batteria al litio - Va sostituita solo da un tecnico specializzato e qualificato. ATTENZIONE: l'errata sostituzione della batteria può causare pericolo di esplosioni. Sostituire solamente con lo stesso tipo o con uno equivalente raccomandato dal produttore. Eliminare le batterie usate secondo le istruzioni del produttore. TUTTI I PAESI: installare il prodotto in conformità delle vigenti normative elettriche nazionali.
AR700 Series Router FORSIKTIG: MEKANISK LASTNING Installering av utstyret på hyllen må utføres på en slik måte at ingen farlige situasjoner oppstår som en følge av ujevn lastning. Litiumbatteri — Må kun byttes ut av en faglig kvalifisert tekniker. FORSIKTIG: Eksplosjonsfare hvis batteriet feilinnsettes.Batteriet må bare erstattes med samme type eller en tilsvarende type som er anbefalt av fabrikanten. Batteriene må kasseres i samsvar med fabrikantens instruksjoner.
Installation and Safety Guide TEMPERATURA DE FUNCIONAMENTO: AR750S, AR770S: Este produto foi projetado para uma temperatura ambiente máxima de 50 graus centígrados. ELÉTRICO - SOBRECARGA DA REDE DE CORRENTE ALTERNADA (AC) Antes de instalar o produto, verifique o efeito cumulativo da conexão de diversos aparelhos àrede de corrente alternada através das etiquetas que indicam potência ou amperagem.
AR700 Series Router ELECTRICO - EQUIPO DEL TIPO CLASE 1 ESTE EQUIPO TIENE QUE TENER CONEXION A TIERRA. El cable tiene que conectarse a un enchufe a tierra debidamente instalado. Un enchufe que no está correctamente instalado podría ocasionar tensiones peligrosas en las partes metálicas que están expuestas. EQUIPO CONECTABLE, el tomacorriente se debe instalar cerca del equipo, en un lugar con acceso fácil”.
Installation and Safety Guide Säkerhet VARNING: Denna produkt kan ge upphov till radiostörningar i hemmet, vilket kan tvinga användaren till att vidtaga erforderliga åtgärder. VARNING! Laserprodukt av klass 1. VARNING! Laserstrålning när enheten är öppen. TILLKÄNNAGIVANDEN BETRÄFFANDE ELEKTRICITETSRISK: RISK FÖR ELEKTRISK STÖTFör att undvika ELEKTRISK stöt, ta ej av locket. Det finns inga delar inuti som behöver underhållas.
AR700 Series Router Connection to mains voltage supply This product is supplied with a power cord that incorporates a moulded plug and has been approved for use. It must only be used with the power cord supplied. For continued protection against the risk of fire and shock hazard, replace fuses only with the same type and rating. Telecommunications Interfaces Warning To reduce risk of fire use only No.26 awg or larger telecommunications line cord if the cord supplied is not used with the apparatus.
Installation and Safety Guide Connection to ISDN network Ports for the connection of other apparatus The following interfaces normally operate at SELV (Safe Extra Low Voltage) levels: ■ Asynchronous (console) ports ■ Ethernet ports ■ G703 ports ■ Synchronous ports Note SELV is a secondary circuit whose voltages do not exceed a safe value under normal operating conditions and under single fault conditions. Under normal operating conditions the voltages do not exceed 42.4 V peak AC or 60 V DC.
AR700 Series Router US Federal Communications Commission (FCC) This equipment complies with Part 68 of the Federal Communications Commission (FCC) rules for the United States. A label is located on the underside of the base unit containing the FCC registration number. You must, upon request, provide the following information to your local telephone company: For the AR021U PIC Facility Interface Code 021S5 Service Order Code 6.
Installation and Safety Guide Canadian Department of Communications The Industry Canada label identifies certified equipment. This certification means that the equipment meets telecommunications network protective, operational and safety requirements as prescribed in the appropriate Terminal Equipment Technical Requirements document(s). The Department does not guarantee the equipment will operate to the user’s satisfaction.