
User Manual and Operating Guide


© Copyright, Alliance Laundry Systems LLC – DO NOT COPY or TRANSMIT
Installation
802702
26
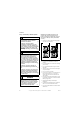
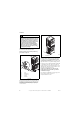
Place a level on the cabinet top and check if the unit is
level from side to side and front to back.
NOTE: Level must rest on raised portion of top
panel. Refer to Figure 24.
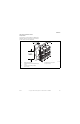
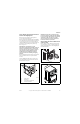
If unit is not level, tilt unit to access the front and rear
leveling legs. For easier access to leveling legs, prop
up unit with a wooden block. Refer to Figure 25.
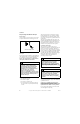
Loosen the locknuts and adjust legs by screwing into
or out of unit base.
Make sure that the unit does not rock. When unit is
level and does not rock, tighten locknuts securely
against bottom of unit base. If these locknuts are not
tight, unit will move out of position during operation.
Leveling legs can be adjusted from inside the unit with
a 7/8 inch deep well socket. All four legs must rest
firmly on the floor so the weight of the unit is evenly
distributed. The unit must not rock and must be level
from side-to-side and front-to-back.
NOTE: Do not slide unit across floor once the
leveling legs have been extended. Legs and base
could become damaged.
Place rubber feet (supplied in accessories bag) on all
four leveling legs. Refer to Figure 24.
Verify that unit does not rock.
SWD796N
1 Level
2 Rubber Foot
3 Leveling Leg
4 Locknut
5 Unit Base
Figure 24
Units elevated above floor level must be
anchored to that elevated surface, base or
platform. The material used to elevate the
unit should also be anchored to the floor
to ensure that the unit will not walk or that
the unit can not be physically pulled,
tipped or slid from its installed position.
Failure to do so may result in conditions
which can produce serious injury, death
and/or property damage.
W307
WARNING
SW
1
2
3
4
5
SWD799N
1 Wood Block
Figure 25
SWD799N
1