
Specifications


© Copyright, Alliance Laundry Systems LLC – DO NOT COPY or TRANSMIT
Installation
F8429301 (EN)
40
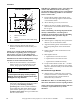
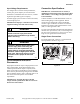
8. Remove shipping materials and place the
machine or elevated base frame carefully over
the bolts.
NOTE: Never attempt to lift the machine by the
door handle or by pushing on the cover panels.
Always insert a pry bar or other lifting device
under the bottom frame of the machine to move it.
IMPORTANT: DO NOT install 80 pound or larger
machines on an elevated metal base frame.
9. Raise and level the machine or elevated base
frame 0.5 inch (1.27 cm) off the floor on four
corners, using spacers such as nut fasteners.
10. Completely fill the space between the elevated
base frame or machine base and the floor with a
good quality non-shrinking machinery
precision grout to ensure a stable installation.
Grout completely under frame. Remove front
panel and back panel to gain access to entire
perimeter of base plates. Force grout under base
until all voids are filled.
IMPORTANT: Minimum Grade 5, SAE rating, flat
washers and minimum Grade 5, SAE rating,
serrated hex flange locknuts are the recommended
hardware for anchoring machine or elevated base
frame to anchor bolts.
11. Position the flat washers and locknuts on the
anchor bolts and finger-tighten to machine base
or elevated base frame.
12. Allow machine grout to set, but not cure.
13. Remove the spacers carefully, allowing the
machine base or elevated base frame to settle into
the wet grout.
NOTE: If installing a 20 through 60 pound model
directly to finished floor, wait until grout is
completely cured and skip to Step 18. If installing
on elevated base frame, proceed to Step 14.
20-60 Pound Models
14. After the grout is completely cured, position the
machine over the elevated base frame.
15. Align the mounting holes on the machine with
the corresponding holes on the elevated base
frame.
16. Install a bolt, flat washer and locknut in each
mounting hole.
17. Hand tighten each nut.
a. Tighten the two rear nuts two turns.
b. Tighten the two front nuts two turns.
c. Tighten the two middle nuts firmly.
18. Torque all the locknuts to 90 ft.-lbs. – one after
the other – until all are tightened evenly and the
machine is fastened securely to the elevated base
frame or floor.
80 Pound and Larger Models
19. After the grout is completely cured, torque the
locknuts to 160 ft-lbs – one after the other – until
all are tightened evenly and the machine is
fastened securely to the floor.
IMPORTANT: Refer to recommended grout cure
times from manufacturer before torquing locknuts.
NOTE: Check and retighten the locknuts after five
to ten days of operation and every month
thereafter.
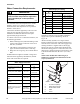
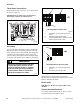
PHM809N
1 Machine Frame Base
2 Grout
3 Anchor Bolt (minimum Grade 5 SAE rating)
4 Concrete
Figure 37
1
2
3
4
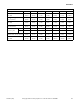
CAST-IN-PLACE ANCHORS
Edge of Pad
A
B
C
D
E
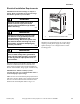
Crush hazard.
To avoid personal injury and/or property
damage, do not tip the machine more than
25 degrees in any direction.
W793
WARNING