
Specifications


Installation
39
F8429301 (EN)
© Copyright, Alliance Laundry Systems LLC – DO NOT COPY or TRANSMIT
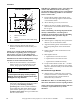
Machine Mounting and Grouting
NOTE: After the concrete has cured completely
and the cast-in-place method was used, refer to
Figure 37 and proceed to step 7. If acrylic adhesive
anchors are desired, refer to Figure 36 and proceed
with step 1 after concrete has cured completely.
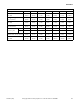
1. Refer to Table 3 to set the drill depth gauge.
Table 3
2. Drill the holes to the set depth.
3. Use compressed air or squeeze bulb to clean out
debris from each hole.
4. Fill half the hole depth with an industry-accepted
adhesive anchoring system.
5. Insert anchor bolt until it reaches the bottom and
a minimum of 2.5 in. (64 mm) extends above
surface and a minimum of 3.5 in. (89 mm) for
20-60 pound models, 6 in. (127 mm) for
80-100 pound models or 5.5 in. (127 mm) for 125
pound models is embedded in concrete.
6. Ensure all air pockets are removed from adhesive
surrounding the bolt.
7. Allow adhesive around bolt to cure completely.
IMPORTANT: Refer to bolt manufacturer’s
recommended adhesive cure times.
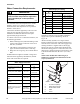
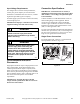
PHM811N
1 Machine Frame Base
2 Grout
3 Acrylic Adhesive
4 Anchor Bolt (minimum Grade 5 SAE rating)
5 Concrete
Figure 36
ACRYLIC ADHESIVE ANCHORS
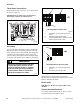
1
3
4
2
5
Drill hole size per
manufacturer
requirements
Edge of Pad
A
D
C
B
E
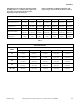
Minimum Anchoring Specifications
20-40 60 80-100 125
Number of
Bolts
4 or 6* 6 6 10
A
Bolt Length
6 in.
(152 mm)
6 in.
(152 mm)
8.5 in.
(216 mm)
8 in.
(203 mm)
B
Thread
Extension
2.5 in.
(64 mm)
2.5 in.
(64 mm)
2.5 in.
(64 mm)
2.5 in.
(64 mm)
C
Bolt
Diameter
5/8 in.
(16 mm)
5/8 in.
(16 mm)
3/4 in.
(19 mm)
3/4 in.
(19 mm)
D
Embedment
Depth
3.5 in.
(89 mm)
3.5 in.
(89 mm)
6 in.
(152 mm)
5.5 in.
(127 mm)
E
Distance
from Bolt
Center to
Edge of
Concrete Pad
6 in.
(152 mm)
6 in.
(152 mm)
6 in.
(152 mm)
6 in.
(152 mm)
* On 20-40 pound models, the four (4) corner bolts are required
and the two (2) center bolts are optional when mounting a
machine or elevated base frame to floor.