
Specifications


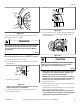


P045I_SVG
2
5
3
4
1
1. Drive Motor
2. Drive Pulley
3. Belt
4. Straightedge
5. Driven Pulley
Figure 44
4. Check overflow hose and drain hose for leaks or visible signs
of deterioration. Replace immediately if either are present.
5. Clean inlet hose filter screens:
a. Turn water off and allow valve to cool, if necessary.
b. Unscrew inlet hose and remove filter screen.
c. Clean with soapy water and reinstall. Replace if worn or
damaged.
6. Tighten anchor bolts, if necessary.
7. Use a vacuum to clean lint from motor.
8. Clean interior of machine, by wiping with a water-soaked
sponge or cloth. Use compressed air to clear debris between
the shell and the basket by directing it through the perfora-
tions of the basket.
9. Use compressed air to ensure that all electrical components
are free of moisture and dust.
10. Remove chemical supply components and check all flush ho-
ses and connections for residual chemicals, leaks or visible
signs of deterioration. Clean or replace as necessary.
11. If applicable, check the supply dispenser hoses and hose con-
nections for leaks or visible signs of deterioration. Replace
immediately if either are present.
12. Verify points of contact at terminals and quick disconnects
are firm trhoughout the machine by gently tugging the wires.
Reseat any loose contacts.
Quarterly
NOTE: Disconnect power to the machine before per-
forming the quarterly maintenance procedures.
1. Tighten door hinges and fasteners, if necessary.
2. Tighten anchor bolts, if necessary.
3. Tighten motor mounting bolt locknuts and bearing bolt lock-
nuts, if necessary.
4. Verify that the drain motor shield is in place and secure.
5. Check all painted surfaces for bare metal.
• If bare metal is showing, paint with primer or solvent-
based paint.
• If rust appears, remove it with sandpaper or by chemical
means. Then paint with primer or solvent-based paint.
6. Clean steam filter, where applicable.
a. Turn off steam supply and allow time for the valve to
cool.
b. Unscrew nut.
c. Remove element and clean.
d. Replace element and nut.
7. 150 models: place a large magnet over the normally-closed
ball switch to verify the stability switch operation. Refer to
the Verify Safety Switch Operation (For 150 Pound Design 2
Models) section.
Care of Stainless Steel
• Remove dirt and grease with detergent and water. Thoroughly
rinse and dry after washing.
• Avoid contact with dissimilar metals to prevent galvanic cor-
rosion when salty or acidic solutions are present.
• Do not allow salty or acidic solutions to evaporate and dry on
stainless steel. Wipe clean of any residues.
• Rub in the direction of the polish lines or “grain” of the stain-
less steel to avoid scratch marks when using abrasive clean-
ers. Use stainless steel wool or soft, non-metal bristle brushes.
Do not use ordinary steel wool or steel brushes.
• If the stainless steel appears to be rusting, the source of the
rust may be an iron or steel part not made of stainless steel,
such as a nail or screw.
• Remove discoloration or heat tint from overheating by scour-
ing with a powder or by employing special chemical solu-
tions.
• Do not leave sterilizing solutions on stainless steel equipment
for prolonged periods of time.
• When an external chemical supply is used, ensure no siphon-
ing of chemicals occurs when the machine is not in use. High-
ly concentrated chemicals can cause severe damage to stain-
less steel and other components within the machine. Damage
of this kind is not covered by the manufacturer’s warranty.
Locate the pump and tubing below the machines’s injection
point to prevent siphoning of chemicals into the machine.
Maintenance
70
©
Copyright, Alliance Laundry Systems LLC - DO NOT COPY or TRANSMIT F8423301ENR3