
Specifications


End of Day
1. Clean the AC drive filter (where applicable):
a. Remove the external plastic cover which contains the fil-
ter.
b. Remove the foam filter from the cover.
c. Wash the filter with warm water and allow to air dry. Fil-
ter can be vacuumed clean.
IMPORTANT: The control module cover and fan fil-
ter must be in place for the fan to properly cool the
AC inverter drive. Failure to observe this warning
will void the warranty and could lead to expensive
AC inverter drive repair.
2. Clean the door gasket of residual detergent and all foreign
matter.
3. Clean automatic supply dispenser and lid [where applicable]
inside and out with mild detergent. Rinse with clean water.
4. Clean machine’s top, front, and side panels with mild deter-
gent. Rinse with clean water.
NOTE: Unload the machine promptly after each
completed cycle to prevent moisture buildup. Leave
loading door open at the end of each completed cy-
cle to allow moisture to evaporate.
Weekly
Check the machine for leaks.
a. Start an unloaded cycle to fill the machine.
b. Verify that door and door gasket do not leak.
c. Verify that the drain valve is operating and that the drain
system is free from obstruction. If water does not leak out
during the prewash segment, drain valve is closed and
functioning properly.
Monthly
NOTE: Disconnect power to the machine at its source
before performing the monthly maintenance proce-
dures.
1. Clean the AC drive fins (where applicable).
2. Each month OR after every 200 hours of operation, lubricate
bearings (locate the bearing lubrication decal at the rear of the
left side of the machine, as viewed from the front).
The grease must have the following characteristics:
• NLGI Grade 2
• Lithium-based
• Water-insoluble
• Anti-rusting
• Anti-oxidizing
• Mechanically stable
The grease must have adequate base oil viscosity with one of the
following ratings:
• ISO VG 150 ( 709–871 SUS at 100°F [135–165 cSt at
40°C])
• ISO VG 220 ( 1047–1283 SUS at 100°F [198–242 cSt at
40°C])
• An SAE 40 rating is also acceptable as long as the cSt or
SUS values are within the specified ranges.
Pump the grease gun slowly, permitting only 2 strokes.
3. Use the following procedures to determine if V-belt requires
replacement or adjustment. Call a qualified service technician
in either case.
a. Check V-belt for uneven wear and frayed edges.
b. After disconnecting power to the machine and removing
all panels necessary for access to the drive belt, use one of
the following methods to verify that the V-belt is properly
tensioned.
• Tension Gauge. Loosen motor mounting bolts and
slide motor along motor plate to change belt span
length. The belt tension should be between 70 and 90
pounds [± 5 pounds] [set initial tension toward the
high end of this range].
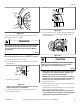
• Deflection. Refer to Figure 43 . Loosen motor mount-
ing bolts and slide motor along motor plate to change
belt span length. Belt tension measurements should be
taken as close to the center of the belt span as possible.
For every inch of span length, the belt should deflect
1/64 inch [0.40 mm]. Thus, a belt with span length of
50 inches should deflect 50/64 inch [19.84 mm]. An
initial [run-in] force of 5.25 pounds should be used to
set the belt tension. An operating [normal] force of 3.5
pounds should be used after the machine has been op-
erated for a few hours.
P044I_SVG
2
1
1. Deflection
2. Span Length
Figure 43
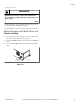
c. Verify that V-belts are properly aligned by checking pul-
ley alignment. Place a straightedge across both pulley
faces. The straightedge should make contact with the pul-
leys in four places. Refer to Figure 44 .
Maintenance
F8423301ENR3
©
Copyright, Alliance Laundry Systems LLC - DO NOT COPY or TRANSMIT 69