
Specifications


© Copyright, Alliance Laundry Systems LLC - DO NOT COPY or TRANSMIT
Specifications and Dimensions
23
C003292ENR1
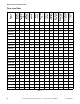
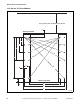
Mounting Bolt Hole Locations
Use a sturdy template to guide hammer-drill into floor.
A heavy steel template/drill guide is available from
your distributor.
Make sure to follow bolt manufacturer’s
recommendation for bit size for the particular anchors
you are using.
The dimensions shown in Figures 11 through 13 are
patterns for various models.
Installing Anchors
1. Measure holes to verify that they match bolt hole
pattern in base of frame.
2. Drill holes for anchor bolts. Refer to Figure 10.
3. Clean out anchor holes and floor around them.
4. Insert anchors and secure them per their
manufacturer’s installation instructions.
Grouting and Setting Machine
After concrete has cured and anchor bolts are properly
set, proceed as follows:
1. Remove two 1/4-20 bolts that secure trim skirt
and remove skirt.
2. Carefully position machine over anchor bolts and
lower it into place – all anchor bolts should pass
through the frame holes easily.
3. Using 4 removable spacers, raise machine about
1/2 in. (13 mm) and level it both front to rear and
side-to-side. The machine should rest on 4 points
when this operation is completed.
4. Remove rear panel so inside is accessible for
grouting.
5. Mix enough machinery grout to fill all spaces
between machine base and floor. Grout
completely under all frame members. Force grout
under machine base until all voids are filled.
6. Before grout has set and become stiff, carefully
remove spacers, allowing machine to settle into
wet grout.
7. When grout is fully cured, place lock-washers
and nuts on anchor studs. Tighten nuts in even
increments using a diagonal pattern. This will
help insure equal tension at all anchor points.
NOTE: After machine has been in place and
operated for a day, retighten anchor bolts.
PHM178N
1 Frame
2 Grout
Figure 10
1
2
2 in.
(51 mm)
8 in.
(203 mm)
0.75 in.
(19 mm)
Be very careful when lifting and moving
machine. If machine falls, serious
personal injury or death may result.
W707
WARNING