2 3 4 5 6 7 8 9 Stop 0 Start COM223F COM223F Part No.
LICENSE AGREEMENT By installing this software you agree to the following provisions. If you do not agree with these provisions, return the software and all materials included with the software within thirty (30) days. This is a license agreement and not an agreement for sale, Alliance Laundry Systems LLC (hereinafter “Alliance Laundry Systems”) hereby licenses this software to you under the following terms and conditions.
Table of Contents Introduction . . . . . . . . . . . . . . . . . . . . . . . . . . . . . . . . . . . . . . 4 System Requirements . . . . . . . . . . . . . . . . . . . . . . . . . . . . . . . 5 Installation of the Alliance Planner Programming Software. . . . . . . . . . . . . . . . . . . . . . . . . . . . . . 6 Opening Alliance Planner Programming Software . . . . . . . . 7 Loading Cycles . . . . . . . . . . . . . . . . . . . . . . . . . . . . . . . . . . . . 8 Creating and Modifying Cycles . . . . . . . .
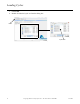
Introduction The Alliance Planner Programming Software allows the user to pre-program customized cycle formulas, vends, etc. for all WE-8 (OPL) and WE-8 BControl (coin) washer-extractors in a facility. The information from the software is downloaded into the laptop, where the user is able to create and/or modify cycles. The cycle information is stored on the laptop and then downloaded into the washer-extractor.
System Requirements The Alliance Planner Programming Software has the following recommended system requirements: free serial port, keyboard, mouse or other pointing device, and a CD drive or DVD drive.
Installation of the Alliance Planner Programming Software 1. Load the CD into your laptop CD/DVD drive. 2. The Alliance Planner Programming installer will automatically start. If the installer does not start automatically... a. Navigate to the CD/DVD drive using Windows Explorer or My Computer. b. Double-click the Alliance Planner file on the CD. 3. Follow the on-screen instructions. 4. The Alliance Planner Programming Software will be installed on your laptop.
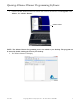
Opening Alliance Planner Programming Software 1. Click the START button located in the bottom left corner of the monitor. Click Programs. Click Alliance, then Alliance Planner. Alliance Planner CFD989R NOTE: The Alliance Planner Programming icon is also added to your desktop. The program can be started by double clicking the icon on your desktop. 2. The Alliance Planner will display.
Loading Cycles 3. Click Load. 4. Double click desired cycle set from the dialog box.
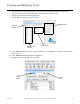
Creating and Modifying Cycles 5. 6. 7. 8. The selected cycle charts will display. Cycles can be created and modified from this screen. Click an existing cycle from the Existing Cycle Section to modify a cycle. Change step details in the Edit Step Section. Add or delete the step in the Cycle Section. Edit Step Section Add Cycle Section CFD993R Existing Cycle Section Cycle Section 9. Go to Add Cycle Section. Click ^ arrow to add a new cycle number (i.e., scroll to 58 in a list that has 57 cycles). 10.
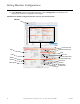
Setting Machine Configurations 12. Click Machine located in the application menu. Click Configuration. The dialog box for changing the machine’s configuration will display. IMPORTANT: Machine configuration listed in software must match machine.
Setting Machine Configurations (cont.) Machine c. Type: Select the machine model (must match serial plate model). Machine Type Options 18 – 40 Pound OPL Machines with 3 Compartment Supply Dispenser. NOTE: Failure to set the type of machine will affect water levels and acceleration times.
Setting Machine Configurations (cont.) Machine Type Options Vended Machines with 4 Compartment Supply Dispenser. X18R1C X30R1C X35R1C X45R1C d. Units: Select English or Metric. e. Level hysteresis: Select the level at which the water drops before it senses it must refill (e.g. 1 inch [3 cm]) +/- requested water level due to over/undershoot of fill. This avoids overactive cycling of the water valves. f.
Saving Cycles 13. Click Save to save a new or modified cycle. A dialog text box will display. Name the file and click save. The file will save to where the software is stored unless you choose a different location. Save CFD993R NOTE: The standard cycles from Alliance Laundry Systems and any cycles created by you can be accessed by clicking Load.
Setting Vend Prices (Coin Models) 14. Click Prices to open the dialog box for changing vend prices. The dialog box for changing vend prices will display. . Prices CFD993R 15. The following information can be changed: a. Prices: Allows programmer to designate the price. b. Coin Denomination: Allows programmer to designate the coin values to be used (i.e., 25 = U.S. quarter, 100 = Yen, etc...). c. Decimal Point: Allows the programmer to place the position of the decimal point. .
Changing COM Port 17. Change COM port in Alliance Planner a. Click Setup to open the dialog box for changing the COM port. Setup CFD990R NOTE: If the laptop does not have a free serial port, a USB to Serial Adapter can be used.
Changing COM Port (cont.) b. Select the appropriate COM port in the drop-down menu or click the “auto detect” button to find the correct port. For the auto detect function to work, the machine must be connected to the PC with the serial cable.
Connecting to Machine OPL Models 18. Place machine in program mode by turning key. 19. Connect cable from the laptop to the machine. 1 2 3 4 5 6 7 8 9 Stop 0 Start COM223F COM223F Coin Models 20. Remove coin box. 21. Flip programming switch in top right corner of box. Refer to the following illustration. 22. Connect cable from the laptop to machine.
Connecting to Machine (cont.) Board Information 23. Click Machine in the application menu. Click Board Info. The dialog box will display the following information if the PC is connected to the machine and the machine is in Program Mode: a. Planner Software b. Boot software c. Keyboard software d. Hardware version CFD1001R Transferring Cycles 24. Click Talk in the application menu. 24. A dialog box will appear. a. Click Write Cycles to upload the currently loaded cycles to the laundry machine. b.
Connecting to Machine (cont.) Write Cycles Read Cycles Write Software Read Prices CFD1003R CFD1002R Write Prices NOTE: Write software is for technician’s use only.
Upgrading the Washer Extractor’s Firmware The following instructions explain how to upgrade the WE-8 firmware on HX, SX and UX cabinet freestanding washer-extractors using the Alliance Planner software. 1. Open the Alliance Planner software on your computer. 2. In the Alliance Planner software, click Talk. Refer to Figure 1. The Communication via front connector window appears.
Upgrading the Washer Extractor’s Firmware (cont.) 3. From the Communication via front connector window, click Write Software. Refer to Figure 2. The Open window appears. Write Software CFD1005R Figure 2 4. Navigate to the firmware file. Refer to Figure 3. IMPORTANT: Do not open the firmware file yet. CFD1004R Figure 3 5. Disconnect power from the washer-extractor. 6. Turn the washer-extractor’s Run/Program switch to the Program position.
Upgrading the Washer Extractor’s Firmware (cont.) 7. Connect the programming cable between the computer and the washer-extractor. 8. Press and hold the Start button on the washer-extractor’s control. 9. While continuing to hold the Start button, re-connect power to the washer-extractor. The washerextractor’s control displays vX.XX, where “X.XX” is the version number of the control’s firmware.