AF-1250SS1 16 cu. ft.
Safety Rules This is the safety alert symbol. It is used to alert you to potential personal injury hazards. Obey all safety messages that follow this symbol to avoid possible injury or death. Read and understand all safety rules and operating instructions before using this tractor attachment. Follow all safety rules and operating instructions provided by your vehicle's manufacturer when using attachment. Never allow children or untrained persons to operate vehicle or attachment.
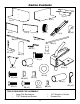
Carton Contents 3 (x1) 2 (x1) 1 (x1) 4 (x1) 6 (x2) 5 (x1) 24 (x1) 7 (x1) 23 (x2) 25 (x2) 26 (x1) 29 (x1) 27 (x2) 11 (x1) 28 (x1) 15 (x1) 31 (x2) 30 (x1) 33 (x48) 22 (x1) 32 (x4) 34 (x46) 35 (x2) 36 (x1) 37 (x1) 38 (x2) 39 (x1) 40 (x3) 41 (x2) TOOLS REQUIRED FOR ASSEMBLY: • • Large Flat Screwdriver 7/16" Wrench and Socket • • 2 1/2" Wrench or Socket Grease Gun
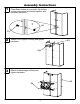
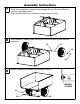
1 Assembly Instructions Place Body Halves on a smooth, flat surface so they are square and fasten together with hardware as shown. 34 33 2 Attach Front Support to Body and tighten hardware. 33 34 3 Attach Undercarriage to Body and tighten hardware.
4 Assembly Instructions Attach Front Gate to inside of Body as shown and tighten hardware. 33 34 5 Attach Corners to Body and tighten hardware. 34 33 6 Insert Axle into Undercarriage halfway as shown. Center Spacer inside Swivel Clevis and align with Axle.
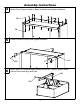
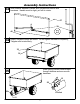
7 8 Assembly Instructions Slide Axle completely through Undercarriage; Swivel Clevis and Spacer must be captured by Axle. Align Drawbar with Front Support and press down to latch. Slide Washers, Spacers and Wheels onto Axle and secure with Hairpins as shown. 31 32 32 41 9 Attach Support Bar to Body behind flange loosely.
10 Assembly Instructions Attach Corner Gussets to Body and tighten all hardware. 33 30 34 11 Attach Latch Bars to Handle as shown. Do not tighten hardware completely; Latch Bars must rotate freely. Slide Grip onto Handle. 27 24 38 29 40 12 Slide Latch Bars into Tailgate retainers as shown. Align Handle with mounting hole on Tailgate.
13 Assembly Instructions Slide Washer between Handle and Tailgate and secure with hardware. Handle must be tight, yet free to rotate. 37 39 40 14 Attach Tailgate to Body as shown. Do not tighten hardware completely; Tailgate must rotate freely. 33 35 15 Slide Spring Loaded Hitch Bracket through drawbar and secure with hardware.
Operating Instructions Before Using Dump Cart: 1. Apply grease to wheels using grease gun until grease can be seen squeezing out from both sides of the wheel. 2. Check tire pressure and inflate to 28 psi if needed. 3. Read all Safety Rules found on page 1. How to Use Dump Cart: 1. Attach Dump Cart to your tractor using the supplied hitch pin. 2. Do not exceed 1250 pounds when loading material into the cart body. 3.
Limited Warranty If this product fails due to a defect in material or workmanship within THREE YEARS from the date of purchase, we will at our option repair or replace it free of charge. This warranty excludes tires and wheels, which are expendable and become worn during normal use. This warranty does not cover: • Repairs necessary because of operator abuse or negligence. • Equipment used for commercial or rental purposes. • Paint that is worn or faded due to normal use or exposure.
Repair Parts 33 33 23 5 33 35 29 39 34 40 28 25 37 38 33 1 24 2 3 26 34 30 16 11 12 15 17 36 8 22 11 42 27 4 12 20 REPLACEMENT PARTS ORDERING 34 9 19 21 18 10 11 14 13 10 32 6 32 41 31 45 7 43 1-800-652-2321
DESIGNED AND TESTED IN COLUMBUS, OHIO MANUFACTURED IN THE U.S.A.