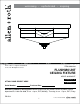
welcoming • sophisticated • inspiring ® allen + roth is a registered trademark of LF, LLC. All Rights Reserved. ITEM #0203286 FLUSHMOUNT CEILING FIXTURE MODEL #LWS0547F Français p. 9 ATTACH YOUR RECEIPT HERE Serial Number Español p. 17 Purchase Date Questions, problems, missing parts? Before returning to your retailer, call our customer service department at 1-866-439-9800, 8 a.m. - 6 p.m., EST, Monday - Thursday, 8 a.m. - 5 p.m., EST, Friday. EB1534 Lowes.
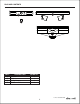
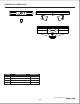
PACKAGE CONTENTS C GND A B D PART A B C D DESCRIPTION Crossbar Finial Ceiling Canopy Shade QUANTITY 1 1 1 1 Lowes.
HARDWARE CONTENTS (shown actual size) AA BB CC Qty. 3 EE FF GG HH Hex Nut Green Ground Wire Screw Connector Qty. 1 DD Qty. 3 Outlet Box Screw Hex Coupling Qty. 1 Flat Washer Qty. 1 Lock Washer Qty. 2 Qty. 2 Short Nipple Qty. 1 Long Nipple II Qty. 1 SAFETY INFORMATION Please read and understand this entire manual before attempting to assemble, operate or install the product.
PREPARATION Before beginning assembly of product, make sure all parts are present. Compare parts with package contents list and hardware contents above. If any part is missing or damaged, do not attempt to assemble the product. Contact customer service for replacement parts. Estimated Assembly Time: 20 - 30 minutes Tools Required for Assembly (not included): Flathead screwdriver, Phillips screwdriver, Pliers, Wire cutters, Electrical tape, Safety goggles and Ladder.
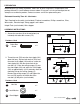
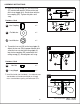
ASSEMBLY INSTRUCTIONS 3. Thread another hex nut (DD) to the other end of the short nipple (HH) just enough so the inside surface of the ceiling canopy (C) rests against it. 3 DD Outlet Box HH C Hardware Used DD DD Hex Nut x1 4. Attach ground fixture wire to either the green ground screw (AA) on crossbar (A) or to the ground wire in the outlet box (usually GREEN or BARE). If attaching fixture ground wire to the crossbar, it is imperative that the outlet box in your home be properly grounded.
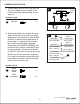
ASSEMBLY INSTRUCTIONS 5. Place the ceiling canopy (C), the flat washer (FF) and the lock washer (GG) over the end of the short nipple (HH). Secure them with the hex coupling (EE). Tighten with pliers until snug. 5 DD Outlet Box C HH Hardware Used EE Hex Coupling x1 FF EE GG Flat Washer x1 GG Lock Washer x1 FF 6. Thread the hex nut (DD) to the long nipple (II).
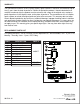
ASSEMBLY INSTRUCTIONS 8. Place the shade (D) over the end of the long nipple (II). Secure by threading the finial (B) onto the long nipple (II). Hand-tighten until snug. 8 C D II B CARE AND MAINTENANCE • Wipe clean using soft, dry cloth or static duster. Always avoid using harsh chemicals and abrasives to clean fixture as they may damage the finish. TROUBLESHOOTING PROBLEM POSSIBLE CAUSE CORRECTIVE ACTION Bulbs will not light. 1. Bulb is burned out. 2. Power is off. 3. Faulty wire connection. 4.
WARRANTY The manufacturer warrants all of its lighting fixtures against defects in materials and workmanship for five (5) years from the date of purchase. If within this period the product is found to be defective in material or workmanship, the product must be returned, with a copy of the original sales receipt as proof of purchase in the original carton, to the place of purchase. The manufacturer will, at its option, repair, replace or refund the original purchase price to the consumer.
welcoming • sophisticated • inspiring ® allen + roth est une marque de commerce déposée de LF, LLC. Tous droits réservés. ARTICLE N°0203286 PLAFONNIER ENCASTRÉ MODÈLE N°LWS0547F JOINDRE LE REÇU ICI Numéro de série Date d’achat Des questions, des problèmes, des pièces manquantes? Avant de retourner l'article à votre détaillant, appelez notre service à la clientèle au 1 866 439-9800, entre 8 h et 18 h (HNE), du lundi au jeudi, ou entre 8 h et 17 h (HNE), le vendredi. Lowes.
CONTENU DE L'EMBALLAGE C GND A B D PIÈCE A B C D DESCRIPTION Barra transversale Faîteau Couvercle Abat-jour QUANTITÉ 1 1 1 1 Lowes.
QUINCAILLERIE INCLUSE (grandeur réelle) AA Vis de terre verte Qté : 1 BB EE FF GG Rondelle plate Rondelle de blocage Qté : 1 Qté : 2 HH Écrou hexagonal Connecteur de fils Qté : 3 DD CC Qté : 3 Vis de boîte à prises Raccord hexagonal Qté : 1 Qté : 2 Tige filetée courte Qté : 1 Tige filetée longue Qté : 1 II CONSIGNES DE SÉCURITÉ Veuillez vous assurer de lire et de comprendre l’intégralité de ce manuel avant d’assembler, d’utiliser ou d’installer ce produit.
PREPARATION Avant de commencer l’assemblage du produit, assurez-vous d’avoir toutes les pièces. Comparez les pièces avec la liste du contenu de l’emballage et celle de la quincaillerie ci-dessus. S’il y a des pièces manquantes ou endommagées, ne tentez pas d’assembler le produit. Communiquez avec le service à la clientèle pour obtenir des pièces de rechange. Durée d'assemblage prévue: 20 à 30 minutes.
INSTRUCTIONS POUR L’ASSEMBLAGE 3. Vissez un écrou hexagonal (DD) sur l’autre extrémité de la tige (HH) tout juste assez pour que la surface intérieure du couvercle (C) repose contre la tige. 3 DD Boîte à prises HH C Quincaillerie utilisée DD DD Écrou hexagonal x1 4. Attachez le fil de terre du luminaire à la vis de terre (AA) sur la barre transversale (A) ou au fil de terre se trouvant dans la boîte à prises (habituellement VERTE ou DÉNUDÉ).
INSTRUCTIONS POUR L’ASSEMBLAGE 5. Placez le couvercle (C), la rondelle plate (FF) et la rondelle de blocage (GG) par-dessus l’extrémité de la tige (HH). Fixez-les à l’aide du raccord hexagonal (EE). Serrez-le à l’aide de pinces jusqu’à ce qu’il soit fixé. 5 DD Boîte à prises C HH Quincaillerie utilisée EE Raccord hexagonal x1 FF FF Rondelle plate GG Rondelle de blocage x1 EE GG x1 6. Vissez l’écrou hexagonal (DD) sur la tige filetée longue (II).
INSTRUCTIONS POUR L’ASSEMBLAGE 8. Placez l’abat-jour (D) par-dessus l’extrémité de la tige munie d’un écrou hexagonal (II). Fixez le tout en vissant le faîteau (B) sur la tige (II). Serrez-le à la main jusqu’à ce qu’il soit fixé. 8 C D II B SOINET ENTRETIEN • Essuyez au moyen d'un chiffon doux et propre ou d'un plumeau antistatique. Évitez toujours d'utiliser des produits chimiques rudes et des abrasifs pour nettoyer le luminaire puisqu'ils peuvent endommager le fini.
GARANTIE Le fabricant garantit tous ses luminaires contre les défauts de fabrication de matériaux et de main d'oeuvre pendant cinq (5) an à compter de la date d'achat. Si pendant cette période, le produit s'avère défectueux en ce qui concerne les matériaux ou la main d'oeuvre, le produit peut être retourné, avec une copie du reçu d'achat original comme preuve d'achat, dans sa boîte originale au lieu de l'achat.
welcoming • sophisticated • inspiring ARTÍCULO #0203286 ® allen + roth es una marca registrada de LF, LLC. Todos los derechos reservados. LÁMPARA DE TECHO EMPOTRADA MODELO #LWS0547F ADJUNTE SU RECIBO AQUÍ Número de serie 15 Fecha de compra ¿Preguntas, problemas, piezas faltantes? Antes de volver a la tienda, llame a nuestro Departamento de Servicio al Cliente al 1-866-439-9800, de lunes a jueves de 8 a.m. a 6 p.m. y los viernes de 8 a.m. a 5 p.m., hora estándar del Este. Lowes.
CONTENIDO DEL PAQUETE C GND A B D PIEZA A B C D DESCRIPCIÓN Barra transversal Terminación roscada Cubierta para techo Pantalla CANTIDAD 1 1 1 1 Lowes.
ADITAMENTOS (se muestra en tamaño real) AA BB CC DD EE Tuercas Tornillo hexagonales de Conector conexión para Acoplador Cant. 3 a tierra cable hexagonal verde Tornillo de Cant. 3 la caja Cant. 1 Cant. 1 de salida eléctrica FF Arandela plana Cant. 1 GG HH Arandela de seguridad Cant. 2 Cant. 2 Manguito roscado corto Cant. 1 Manguito roscado largo II Cant. 1 INFORMACIÓN DE SEGURIDAD Lea y comprenda completamente este manual antes de intentar ensamblar, usar o instalar el producto.
PREPARACION Antes de comenzar a ensamblar el producto, asegúrese de tener todas las piezas. Compare las piezas con la lista del contenido del paquete y los aditamentos mencionados anteriormente. No intente ensamblar el producto si falta alguna pieza o si éstas están dañadas. Póngase en contacto con el Departamento de Servicio al Cliente para obtener piezas de repuesto. Tiempo de ensamblado aproximado: entre 20 y 30 minutos.
INSTRUCCIONES DE ENSAMBLAJE 3. Enrosque otra tuerca hexagonal (DD) en el otro extremo del manguito roscado (HH) lo suficiente como para que la superficie interior de la cubierta para techo (C) repose sobre él. 3 Tuercas hexagonales HH C Aditamentos utilizados DD Caja de salida eléctrica DD DD x1 4.
INSTRUCCIONES DE ENSAMBLAJE 5. Coloque la cubierta para techo (C), la arandela plana (FF) y la arandela de seguridad (GG) en el extremo del manguito roscado (HH) y asegúrelos con el acoplador hexagonal (EE). Apriete con pinzas hasta que quede ajustada. 5 DDde salida eléctrica Caja C HH Aditamentos utilizados EE Acoplador hexagonal x1 FF FF Arandela plana GG Arandela de seguridad EE GG x1 x1 6. Enrosque la tuerca hexagonal (DD) en el manguito roscado largo (II).
INSTRUCCIONES DE ENSAMBLAJE 8. Coloque la pantalla (D) en el extremo del manguito roscado con tuerca hexagonal (II). Asegure enroscando el remate (B) en el manguito roscado (II). Apriete a mano hasta que quede ajustado. 8 C D II B CUIDADO YMANTENIMIENTO • Limpie el producto con un paño suave y seco o un plumero antiestático. No utilice productos químicos perjudiciales o abrasivos para limpiar la lámpara, ya que podrían dañar el acabado.
GARANTIA El fabricante garantiza todos estos accesorios de iluminación contra defectos en los materiales y la fabricación por un período de cinco (5) año a partir de la fecha de compra. Si dentro de este período de garantía el producto resultara defectuoso en los materiales o fabricación, se deberá devolver al comercio donde se adquirió, junto con una copia del recibo de venta original como comprobante de compra en la caja original.