
User Guide

XONE:V6 User Guide 21
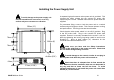
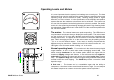
Installing the Power Supply Unit
A separate high performance mains power unit is provided. This
converts the mains voltage into the various DC power rails
required by the console. Suitable mains and DC power leads are
supplied.
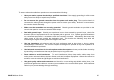
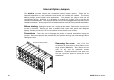
For permanent fixing, screw or bolt the power unit to a vertical
surface using 6x fixings as shown. This ensures optimum cooling
and performance. The fixing holes are 5mm diameter.
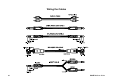
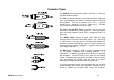
Check that the mains power switch is in its off (O) position. Plug
in the IEC mains lead. Plug in the console DC power lead
supplied. Ensure it is correctly orientated in the socket. Lock it in
place by tightening the locking ring being careful to avoid cross
threading it. Allow at least 100mm (4”) clearance for the
connector and cable beneath the unit.
Make sure you have read the Safety Instructions
printed in this guide and on the power unit case. Check that
the unit mains voltage setting is correct.
To avoid damage to the console circuits do not plug in
the DC power lead while the power unit is turned on.
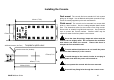
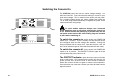
Check that there is adequate free air flow around the
unit. Make sure that the ventilation slots are not obstructed in
any way and that no items can fall into them. To avoid
radiated interference do not install the power unit closer than
200mm (8”) to the console.
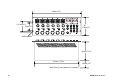
202mm (8")
271mm (10 5/8")
256mm (10")
79mm (3 1/8")
79mm (3 1/8")
69mm (2 11/16")
dia 5mm (3/16")
To avoid damage to the power supply unit
internal assemblies do not mount it on to any
surface subject to resonance or vibration.