
User Manual


ALLEN&HEATH 23 AP10733_1_XONE:PX5 User Guide
XONE:SYNC
The Xone:PX5 features Xone:Sync which enables you to synchronise external equipment through
the USB connection and the MIDI SYNC / OUT port.
Xone:Sync can generate internal MIDI clock signals which can be sent via USB to a DAW or via the
MIDI SYNC / OUT port to external hardware devices, such as drum machines, synths or external
effects processors.
It can also receive MIDI clock signals via USB from a DAW or DJ performance software which will
ensure that the XONE:FX engine is synchronised accurately to the incoming audio signal.
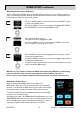
Sending External MIDI Clock via USB
Connect the Xone:PX5 directly to your laptop using a type A-B USB
cable.
Ensure that your DAW is set-up to receive MIDI clock (consult the
manufacturer’s documentation to find out how to do this).
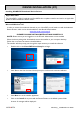
In AUTO BPM detection mode, the Xone:PX5’s internal BPM engine
will set the BPM based on the incoming audio signal of the channel
selected by the FX ASSIGN control.
In this example, the AUTO BPM engine will detect the BPM from the
input signal of Channel 2.
This will be used as the tempo of the MIDI clock output via USB to
your DAW.
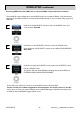
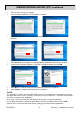
To control the playback
Press the MODE button to enter the GREEN layer.
This mode controls the MIDI Clock transport controls;
STOP / START / PAUSE
To send the Xone:PX5’s internal MIDI Clock to your DAW,
press the PLAY button.
So long as your DAW is set to receive MIDI Clock correctly, this will
start playback in the software.
Pressing the STOP button will stop playback.
Sending External MIDI Clock via MIDI SYNC / OUT
Connect the Xone:PX5 to your external device using a 5pin DIN MIDI cable.
Ensure that your DAW is set-up to receive MIDI clock.
Consult your software application documentation to find out how to do this.
Follow the steps above to control the playback of your external device.