
User Manual


Qu-Pac Getting Started Guide 9 AP9815 iss4
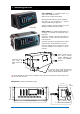
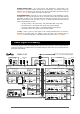
6. Front Panel
Live mixing screens - Provide quick access to live mixing functions such as level control
and signal processing:
Qu-Control - User assignable custom screen for simple level, mute and
on/off control. A user permission can be set so that this is the only
control available to the ‘Basic User’, for example bar staff control of
zone music source and level at a venue.
Processing – Follows the active Sel key or button to open the signal
processing screens. This includes the Preamp, Gate, Ducker, PEQ,
GEQ, Compressor, Delay, FX parameters and more.
Routing – Follows the active Sel key or button to open the routing
assignment and related option screens.
Channel – This is the main screen for live mixing. It follows the active
Sel key or button to open a virtual ‘fader strip’ on screen. This replaces
the physical faders of the other Qu mixer models. It provides a way to
work with the faders when mixing from the front panel.
The Channel screen presents tabs and Sel buttons to access any Qu
input or output channel, and the DCA and Mute Group masters.
System screens - Provide access to the mixer setup, Qu-Drive recording and memories:
Home – Pages of housekeeping functions including safe Shut Down,
Lock Surface, change and set up User Profiles, view Meters and RTA,
and work with Qu-Drive stereo and multitrack recording and playback.
FX – View, load and set up the 4 internal effects units. The Back Panel
view lets you patch each unit as inserted or send/return. These can
provide reverbs, delay and modulation effects types.
Scenes – Name, store and recall to/from 100 Scene memories. You can
block selected parameters from scene recall by setting the global or
per-scene Filters. You can protect selected channels from being
overwritten by making them scene recall Safe.
Setup – Pages to configure Qu-Pac. Includes PAFL options, Talkback,
Signal Generator, Custom Sel keys, SoftKeys, Network, MIDI, Output
Patching and more. You can transfer Scene, Library and Show data to a
USB storage device, calibrate the screen, format a USB drive for
recording, and update the mixer firmware.
Press and hold the Setup key and turn the screen Rotary for the dimmer
function to adjust screen and indicator brightness.
Touch Screen
Custom Sel keys
Function Fn key
Copy/Paste/Reset
Screen rotary control
SoftKeys
Live mixing screens
System screens
ST3 stereo input
Qu-Drive USB port
Engineer’s monitor
Alt Out level