Getting Started Guide For Firmware Version V1.9 Before starting please check www.allen-heath.com for the latest QuPac firmware and documentation.
Limited One Year Manufacturer’s Warranty Allen & Heath warrants the Allen &Heath -branded hardware product and accessories contained in the original packaging ("Allen & Heath Product”) against defects in materials and workmanship when used in accordance with Allen & Heath's user manuals, technical specifications and other Allen & Heath product published guidelines for a period of ONE (1) YEAR from the date of original purchase by the end-user purchaser ("Warranty Period").
IMPORTANT - Read these instructions before starting: Safety instructions Before starting, read the Important Safety Instructions printed on the sheet supplied with the equipment. For your own safety and that of the operator, technical crew and performers, follow all instructions and heed all warnings printed on the sheet and on the equipment panels. System operating firmware The function of the Qu mixer is determined by the firmware (operating software) that runs it.
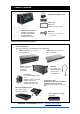
1. Packed contents Qu-Pac Mixer Getting Started Guide AP9815 Safety Sheet AP9240/CL-1 • Read this before starting 19” Rack Ears and screws Mains lead AA9848-L and AA9848-R 4x AB0344 M6x16 screws 4x AB0345 M6 cups 4x AB0332 M4x8 screws • Check this is correct for your territory Options and Accessories available Remote Audio Racks Provides remote audio over dSNAKE Cat5 cable digital snake.
2. Contents 1. Packed contents .............................................................................................................................. 4 2. Contents .......................................................................................................................................... 5 3. Introduction to Qu-Pac..................................................................................................................... 6 4. Installing Qu-Pac ..........................
3. Introduction to Qu-Pac Qu-Pac is part of the Allen & Heath Qu Series of digital mixers. It is a faderless version with the same local connections as the Qu-16, but features the Qu-32 mix engine and can therefore be expanded to a full 32 channels using an optional AudioRack linked via the dSNAKE Cat5 digital snake. Qu-Pac is intended for wireless live mixing, for example using an iPad. It can also be fully controlled using its front panel touch screen.
4. Installing Qu-Pac Free Standing - For operating while on a desk, shelf or other flat surface. Make sure the 4 rubber feet are fitted. Allow space at the sides and rear for ventilation. The mixer can be transported in a purpose designed padded bag or flight case. Optional polyester Qu-Pac padded carry bag AP9931 is available from Allen & Heath. Rubber feet Rack Cased - For operating while fitted into a 4U space in a standard 19” equipment rack or flight case.
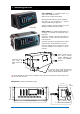
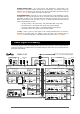
5. Rear Panel AES digital out Lamp Alt out 2Trk out LR main out Analogue Mix outputs Mic and Line inputs Talkback Mic in ST1 and ST2 stereo line in Kensington Lock Cable clamp dSNAKE remote audio Power On/Off Network USB B streaming Mains fuse Mains power input 5.1 Connecting and powering up the mixer If you are using a remote AudioRack then connect it with a Cat5 digital snake. Use STP (shielded twisted pair) Cat5e or higher spec cable up to 100m (330’) long.
6. Front Panel SoftKeys Touch Screen Live mixing screens System screens ST3 stereo input Qu-Drive USB port Engineer’s monitor Alt Out level Custom Sel keys Function Fn key Copy/Paste/Reset Screen rotary control Live mixing screens - Provide quick access to live mixing functions such as level control and signal processing: Qu-Control - User assignable custom screen for simple level, mute and on/off control.
Custom Select keys - 16 Sel keys can be user assigned for quick access to any combination of channels, masters, DCA groups and MIDI strips. For example, assign only those that you are using for your show. You can view their fader levels and meters using the Channel / Custom screen. Space is provided for a label strip. Copy/Paste/Reset – These let you copy or reset processing or mix parameters.
8. Wireless Control The Allen & Heath Qu-Pad, Qu-You and Qu-Control apps are available free from the Apple Store for iOS devices including iPad, iPhone and iPod Touch. Qu-You is also available for Android devices. Set up the Qu wireless network - For best performance use a dual band (2.4 and 5GHz) wireless router (wireless access point) with auto channel selection. Position it high up to avoid obstacles such as people and equipment.
9. Qu-Start This section provides a quick guide to get you started mixing with Qu. For more information please refer to other sections in this guide and to the Qu Mixer Reference Guide available for download from www.allen-heath.com/key-series/qu-series. 9.1 Things to check before starting: Mixer firmware version – View current version on the Home screen. Go to www.allen-heath/key-series/qu-series to check you are running the latest version.
9.3 Prepare the mixer for your session: Touch to name Patch input sockets Name the channels and masters – Working from your plot sheet, use the mixer Processing screens to enter names with up to 6 characters. Touch the name to open the keypad. The Qu-Pad app can also be used to enter names. Choose the sources for the channels – You can choose one of 3 sources for each mono and stereo channel – Local (rear panel) socket, dSNAKE (remote) socket, or USB (playback).
Patching – The reset default patch is a simple one-to-one mapping of local sockets to the channels, and a traditional patch of outputs suitable for the typical PA application. However, Qu offers flexible patching letting you route signals anywhere you want. Many of the patching screens use the Fn key as a ‘+1’ increment to let you quickly step through a range of sockets. Most require confirmation to Apply or Cancel the changes you make.
9.4 Set a starting point for processing and mix parameters: Start by using the Processing screen Preamp page Linking button to link parameters for any odd/even stereo pairs of channels you may need. For example, stereo keyboards or backing tracks. Adjusting Pan on one channel will set the width for the pair.
9.5 Save the settings: Scene memories – Once you have set up the mixer ready for the session, go to the Scenes screen to name and store the current mix settings as a scene. You could name and store a scene as a template starting point for future shows, for each band after you sound check them, theatre show cues, recording sessions and so on. You can store up to 100 scenes within the Qu mixer. You can copy and clear existing scenes. To copy a scene hold down the Copy key and touch a scene in the list.
9.6 Mixing with Qu-Pac: Wireless mixing Qu-Pad app – This is an engineers tool that lets you mix using wireless iPad control via a Wi-Fi router plugged into the Qu Network port. You can connect up to two iPads running QuPad. Qu-You app – Lets musicians mix their own monitors using wireless iPhone, iPad, iPod Touch or Android device control via the router. It prevents access to the main LR mix and can be locked to one mix. You can connect up to 8 iOS devices running Qu-You.
Channel screen Custom page Custom Select keys Mixing with the Custom Select keys – Press to select a channel, master, DCA group or MIDI strip that has been assigned to these quick access keys. Use the Channel / Custom screen to work with the faders, pan, mutes, routing and mix sends. Use the Processing screen to work with the preamps, gates, EQ, compressors and delays. Use the Routing screen to work with the mix assignments and routing options.
9.7 The Qu-Control screen Qu-Control is a custom assignable screen to present just the few controls needed for basic operation. For example, to control background music source and level within a music bar. It can be associated with the Qu ‘Basic User’ with permissions set by the ‘Admin’ user so that only this screen is available for nontechnical bar staff to adjust the background music. Access to the live mixing and setup functions can be locked out for the Basic User.
9.9 USB recording and playback: USB B Streaming – Connect an Apple® Mac or Windows® PC computer to the rear panel USB B port to stream up to 32 channels of audio in both directions and send MIDI messages. You can download the Allen & Heath DAW Control driver (for Mac computer only) to convert the Qu MIDI Strip messages into HUI or Mackie Control protocol. Download the Allen & Heath Qu Windows driver to stream standard MIDI messages to a PC.
9.10 A few more functions Use the Signal Generator to test speakers - After plugging up the PA check that all the amplifier and speaker levels are correctly set. Turn the system on in the correct sequence: Start with the level turned down Turn the mixer on first, amplifier/speakers on last. Pink noise is an excellent source for testing speakers. It generates equal energy per octave across all frequencies.
10.Resetting the Mixer There are two ways to reset the Qu settings to give you a known starting point: 10.1 Reset Mix Settings – A starting point for mixing This button in the Scenes screen instantly resets the mixer to a known starting point for mixing. It provides a quick way to reset the processing, mixes and patching before a show or after another user has finished with it. All parameters that can be saved in scenes are reset to a factory default to ‘zero the board’ ready for the new mixing session.
181 177 43.00 43 43 43 440 174 180 THIRD ANGLE PROJECTION TOLERANCES U O S: GENERAL 0.25 HOLE CENTRES 0.10 HOLE SIZES 0.05 ANGULAR DIMS 0.50 Qu-Pac Height 180mm (7") Length 440mm (17.3") Width 180mm (7") Weight 6.6kg (14.5lbs) Qu-Pac Packaged Height 310mm (12.2") Length 620mm (24.4") Width 310mm (12.2") Weight 8.5kg (18.7lbs) DRAWING WEIGHTS AND DIMS UNIT QU-PAC ALLEN & HEATH Ltd.