Before starting please download the latest Qu-Pac firmware and documentation from www.allen-heath.com. For Firmware Version V1.
Limited One Year Manufacturer’s Warranty Allen & Heath warrants the Allen &Heath -branded hardware product and accessories contained in the original packaging ("Allen & Heath Product”) against defects in materials and workmanship when used in accordance with Allen & Heath's user manuals, technical specifications and other Allen & Heath product published guidelines for a period of ONE (1) YEAR from the date of original purchase by the end-user purchaser ("Warranty Period").
IMPORTANT - Read these instructions before starting: Safety instructions Before starting, read the Important Safety Instructions printed on the sheet supplied with the equipment. For your own safety and that of the operator, technical crew and performers, follow all instructions and heed all warnings printed on the sheet and on the equipment panels. System operating firmware The function of the Qu mixer is determined by the firmware (operating software) that runs it.
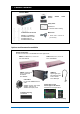
1. Packed contents Qu-Pac Mixer Getting AP9815 Started Guide Safety Sheet AP9240/CL-1 • Read this before starting 19” Rack Ears and screws Mains lead AA9848-L and AA9848-R 4x AB0344 M6x16 screws 4x AB0345 M6 cups 4x AB0332 M4x8 screws • Check this is correct for your territory Options and Accessories available Remote Audio Racks Provides remote audio over dSNAKE Cat5 cable digital snake.
2. Contents 1. Packed contents ................................................................................................................................. 4 2. Contents .............................................................................................................................................. 5 3. Introduction ......................................................................................................................................... 6 4. Installing Qu-Pac ........
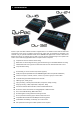
3. Introduction Qu-Pac is part of the Allen & Heath Qu Series of digital mixers. It is a faderless version with the same local connections as the Qu-16, but features the Qu-32 mix engine and can therefore be expanded to 32 channels using an optional AudioRack linked via the dSNAKE Cat5 digital snake. Qu-Pac is intended for wireless live mixing, for example using an iPad. It can also be fully controlled using its front panel touch screen.
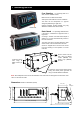
4. Installing Qu-Pac Free Standing - For operating while on a desk, shelf or other flat surface. Make sure the 4 rubber feet are fitted. Allow space at the sides and rear for ventilation. The mixer can be transported in a purpose designed padded bag or flight case. Optional polyester Qu-Pac padded carry bag AP9931 is available from Allen & Heath. Rubber feet Rack Cased - For operating while fitted into a 4U space in a standard 19” equipment rack or flight case.
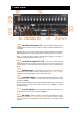
5. Rear Panel 2 1 12 3 17 10 15 11 9 8 7 6 5 4 13 14 16 1 Local Mic/Line inputs 1-16 - Plug into either the XLR Microphone or TRS jack Line socket, not both. The Line input adds a 10dB pad to attenuate very hot signals. Mic/Line inputs 17-32 can be accessed using an optional AudioRack connected via dSNAKE. You can choose the source to Qu-Pac channels from these local inputs, remote dSNAKE inputs, Qu-Drive USB playback or USB streaming from a computer.
7 2TRK output - Dedicated stereo recording jack output that follows the main LR mix. It is post-fader and therefore affected by the LR master fader. 8 AES output - 2-Channel AES (Audio Engineering Society) digital audio standard output for connection using an XLR cable to equipment fitted with an AES input. Use the Setup / Output Patch / Surface screen to patch outputs to the AES socket.
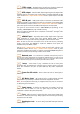
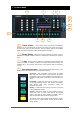
6. Front Panel 8 1 4 5 9 10 11 12 7 3 6 2 1 Touch Screen - All live mixing, setup and memory management functions can be controlled from the Qu-Pac front panel. The colour touch screen provides quick access to these functions. The top presents tabs for the available pages. The bottom presents a toolbar showing status information. 2 Screen Rotary - Adjusts the value of parameters on screen. Touch a parameter. It highlights orange to show it is selected. Turn the Rotary to adjust its value.
5 System screens - These screens provide access to the mixer setup, Qu-Drive recording and memories: Home – Pages of housekeeping functions including safe Shut Down, Lock Surface, change and set up User Profile, view Meters and RTA, and work with Qu-Drive stereo and multitrack recording and playback. FX – View, load and set up the 4 internal effects units. The Back Panel view lets you patch each unit as inserted or send/return. These can provide reverbs, delay and modulation effects types.
11 Phones - Level trim and standard ¼” jack socket for plugging in headphones to listen to the mixer PAFL (monitor) signal. 12 Alt Out - Level control for the stereo ‘alternative’ local output available on the rear panel. The source to this output is patched using the Setup / Output Patch / Surface screen. For example you could access a stereo Matrix output here. Note – For more information on setting up and operating Qu-Pac download the Qu Mixer Reference Manual from the Allen & Heath web site. 7.
8. Operating Qu-Pac 8.1 Mixing using the Front Panel Controls 7 1 3 4 2 6 5 1 Select a channel - Press a Custom Sel key or touch a select button in the Channel screen to select a channel for editing. 2 Channel screen - Select any channel for editing, and adjust its fader and send levels using the ‘virtual fader strip’ and screen rotary control. Any Qu channel, FX or master can be accessed using the tabs in this screen.
3 Processing screen - Access the processing for the currently selected channel. Touch the top part of the screen to open the page for each processing type. Touch a parameter box to highlight it and use the rotary to adjust its value. Input Preamp/Linking/Insert/Delay, Gate, PEQ, Compressor Output Delay/Insert, PEQ, GEQ, Compressor Note – To turn phantom power on or off, touch and hold the 48V button for 1 second or longer. This is to prevent accidental operation.
8.2 Mixing using Wireless Control Qu-Pad (engineer’s live mix control) and Qu-You (musician’s personal monitor control) apps are available free from the Apple Store for iOS devices including iPad, iPhone and iPod Touch. Setting up the Qu wireless network The app sends and receives control data over a wireless (Wi-Fi) network. This requires a wireless router (wireless access point) connected to the Qu mixer Network port.
Qu Mixer Requirements - The Qu mixer firmware and app feature release version numbers must be the same, for example V1.6 firmware will not run with the V1.7 app. However, the maintenance version numbers do not need to be identical, for example Qu-Pad V1.70 would run with Qu mixer V1.71. Refer to the Allen & Heath web site for more information and to download the latest Qu mixer firmware.
8.3 Qu-Control Qu-Control is a custom assignable screen to present just the few controls needed for basic operation. For example, to control background music source and level within a music bar. It can be associated with the Qu ‘Basic User’ with permissions set by the ‘Admin’ user so that only this screen is available for nontechnical bar staff to adjust the background music. Access to the live mixing and setup functions can be locked out for the Basic User.
9. Resetting the Mixer There are two ways to reset the Qu settings to give you a known starting point: 9.1 Reset Mix Settings – A starting point for mixing This button in the Scenes screen resets the mixer to a known starting point for mixing. It provides a quick way to reset the processing, mixes and patching before a show or after another user has finished with it. All Scene parameters are reset to a factory default. Parameters that are not stored in scenes are not affected.
9.2 System Hard Reset A power up reset is available if you need to fully reset the Qu mixer settings and memories. This could be done to clear the system out before sending the mixer to a client, or if you suspect a system problem. To reset mix parameters before starting a show or sound check, use a Scene or the Reset Mix Settings function. Note – A hard reset clears all current settings, all Scenes, User Libraries and User Permissions.
Qu-Pac Getting Started Guide 20 AP9815 iss1