
Manual


Qu Mixer User Guide 34 AP9372 iss.1
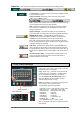
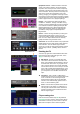
Patch the source to be recorded using the Setup /
Output Patch / USB Audio screen. Touch the track 17
box and turn the rotary to select the left source. Press
the ‘+1’ Fn key to increment the right source to track
18, or use the rotary to select an unrelated source.
Note Qu-Drive Stereo recording shares the same
patch as Track 17-18 of the Qu-Drive multitrack
recording and USB streaming.
The record meter on the USB page displays the
current source. The default is LR post-fade.
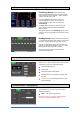
Arm the recording by touching the red circle Record
button. Touch the Play button to start the recording.
Stereo Playback – You can play back audio files
from a USB hard drive plugged into Qu-Drive port:
Format = 44.1 or 48kHz, 16 or 24-bit, WAV file
Note – Do not use wav files with BWF (broadcast)
chunks.
Note – Use the USB hard drive for the Qu mixer only.
Do not use it for other applications.
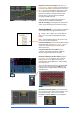
Format the USB drive on the Qu mixer before loading
the playback files. Use the Setup / Utility / Qu-Drive
screen. This clears the drive and sets up the Qu
directory structure.
Copy audio WAV files on to USB from your
computer. Place these in the AHQU / USBPLAY
directory. Plug the USB drive into Qu-Drive.
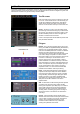
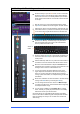
Patch the playback to the ST3 channel using the
Processing / Preamp screen Fn key to open the
Preamp Source screen. Make sure Qu-Drive is
selected as the ‘Global USB Source’. Select USB as
the source for ST3.
Once you have selected Qu-Drive as the global USB
source you can also use the panel USB key in the
Preamp section to toggle between the ST3 preamp
and USB source.
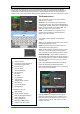
Select the track to play back by touching the name
box. You can choose a track from the Playback or the
Recordings directory. Touch Select to confirm.
Press the Fn key for options to choose playback
mode: