
User's Manual
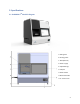
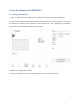
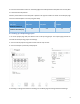
Table Of Contents

8
4.2. Loading bioprinting probe
1. Once the UV sterilization is completed, open the sliding door.
2. Remove the provided printing probe from the sterile packaging in a biosafety cabinet.
Caution: choose the right printing probe (i.e., 6, 12, or 24-well probe) to match the well plate (i.e., 6, 12,
or 24-well plate) to be used for printing.
3. Carefully retrieve the probe adapter from above the well-plate tray. Mount the probe to the adapter
of the BIONOVA X by pressing the large end of the probe into the adapter and then mount the adapter
with the probe onto the printer. Make sure the probe is mounted properly and tightly.
Caution: pay attention to not touch the well-plate tray when inserting or removing the printing probe.
4.3. Preparing and loading bioink
1. Choose the provided well plate to match the loaded printing probe.
2. Remove the well plate from the sterile packaging in a biosafety cabinet.
3. Load the bioink to the well plate and do not exceed the maximum volume suggested in the following
table.