INSTRUCTION MANUAL Models: WNWR28-1SSRN WNWR55-1SSRN WNWR53-2SSRN WNWR42-2SSFN WNWB-2SSFN WNWR142-2SSRN WNWR150-2SS BEFORE USE,PLEASE READ AND FOLLOW ALL SAFETY RULES AND OPERATING INSTRUCTIONS Allavino has a policy of continuous improvement on its products and reserves the right to change materials and specifications notice ALLAVINO Distributed and Serviced by BEVERAGEFACTORY.COM 8510 Miralani Dr., San Diego, CA 92126 www.allavino.
TABLE OF CONTENTS Safety instructions and warnings………………………………………………………………………2-3 Transportation and unpacking …………………………………………………………………………4 Installation instructions ……………………………………………………………………….4-6 Operation ………………………………………………………………………………………………... 7-14 Cleaning and care …………………………………………………………………………………………15 Problems with your appliance? .……………………………………………………….……………….16 Limited warranty …………………………………………………………………………………………..
SAFETY INSTRUCTIONS AND WARNINGS IMPORTANT SAFETY INSTRUCTIONS WARNING:Before the appliance is used, it must be properly positioned and installed as described in this manual. Please read the manual carefully. To reduce the risk of fire, electric shock or injury when using the appliance, follow basic precautions, including the following: To prevent injury or damage to the appliance, it should be unpacked and set up by two people.
SATETY INSTRUCTIONS AND WARNINGS Children in the household DANGER, RISK OF CHILD ENTRAPMENT! Before you throw away your old appliances: Take off the door. Leave the shelves in place So that children may not easily climb inside. Never leave packaging materials with children.
TRANSPORTATION AND UNPACKING If the appliance is transported in a horizontal position, the oil from the compressor may leak into the cooling circuit. For this reason, allow the appliance to rest in a vertical position for 12 hours before turning it on, so that the oil flows back into the compressor. Remove the external packaging, remove the protective plastic film from the surface of the appliance (if used) and clean the external parts of the appliance with a cleaner designed for this purpose.
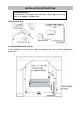
INSTALLATION INSTRUCTIONS FOR YOUR SAFETY While performing installations described in this section, gloves and safety glasses or goggles should be worn. Tools you will need: Installation dimensions (mm/in) If your appliance is to be built-in, follow the diagram and chart below for appropriate dimensions.
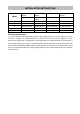
INSTALLATION INSTRUCTIONS Model WNWR281SSRN WNWR551SSRN WNWR42-2SSFN WNWR1422SSRN WNWR532SSRN WNWB-2SSFN WNWR150-2SS A 660mm (26”) 660mm (26”) 660mm (26”) 680mm (26 3/4”) B 387mm (15 1/4”) 610mm (24”) 610mm (24”) 610mm (24”) C 883mm (34 3/4”) 883mm (34 3/4”) 883mm (34 3/4”) 1775mm (69 7/8”) C 152mm (6”) 152mm (6”) 152mm (6”) 230mm (9 1/16”) E 51mm (2”) 51mm (2”) 51mm (2”) 51mm (2”) Electrical requirements A 115 Volt (AC only)/ 60Hz grounded electrical supply equipped with a
OPERATION Operating Conditions Proper operation of the appliance is guaranteed only if the following conditions are met: The temperature in the room where the appliance is located conforms to the climate class stated on the appliance’s rating label. Maximum ambient relative humidity: RH75%. The appliance must be placed at a sufficient distance from heat sources (e.g., ovens, central heating, direct sunlight, etc.).
OPERATION FOR Model: WNWR53-2SSRN, WNWR142-2SSRN AND WNWR150-2SS Control elements 1) “ ”Button To turn this unit ON and OFF, press and hold this button for approximately 3 seconds. 2) “ ”Button Energy conservation button: Pressing this button for 3 seconds will turn the energy conservation mode either ON or OFF. In this mode, the LED light display will be turned off, the ºF/ ºC light will be on.
OPERATION Functions Temperature Memory Function If the power is suddenly lost, the set temperature will be saved by the unit. Once the power is back on, the unit will be at the same set temperature. “Close Door” Reminder Function When you forget to close the door or the door is not fully closed, there will be warning alarm after 5 minutes.
SHELVES (Models: WNWR42-2SSFN/WNWB-2SSFN) Do not cover racks with aluminum foil or any other material that will prevent adequate air circulation within the cabinet. To prevent damaging the doors or gasket seals, open the doors wide when removing the shelves. For easier handling of bottles, it is necessary to pull the shelf out by at least 1/3. The sides of the shelves are equipped with protective stoppers which prevent bottles from falling from the shelves.
OPERATION INSTRUCTIONS Reverse the door These appliances have a reversible door but is delivered with the door hinged on the right. A left-hand hinge kit comes with the unit (in the box), should you wish to reverse the hinge on your unit.
OPERATION INSTRUCTIONS For Models: WNWR55-1SSRN/WNWR53-2SSRN Disconnect power before removing doors Unscrew 2 screws at bottom and remove the Reed switch (6), then install (6) at top of door frame, Unscrew the screw located underneath the door frame and the limit device (5),and relocate if at the left end side of the door frame. The door revolves 180 degrees. This operation requires two persons.
OPERATION Wine storage If you are storing wine for long periods of time, it should be stored at a temperature of between 10 ºC and 14 ºC(50 ºF and 57 ºF) This is the range of temperatures wine coolers are kept at, and it is just right to allow wine to mature properly.
OPERATION Wine storage (For 750ml Bordeaux bottles) Model: WNWR42-2SSFN (Total: 42 bottles) MODEL: WNWR150-2SS (Total: 150 Bottles max) Model: WNWR142-2SSRN (Total: 142 bottles max) Wine and Beverage Storage (For 750ml Bordeauxs and 335ml cans) Model: WNWB-2SSFN
CLEANING AND CARE Cleaning the appliance Wipe the internal surface of the appliance with a soft sponge lightly dipped in a table salt solution. Add 2 tablespoons of table salt to a quart of warm water. Wash the shelves in warm water with a small amount of kitchen dishwashing liquid, rinse and wipe dry. Allow the wooden shelves(if the appliance has them) to dry completely before returning them to the wine cooler.
PROBLEMS WITH YOUR APPLIANCE? You can solve many common appliance problems easily, saving you the cost of a possible service call. Try the suggestions below to see if you can solve the problem before calling the servicer. Troubleshooting guide Problem Possible cause Appliance does not operate Not plugged in. The appliance is turned off. Tripped circuit breaker or blown fuse. Appliance is not cold enough. Check the temperature control setting. External environment may require a higher setting.
Warranty information WHAT IS COVERED LIMITED ONE-YEAR WARRANTY: For one year from the date of purchase by the original owner, Allavino will, at its option, repair or replace any part of the unit, which proves to be defective in material or workmanship under normal use. During this period, Allavino will provide all parts and labor necessary to correct such defects free of charge, so long as the unit has been installed and operated in accordance with the written instructions in this manual.