
User manual

Zeus Series / Automated Standalone CD/DVD Duplication System / User Manual
21
Drive and Printer alignment
Make sure the autoloader is turned off.
Click on Start, then Programs, then Accessories, then Communications and then Hyper
Terminal.
Choose a name for the connection. In the Connect to window select Connect using:
Direct to COM1/COM2.
In the COM1/COM2 Properties, make sure you have the following settings:
Bits per second: 9600
Data Bits: 8
Parity: None
Stop bits: 1
Flow control: None
Click OK.
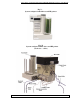
Now, turn the autoloader on and in the Hyper Terminal window you should see Stepper
Controller. Press “Caps Lock” tab and then C once for the autoloader to do its short
movement. Open top drive manually, place discs in the input hopper and use the
following commands:
I = insert - autoloader will load the disc into the drive. If the disc was placed in the
right position, press
A = accept to finish the alignment
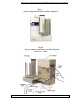
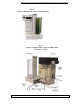
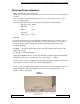
Tight gently thumbscrews # 1 on both sides until they touch the adapter and then tight
thumbscrews # 2 (they consolidate the tower on the adapter – see Fig.9)
In case you don’t have good alignment, adjust the tower (left and right, back and forth)
and repeat the steps above until you obtain the right alignment.
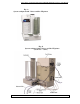
If your system is configured with a printer, repeat the above steps using the printer. If
printer alignment is OK, tight thumbscrews # 3 (located on the printer plate – see
Fig.5b – same for all printers)
Fig. 9
Side View