Standalone, fully automated CD/DVD Duplication System User Manual 5542 Brisa Street, Suite F • Livermore, CA 94550 Tel: 925-447-8484 • Fax: 925-447-8811 • www.all-pro-sol.
HERA Series CD/DVD Duplication System / User Manual Table Of Contents Introduction........................................................................................................................ 1 Quick Start.......................................................................................................................... 2 Getting Started ………………………………………………………………………………..2 Mounting the …………...……………………………………………………………...3 Tower Operating Environment...........................................
Automated CD-R Duplicator System / CD-2, CD-4 &CD-7 Series / User Manual 14. Manage Accounts ………………………………………………………………………...44 15. Shutdown ………………………………………………………………………………....47 Trouble Shooting ……………………………………………………………………….
HERA Series CD/DVD Duplication System / User Manual Introduction Thank you for choosing the HERA Series duplication systems. Hopefully this equipment will bring you satisfaction and great pleasure in CD/DVD duplication. Features: • • • • • • • Stand-alone design, no PC nor software required. Easy operation, no training required. Support various CD and DVD formats Load, Copy, Compare, Verify, Emulate, Editing, etc.
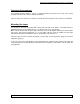
HERA Series CD/DVD Duplication System / User Manual Quick Start Getting started Carefully remove your system from the shipping box and verify that all parts are present. If there are missing or damaged parts contact All Pro Solutions or an authorized distributor immediately to correct any miss-packed or missing parts.
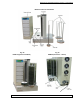
HERA Series CD/DVD Duplication System / User Manual Operating Environment Your CD/DVD System should be used in a climate-controlled environment free of dirt, dust, excess humidity, excessive heat or electro-magnetic interference. Allow at least four (4) inches of clearance around the sides and back of the system for ventilation. Mounting the tower For all systems, the tower is provided with a tower plate mounted on the bottom. This plate will help in stabilizing the tower on the adapter (see Fig.
HERA Series CD/DVD Duplication System / User Manual Fig. 1 System unassembled (HERA-3 and HERA-6) Fig.2 Tower alignment Fig.
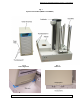
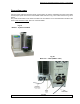
HERA Series CD/DVD Duplication System / User Manual Connecting power Plug one power cable into the tower system, and the other one into the autoloader. Plug each power cable into the proper power source and connect Serial Cable as shown in Fig. 4b for Hera-3 and 6 or Fig. 5b for Hera-9. The power On/Off switch for the tower is located in the front and the one for the autoloader is located in the back. Power the tower on first, then turn on the autoloader. Fig. 4a HERA-9 - System assembled Fig.
HERA Series CD/DVD Duplication System / User Manual HERA-9 (system unassembled) Fig. 5b HERA-9 (system assembled) Fig.
HERA Series CD/DVD Duplication System / User Manual OVERVIEW 1. Welcome The Autoloader is a reliable, high performance, high speed, standalone, robotic DVD and/or CD autoloader. With its professional industrial design and simple user interface, it makes your duplicating experience easier than ever. With the Autoloader, you can have a capacity up to 1000 discs, duplicate continuously for 24 hours (even with multiple masters), and get the highest quality duplication, all at an extremely affordable price.
HERA Series CD/DVD Duplication System / User Manual Proper Shutdown To avoid possible system failures, you need to shut down the autoloader properly. To shut down the autoloader, scroll to menu 15. Shutdown and follow the instructions on the screen. Not performing this function increases the risk of damaging the autoloader.
HERA Series CD/DVD Duplication System / User Manual Another common problem when using an autoloader is the placement of media into the bins. Placing the media into the bins properly can avoid possible picking errors when operating the autoloader. Even though the autoloader is designed with certain tolerance adjustments to prevent mishandling by the picking arm, failures may still arise if the bins are not loaded correctly.
HERA Series CD/DVD Duplication System / User Manual 3. The LCD Control Panel Figure 4 below shows the LCD Control Panel. This panel has a two-line 20 character LCD display to provide user feedback and eight push buttons to control the operation of the Autoloader. The functions for these buttons are shown in Table 1. Fig.
HERA Series CD/DVD Duplication System / User Manual Control Name Function Up Scroll up through the menu or list. Down Scroll down through the menu or list. Enter Execute the function. Also called OK in the Menus. ESC Go back to the previous function. Copy Copy Quick key to make a copy. Pressing this key takes you directly to the Copy menu. Test Test Quick key to make a simulation of the copy process. Pressing this key takes you directly to the Test menu.
HERA Series CD/DVD Duplication System / User Manual 2. Test (page 24) Use the Test menu or Test quick key to simulate the copy process. With simulation, write once recordable discs such as DVD-R, or CDR will be reusable. The purpose of simulation is to ensure error free duplication. Note: Due to physical limitations of the DVD+R recordable format, if you try to simulate DVD+R copying, you will encounter failure messages.
HERA Series CD/DVD Duplication System / User Manual content of the master disc resides during duplication. For additional information, see “Select Source” on page 22. 8. Master Mode (page 28) Use the Master Mode menu to select either Single Master Mode(SM) or Multi Master Mode (MM). For more information on those modes, see “Single Master and Multi Master Modes” on page 17. For more information on using the Master Mode menu, see “Master Mode” on page 29 9.
HERA Series CD/DVD Duplication System / User Manual 3. CD Writing Mode Use this setting to select the mode you would like use to duplicate a CD. There are two different modes: “Disc at Once” and “Track at Once.” Unless you understand completely what they mean, we strongly suggest you to set it as “Disc at Once”. 4.
HERA Series CD/DVD Duplication System / User Manual 2. System Info Use this menu option to see data about the autoloader and its resources (firmware version, RAM and CPU). 3. Device Info Use this menu option to see data about the drives that are installed in the autoloader. 4. Load Default Use this menu option to reset all of the options back to the manufacturer's default values. You can use this function if your autoloader is acting abnormally. 5.
HERA Series CD/DVD Duplication System / User Manual Use this menu option to turn off your system. Once you see the “Ready to Power Off” message, you can safely turn off the machine using the power switch. Turning off your autoloader without performing this function increases the risk of damaging it. 16.
HERA Series CD/DVD Duplication System / User Manual 6. Single Master and Multi Master Mode There are two ways to make copies using the autoloader: Single Master Mode: This mode requires that a single master disc is loaded onto the hard drive prior to initiating the duplication process. This mode is ideal if your job involves one or very few master disc(s). Multi Master Mode (Batch Mode): This mode does not require you to manually load your master.
HERA Series CD/DVD Duplication System / User Manual first job, unload the completed job, and fill the drive trays with blank discs for the next job. The robotic arm will continue to load media into the drives as the duplicated discs are placed in the Output Bin. Once a writer drive (any drive) detects another Master disc, the same process is repeated for the new Master disc. 7. Setting Counters and Assigning Names Two frequently used tasks are setting counters and assigning names to partitions.
HERA Series CD/DVD Duplication System / User Manual Press the Down button repeatedly until “2” is displayed. Press Enter button once to move the cursor to the next position. Press the Down button repeatedly until “1” is displayed. Now, “0021” is displayed, press Enter button once and the cursor moves to “OK”. Then, press the Enter button once to submit your counter value. The loader will now start loading disc from the input spindles and place them into all drive trays. 7.
HERA Series CD/DVD Duplication System / User Manual OPERATION This chapter shows each of the menu options and how they are used. 1. Copy The Copy menu option or the front panel Copy quick key have two different modes of operation: Copy Single Master Mode: This mode requires that a single master disc is loaded onto the hard drive prior to initiating the duplication process. This mode is ideal if your job involves one or very few master disc(s).
HERA Series CD/DVD Duplication System / User Manual Master Mode: Multi Master Master Mode: Single Master Use the Up or Down button to select Single Master Mode. Press the Enter button to submit your selection. Go back to the Copy Menu. Use the Duplicator 1. Copy Up or Down button to navigate to the following screen: Start the Copy Process. Insert your blank discs on to the Input Enter button to enter the Copy menu. Spindle(s) and press the You will see the Choose Partition menu: B.
HERA Series CD/DVD Duplication System / User Manual Note: It is normal to see the progress indicator stay at 0%-10% and 100% for approximately 30 seconds for CD duplication and up to one minute for DVD duplication. That is caused by the initializing and finalizing stages.
HERA Series CD/DVD Duplication System / User Manual Duplicator 1. Copy B.30 (MM) Make sure the Master Mode is set to Multi Master mode (MM). If it is not, use the Up or Down button to navigate to the 8. Master Mode screen. If it is already in Multi Master mode (MM), please skip to the step that starts the copy process. Duplicator 8. Master Mode B.
HERA Series CD/DVD Duplication System / User Manual Once all of the discs are detected, the autoloader will detect the master disc and read the contents of the master disc into the reserve partition. Loader Processing Drive 1 -> Output Bin Once the master disc has been loaded, the autoloader will remove the master disc from the drive and place it onto the Output Spindle.
HERA Series CD/DVD Duplication System / User Manual 3. Compare Use the Compare function to perform a bit-by-bit comparison between the content of your master disc(s) in the Hard Drive and the contents of all discs it copied. This ensures that all of your copies are identical to original master disc(s). Note: The bit-by-bit comparison will only apply on all DVDs and Data CDs.
HERA Series CD/DVD Duplication System / User Manual “PASS 16” indicates 16 discs have been compared successfully. “FAIL 0” indicates none of the discs have failed. Press the “Input Bin Empty (20)” indicates that the system has run out of discs to compare. If you have more discs to compare, you can empty the Output Spindle; place the discs to be compared in the Input Spindle and Press the Enter button to continue.
HERA Series CD/DVD Duplication System / User Manual Duplicator B.30 6. Select Burn Speed Select Burn Speed HDD to CD Speed Press the Enter button on 6. Select Burn Speed menu to set the duplication burn speed and you will see the Select Burn Speed type menu similar to below: There are two recording speed types that can be set: HDD to CD: Copy Hard Drive CD Content to CD-R/RW Discs speed. HDD to DVD: Copy Hard Drive DVD Content to DVD±R/RW Discs.
HERA Series CD/DVD Duplication System / User Manual 8. Master Mode The Master Mode menu is used to select between Single Master mode or Multi Master mode. For more information on the modes, see “Single Master and Multi Master Modes” on page 17. If you are at the 1. Copy Menu, do the following: Duplicator 1. Copy B.30 (SM) Duplicator 8. Master Mode Master Mode: Single Master Master Mode: Multi Master B.30 Use the menu. Up or Down button to find the 8. Master Mode Enter button on 8.
HERA Series CD/DVD Duplication System / User Manual Loader Processing Drive 1 <- Input Bin 1 Processing ... Please Wait Quick Erasing... 0/25 The Robotic Arm will go out and pick the discs to be erased from the Input Spindles and place them into the drives. As soon as the drives are all full, or the number programmed into the counter is reached, you will see the following: The system will check all discs in the drive and prepare them to be erased.
HERA Series CD/DVD Duplication System / User Manual Each of these menus is discussed in it’s own subsection. If you are at the 1. Copy Menu, do the following: Duplicator 1. Copy B.30 (SM) Up or Use the Down button to find the 10. Hard Drive Setup. Enter button on 10. Hard Drive Setup to enter the Press the menu. Use the Up or Down button to select between those options. Duplicator B.30 10. Hard Drive Setup 10.
HERA Series CD/DVD Duplication System / User Manual Enter a new partition name as described in “Editing Names” on page 13. For this example, we will name it “Happy”. Press the Enter button to overwrite the partition named “FUN”. Before continuing, the autoloader will ask you again to confirm it. Edit Partition Name [FUN ] OK? Enter a new partition name as described in “Editing Names” on page 13. For this example, we will name it “HAPPY”.
HERA Series CD/DVD Duplication System / User Manual Press the Enter button to enter the Partition Info menu, and use the the partition that you want information about. ( 2) [FUN From: ADMIN ] CD 21MB Up or Down button to find The “(2)” field indicates that it is the second partition on the drive. The “From:” field indicates the user that created the partition (See “Introduction to Manage Accounts” on page 10.) The “[FUN]” field shows the name of the partition.
HERA Series CD/DVD Duplication System / User Manual the DVD9 format. If you require more partitions and do not plan on copying double layer/dual layer DVD9 media, you can change the hard drive partition size to CD (1 GB) or DVD (5 GB). 10.7 Format Hard Drive This function formats the Hard Drive. It deletes all disc images and re-initiates the Hard Drive. To format the Hard Drive, use the Up or Down button to navigate to the 7. Format Hard Drive menu: Hard Drive Setup 7.
HERA Series CD/DVD Duplication System / User Manual Use the Up or select that option. Down button to select between the languages and press the Enter button to 11.2 Read Error Skip Normally, when the autoloader encounters a read error while reading your master disc, the duplication is aborted and all the recordable media in the writers are ruined.
HERA Series CD/DVD Duplication System / User Manual Use the Up or Down button to select the desired maximum writing speed for Audio, VCD and CDG, and press the Enter button to select that option. Max Audio, VCD & CDG Speed 16x Note: The actual speed that is selected may be determined by the drives or by the blank media. 11.5 Buzzer This setting will allow you to choose whether you want to hear a beep when you press a button or when a task has been completed. Setup 5.
HERA Series CD/DVD Duplication System / User Manual This menu allows you to choose whether you want to enable the Screen Saver feature. By enabling this feature, a screen saver will be displayed when your autoloader has been idle for a long period of time. Setup 7. Screen Saver Screen Saver: On Screen Saver: Off Use the Up or Down buttons to select the Screen Saver menu and press the Enter button to enter that menu.
HERA Series CD/DVD Duplication System / User Manual Use the Up or Down button to select whether the AUTOCOPY Enabled function is on or off, and press the Enter button to select that option. Once you get back to the main menu, use the screen: Duplicator 16. AUTOCOPY B.30 Up or Down button to navigate to the following Fill the input spindle(s) with the required number of blank discs.
HERA Series CD/DVD Duplication System / User Manual The loader will then pick up another blank disc and load it into the drive. This is then repeated for each drive. Loader Processing... Drive 2<-Input Bin The copying process will continue until you run out of blank discs. Input Bin Empty(20) Reset Hoppers? At this point you can either load more discs on to the input spindle(s) and press the Enter button to continue, or press ESC button to terminate your project. the 11.
HERA Series CD/DVD Duplication System / User Manual Setting Saved! Please Restart Once the changes are saved, you shall see the “Please Restart” screen and restart the system to have the new setting take effect. 12. System Utilities System Utilities is used to provide information pertaining to the autoloader as well as modification to maintain proper functioning. The System Utilities are: Disc Info System Info Device Info Load Default Update Firmware 12.
HERA Series CD/DVD Duplication System / User Manual - The “21M” indicates that 21Mbytes of data is encoded on the disc. - “1Session 1Trk” indicates that the data is all in a single session recorded as a single track. Press the Down button to see the next disc. 2. CD-RW 702M Blank INFODISC 97m25s31f Press the A blank 24x CD-RW media was placed in the second tray. - The “2.” Indicates that the information is for the media inserted in tray 2. - The “CD-RW” indicates that the media inserted is a CD-RW.
HERA Series CD/DVD Duplication System / User Manual RAM 128 MB SDRAM The next screen shows the amount and type of memory installed. Press the Down button to cycle back to the firmware version display. The information you see will differ depending on the system you have. 12.3 Device Info This menu allows you to see information about the devices built inside your autoloader. This information includes, but is not limited to, manufacturer, model number, etc. System Utilities 3.
HERA Series CD/DVD Duplication System / User Manual System Utilities 5. Update Firmware Use the Up or Down button to select the Update Firmware menu and press the Enter button to enter that menu. Waiting for Update Please Insert Disc Insert the disc containing the firmware into the 1 tray and make sure there are no other discs in any other trays. After a few moments, the system will detect the disc.
HERA Series CD/DVD Duplication System / User Manual Note: If the drive trays are not properly aligned and there is a need to re-align them, please contact Tech Support Service for information regarding setting alignments. Warning: This function is ONLY for checking the alignment, NOT for setting the alignment. Please do not move the robotic arm with your hands during this process.
HERA Series CD/DVD Duplication System / User Manual Use the Up or Down button to select the Manage Accounts menu and press the to enter that menu. You will be shown the Enter Password menu. Enter PWD [ ] OK? Enter button The system will ask you for the Administrator's Password. Up or Down button to select The default Administrator's Password is “0000.” To enter, press the Enter button to submit the current digit.
HERA Series CD/DVD Duplication System / User Manual User Ralph Added! The autoloader will display a confirmation message and automatically return you to the Manage Accounts menu. 14.3 Edit User Info The Edit User Info menu allows you to change the existing user’s account name and password. During this process, you will be asked to select the existing account and then you will be prompted to enter the new user name and new user password for this account.
HERA Series CD/DVD Duplication System / User Manual Delete User [RALPH ] OK? The autoloader will ask you to confirm the deletion. Press the Enter button to delete the user. User Ralph Deleted! The autoloader will display a confirmation message, automatically return you to the Manage Accounts menu. and 14.5 Password on Bootup This menu allows you to enable or disable the Password on Bootup feature. During this process, you will be asked to select “Yes” or “No” (enable or disable). Manage Accounts 5.
HERA Series CD/DVD Duplication System / User Manual Trouble Shooting No display on LCD or the unit does not operate when the power is on. Check the connections for the power cable and ensure that the power outlet is working correctly. Make sure that the rear-panel power voltage setting matches the voltage of your power outlet.
HERA Series CD/DVD Duplication System / User Manual The autoloader may still be busy performing a task. Give it some time and press the button again. To interrupt the currently running process, press the ESC button and hold it for several seconds. If it still doesn't work, turn the machine off, and then restart the machine after a minute. Copy completed, but the copies are not readable / executable. Use the “compare” feature to check the copied disc (data discs only).