Contents Contents . . . . . . . . . . . . . . . . . . . . . . . . . . . . . . . . . . . . . . . . . . . . . . . . . . 1 CoPilot Overview . . . . . . . . . . . . . . . . . . . . . . . . . . . . . . . . . . . . . . . . . . 1 A Safety Warning . . . . . . . . . . . . . . . . . . . . . . . . . . . . . . . . . . . . . . . . . . 1 Using Your Mobile Device for Guidance . . . . . . . . . . . . . . . . . . . . . . . . 2 Address Entry . . . . . . . . . . . . . . . . . . . . . . . . . . . . . . . . . . . . . . . . . .
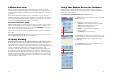
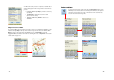
CoPilot Overview Using Your Mobile Device for Guidance Welcome to CoPilot Live! CoPilot will provide you with accurate, turn-by-turn spoken directions and street-level maps that guide you to any destination you specify. If you take a wrong turn, CoPilot instantly re-calculates your route. Let CoPilot guide you — and never get lost again! CoPilot Live is pre-installed and ready to use for route guidance on your mobile device.
5. The Select Stop screen provides you with several different ways to enter a destination. You can: • Enter a new Address • Program or enter your Home address • Program or enter your Work address • Select from your Favourite list • Search for a Point of Interest (POI) • Enter an Intersection • Enter a Contact from your contancts list • Enter a Latitude/Longitude point • Enter a previously Saved Trip Options are described on the following pages.
Start Driving! Entering a Home Address After entering one or more destinations, start driving and enjoy CoPilot’s spoken instructions, continuously updated maps and ETA’s, and automatic route recalculation capabilities. The Driver Safety Screen displays a text-only screen and is the recommended view for safe driving. When you’re within about 1 kilometre of a turn or driving less than 16 k.p.h., CoPilot automatically switches to the map display.
Favourites Finding Points of Interest In the Select Stop screen, tap the Favourite button. A scrollable list will appear, providing quick access to the last 50 destinations that were entered. In the Select Stop screen, tap the POI button to search for and/or enter a point of interest as a destination. Tap a Favourite on the list to enter it as a destination. To change which Favourite is assigned to the Home or Work buttons, choose Menu > Options and tap Favourites (see Menu Options, p. 23).
3. When the search process is complete, a scrollable list of matches will appear. In this screen you have several choices, you can: • Highlight a POI and tap Map to preview it on the map (see below) • Tap Expand to expand the area of the search (this can be done twice) • Highlight a POI and tap Finish to enter it as a destination. Intersection To enter the intersection of two roads, tap the Intersection button in the Select Stop screen.
4. Once the address has been matched, you have the option of assigning a name to the address. CoPilot will pre-fill the name from your Contact record, but that name can be edited here. Contact Integration CoPilot allows you to link directly to your Contacts to retrieve address information. With just a few of quick taps of the stylus, you can enter a contact’s home and/or work address as your destination. Tap Finish to continue. 1. Tap the Contact button in the Select Stop screen. 5.
2. Enter a latitude and longitude in the appropriate format, using the drop-down pick lists for N or S, and E or W. 3. Once the lat/long has been matched, you have the option of assigning a name to the point. Tap Next to add the lat/ long you entered as a stop on your trip itinerary. Driver Safety/Map/Itinerary Screens NOTE: It is not safe to attempt to alter settings on your mobile device while you are driving. Either have a passenger make changes, or pull over to a safe area.
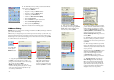
Tap at the top of the Map Screen to invoke a toolbar and menu bar. Use the Detour buttons when you want to take an alternate route to avoid heavy traffic, construction, etc. up ahead. Navigating Through CoPilot Screens View button Tap the View button (second from left on the toolbar — its appearance will reflect the current view) and choose a view from the drop-down menu. Driver Safety Screen - Text only, switches to the map below 16 k.p.h.
Map Modes Trip Editing and Waypoints CoPilot gives you a choice of several different display modes for the Map Screen: To get to the Going To screen from the guidance screens at any time, tap the top of the screen to open the toolbar, then tap the Going To button. From here you can edit the current trip, add additional stops, or start a new trip. 3D Perspective CoPilot’s two-dimensional default display mode can be changed to a threedimensional perspective based off an isometric camera angle.
Picking Stops From the Map Getting ETA’s and Distances CoPilot enables you to pick a stop off the map when you don’t know the exact address of your destination. In any mode, tap and hold on your target location on the map, then add it as a stop. The estimated time of arrival (ETA) and distance to your next stop will always be shown in the lower left corner of the Map and Driver Safety screens. After entering a destination, tap Start Driving to see the ETA/distance.
Detour Feature Selective Routing CoPilot’s Detour Feature allows you to preview an alternate route before deciding whether or not to take it. Perfect for situations in which traffic has suddenly slowed ahead of you, the Detour Feature will generate an alternate route. You can then make an informed decision about whether you’re better off driving through the delay or taking the new route. CoPilot allows you to be selective about the roads you take on your trip.
Guidance Menu Options Tap the top of either the Map Screen or the Driver Safety Screen to access the menu bar. Then tap Menu and select Options. In the Guidance tab, the settings under Speak Turn Warning At determine how often and where CoPilot will give you next turn information out loud. All, none, or some boxes can be checked.
Favourites The GPS Menu Tap the Favorites tab to open your List of Favourite Addresses. The GPS menu is a sub-menu of the main screen Menu. Tap Menu > GPS to access these features. To change the assignment of your work or home address, highlight your choice on the list, then tap Menu and choose Set as work or Set as home. NOTE: POI’s cannot be edited, you will get a “No matches found” error message if you try. GPS Status To view your satellite activity at any time, first tap the GPS Status option.
Modes Menu CoPilot has four modes of operation on the mobile device. Tap the pop-up Mode menu at the bottom of the screen to select Guidance, Navigating, Walking, or Planning Mode. Guidance Mode In Guidance Mode, you enter one or more destinations, then tap the Start Driving button to start driving and receive guidance. This mode provides you with on-screen and spoken driving directions and other information relevant to your trip, such as estimated time of arrival and distance to the next stop.
Select Stop Screen Determining Current Position In this screen you add stops to your trip. There are nine different types of stop entry to choose from: • Enter a new Address • Program or enter a Home address • Program or enter a Work address • Select from your Favourite list • Search for a Point of Interest (POI) • Enter an Intersection • Enter a Contact • Enter a Latitude/Longitude point • Enter a previously Saved Trip When you see this screen, CoPilot is in the process of determining where you are.
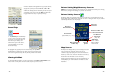
Map Screen Toolbar Buttons The Map Screen displays when you are traveling at less than 16 k.p.h. or are at a standstill. It combines a large map display and concise text instructions. When you’re within 1 kilometer of a turn, CoPilot automatically switches to the map. To invoke the toolbar and menu bar, tap the top of the screen. Next turn directional arrow. Distance to next turn. Route ahead highlighted in green, upcoming turn marked with yellow arrow. Messaging, Live, and GPS Status indicators.
Trip Planning on Your Mobile Device You can use CoPilot on your mobile device for trip planning. Planning Mode allows you to run a trip on your mobile device even when you're not in your car. You'll get driving directions and maps that you can use for reference before your trip begins. 5. To see driving directions, tap the View button, then tap the Itinerary button in the nested toolbar that pops up. 1. First turn on your mobile device and launch CoPilot (tap Programs > CoPilot).
Installing CoPilot to Your Desktop Adding a Data Region CoPilot Live comes fully installed and ready to use for route guidance on your mobile device. However, you will want to install CoPilot to your desktop if 1) you’d like to use the extensive trip planning features available with a desktop installation, or 2) you’re adding a data region. To learn more about CoPilot’s desktop trip planning features, see p. 55-68.
Licence Update Map Download to Your Mobile Device The CoPilot desktop software contains street-level maps for all of Europe, and CoPilot is offered with different licences that allow you to use some or all of these maps on your mobile device. Licences are available for the following: (1) Single region - Detailed street-level maps for any of the following regions: Alps Ski Region, Benelux (Belgium, the Netherlands, and Luxembourg), France, Germany, Italy, Pyrenees, Scandinavia, and the United Kingdom.
Trip to select a corridor along a route between two places; Data Selection Options Region to select a whole country or region. (3) Download the Data: (3a) To a Storage Card in your Mobile Device: 1. Ensure that your mobile device is connected to the desktop/laptop. 2. Clicking the Download icon will take you to a screen where Available Area(s) for download are displayed on the left.
City Radius Data Selection 4. Name the selection, thenclick Next. This method allows you to quickly select data in the shape of a circle surrounding any city on the map. In the Data Download Wizard you type a city name and country abbreviation or postal code and enter the distance you would like the radius to extend around the city, then click Next. 5. You will return to the Data Selection menu where you can select another data area if you like, using any method.
2. Enter a City, State or ZIP code (address optional) within the area that you would like to download. Click Next. Trip Data Selection The Trip method of selecting data is by far the most customizable method. This option allows you to run a trip and select street-level data specific to that trip, thereby avoiding unneeded data and saving valuable memory space.
3. To search for a POI, click the Points of Interest tab, enter a City, State or a ZIP Code and click the Find button. 6. You will return to the Data Selection menu where you can select another data area if you like, using any method. When you are finished selecting data areas, click Download. Trip itineraries that were created using the Trip download method will be transferred along with map data (see p. 50 for details). You can speed up your search by selecting a POI Category and/or Type.
Check Include EU Highway Network to download CoPilot’s complete European Highway Network along with your data. This additional download requires approximately 59 MB of space on your mobile device. When this network is loaded, major roads, cities, and some points of interest outside your selected data region will be shown on the map and you’ll be able to receive guidance as you drive anywhere in the European Union.
Trip Transfer Importing Custom Places When you use the Trip download option, CoPilot transfers whole trips to your mobile device. The trip you create, including its Itinerary, is transferred along with the surrounding data corridor, and it becomes the current trip. CoPilot’s Custom Place Import Wizard enables you to import addresses from your Outlook Contacts database, an Excel file, or text file.
4. In the next screen you'll see the data from your file sorted into columns. If the columns you see in the screen have not sorted the address data correctly, you need to indicate which delimiter CoPilot should recognize when it separates the fields in your file into columns. Each field — e.g. name, street address, city, state, etc. — needs to be separated by a delimiter such as a tab, semicolon, or comma.
Editing Custom Places in the Database After custom places have been added to the database, they can be edited at any time. Select Manage Custom Places from the Tools menu, then highlight the custom place you wish to edit, click Edit, and make your changes. Click Apply when finished. NOTE: By default, addresses entered as Custom Places are assigned to the Custom POI category. You can change this assignment at any time by selecting another Category from the drop-down pick list as you edit.
Run Trip Save Trip Save Trip button or Save Trip.../ Save Trip As... in the File menu. Generates the route for the trip you entered. Displays a detailed Trip Summary, Map and Driving Directions. Opens a standard Windows dialog where you can name your trip and save it to your hard drive either before or after running it in the Trip Planner. Open Trip Edit Trip Open Trip button or Open Trip... in the File menu. Edit Trip button or Edit Trip in the Trip menu.
Print Zoom In Print button or Print... in the File menu. Zoom In button or Zoom In in the Map menu. Takes you to the standard Windows Print options for printing the active window that contains your map or driving directions. Activate the map or directions by clicking on it or selecting it in the Window menu. Select Print TravPak... from the File menu to print driving directions, an overview map, and a zoomed map of each stop.
More Detail Zoom To Region More Detail button or Detail > Show More in the Map menu. Zoom to Region button or Zoom Region in the Map menu. This function allows you to zoom your map view to a specific area. Choices in the sub-menu will depend on which CoPilot data region(s) were purchased. Click once to increase the level of detail you see on the map by one increment without changing the zoom level. Less Detail Refresh Map Less Detail button or Detail > Show Less in the Map menu.
Pick Stops To turn on Pick Stop mode, click the Pick Stops button or rightclick on the map and select Pick Stops. Then click on any point on the map to enter it as a stop. The map view must be zoomed in to level 11 or 12. At lower zoom levels, keep clicking on the map until level 11 is reached (level is displayed in the CoPilot window title bar). In the dialog that opens, you can choose to enter the point as a start place, a waypoint, or a destination.
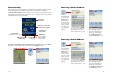
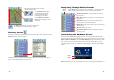
Reference: CoPilot on Your Desktop The following is a guide to the main screens you will see as you use CoPilot on your desktop/ laptop computer for trip planning. Map Window Menus and toolbar buttons to access all of CoPilot's desktop features. Click on a tab to frame any stop on your route. Map of area around your destination. Zoom in and move your cursor over a street to view its name. Trip Planner Window (Points of Interest) Click Points of Interest tab.
Trip Planner Window (Contacts) Routing Options Click the Options button in the Trip Planner window to access CoPilot routing options. Enter a person’s first or last name and hit . CoPilot will search your Contacts database for matches. Auto and Quickest is the default setting, and provides the quickest routing for automobiles based on practical considerations such as road quality, terrain, and urban/ rural classifications.
Fuel Cost Calculator CoPilot Live Communications To calculate an estimate of your fuel costs for a trip, select Fuel Cost Calculator from the Trip menu before you run your route. Fill in the average cost per gallon of fuel that you expect to pay, and the distance per gallon you can expect to get in your vehicle. Click OK, then run your trip. A fuel cost estimate based on what you entered will be calculated and shown in the Trip Summary that CoPilot creates for every trip you run.
On the following pages you'll see how you can communicate with someone on the road from within CoPilot (the Live Mode sections) and what it's like to be the driver using CoPilot when someone else is communicating with you (the Driving with Live sections). To set up your mobile device for tracking/messaging from within CoPilot or on the web, see Driving with Live - Mobile Device Setup, p. 77-78.
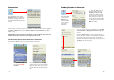
Click your cursor in the space just below the Standard Response Buttons, and begin typing. The Standard Response Buttons are included in every message and are described in detail in Driving with Live - Receive/Respond To Messages (p. 77). You have complete control over the Customizable Response Buttons: 1) Choose to display 1-4 buttons by clicking the corresponding number at the bottom of the screen.
When the driver responds to your trip itinerary update, the response is displayed in the Message Center: To set up access to CoPilot’s Live Network on the Web: 1. Go to the CoPilot Live Web login page at http://live.alk.com. Click Create a new account, and enter all the required information including a User Name and Password. 2. Open CoPilot on your mobile device. Tap the Menu > Live to access Live options and settings. 3.
6. Tap the Connection button in the Live screen to select which mobile operator’s network you will be using. You can also select when CoPilot should connect to the Live network and/or press the Connect button to connect immediately. 7. Once you’ve connected to the Live network, you’ll be able to send invitations to friends, family, and colleagues — tap the Invitations button in the Live screen. From here you can create new invitations or manage existing invitations. 8.
Driving with Live Receive Trip Itinerary Updates About GPS Technology The Global Positioning System (GPS), developed by the U.S. Department of Defense, is a constellation of 24 satellites that orbit the Earth twice daily. Each satellite contains an atomic clock that is accurate to the nanosecond, and constantly emitting radio waves toward Earth.
Software Registration CoPilot® End-User Licence Agreement Registered users are entitled to technical support, discounts on new versions of CoPilot, new product information, and software enhancements. NOTE: Software activation does NOT register your software, they are two separate processes. NOTE: On the following pages there are three separate licence agreements for users of North American, European, and Australian Data. In North America: You can register your software at www.alk.
ALK retains all rights not expressly granted. Nothing in this Licence Agreement constitutes a waiver of ALK's rights under the U.S. copyright laws or other applicable copyright laws or any other federal or state law. 2. Term: This Licence is effective upon receipt by you of the Software and upon opening the package. The Licence is effective until terminated. You may terminate this Licence at any time by returning all copies of the Software, and any portions thereof, to ALK.
ALK® Technologies, Inc. LICENCE AGREEMENT CoPilot | Linux with EUROPEAN DATA LICENCES: 1 User IMPORTANT: Please read the following agreement ("Licence") carefully. THIS IS A LEGAL AGREEMENT BETWEEN YOU, THE USER (either an individual or an entity), AND ALK Technologies, Inc. ("ALK"). IF YOU DO NOT AGREE TO THE TERMS OF THIS LICENCE, DO NOT INSTALL THE SOFTWARE.
OWNERSHIP The database and the copyrights and intellectual property or neighboring rights therein are owned by Navigation Technologies or its licensors. Ownership of the media on which the Database is contained is retained by Navigation Technologies and/or your supplier until after you have paid in full any amounts due to Navigation Technologies and/or your supplier pursuant to this EULA or similar agreement(s) under which goods are provided to you.
ALK Technologies, Inc. LICENCE AGREEMENT CoPilot | Linux with AUSTRALIAN DATA LICENCES: 1 User ALK retains all rights not expressly granted. Nothing in this Licence Agreement constitutes a waiver of ALK's rights under the U.S. copyright laws or other applicable copyright laws or any other federal or state law. THIS IS A LEGAL AGREEMENT BETWEEN YOU, THE USER (either an individual or an entity), AND ALK Technologies, Inc. ("ALK").
4. Licencee's Responsibility: You assume all responsibility for, and ALK shall not be liable for, all action taken, decisions made, and advice given as a result of your use of the Software. 5. General: The export or re-export of the Software may be restricted by the laws of the United States and other countries, and you shall not export this Software in violation of any such applicable laws. This Licence Agreement is governed by the laws of the State of New Jersey.