
Care & Use Manual


6
WARNING:
To prevent harm and ensure proper operation of your grill, it is imperative that the burners are properly
installed with respect to the gas orifices. Be certain that the orifice is inserted completely into the
burner’s inlet and that the burner rests firmly on its support bracket.
The burner should not rock side-to-side nor top-to-bottom if properly installed. If excessive burner move-
ment is present, reseat burner or contact your authorized service provider.
BATTERY INSTALLATION:
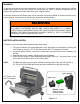
To install a new 9 Volt igniter battery please follow these steps:
1. The igniter modules are located behind the front panel and are accessed by opening the
front section of the grill. LIFT UP the front section and TILT forward until it stops.
2. Locate the igniter module, unscrew the round black cap and install a new 9V battery into
the cap.
3. Reinstall cap into the module, tightening the cap completely.
4. Close the front panel by tilting backwards and slightly lifting up. Then push down on the
front panel until it latches down on the locking tabs.
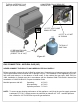
NOTE: 30” BBQ grills have only one igniter module on the right side of the grill (see figure # 1).
42”, 56” and 56” BFG BBQ grills have two igniter modules (one left and one right).
LIFT Front Cover
and TILT forward.
Igniter Cap
Igniter Module
Battery - 9 Volt
Point contacts
towards module
Figure # 1
WARNING
IMPORTANT ELECTRICAL INSTRUCTIONS:
THE GRILL’S ROTISSERIE MOTOR AND LIGHTS ARE WIRED TO A SINGLE
THREE-PRONG (GROUNDING) PLUG FOR YOUR PROTECTION AGAINST SHOCK
HAZARD. THE GRILL SHOULD BE PLUGGED DIRECTLY INTO A PROPERLY
GROUNDED THREE-PRONG RECEPTACLE.