
User Manual

16
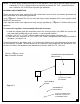
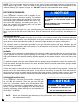
Figure # 5
Flames should be blue and stable with no yellow tips, excessive noise or lifting.
LOW HEAT SETTING ADJUSTMENT:
NOTE:
THE LOW HEAT SETTING ON YOUR GRILL IS PRESET AT THE FACTORY. ADJUST ONLY IF
ALTITUDE OR ENVIRONMENTAL FACTORS ARE CAUSING POOR, LOW HEAT, PERFORMANCE.
ADJUSTMENT STEPS:
1. Follow lighting instructions by setting the control
knob on “HI” and allow the burner to preheat for 10
minutes.
2. Turn the control knob to “LOW” and wait for the
burner temperature to drop and stabilize.
3. Attempting adjustment at any setting other than
LOW can create a dangerous condition.
4. Remove knob by pulling straight away from control
panel.
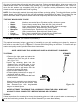
5. Insert a small blade screwdriver into the valve stem
to begin the adjustment. (see figure # 5)
6. Turn counter-clockwise to INCREASE the low heat
flame while using pliers to hold the stem securely.
7. Adjust the flames so the burner is fully lit around the perimeter when the knob is in the LOW
position. Once proper adjustment is reached, reattach the knob by pushing onto stem.
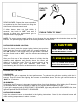
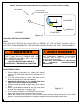
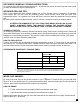
AIR SHUTTER
ADJUSTMENT CUP
SET-SCREW
U-BURNER
Figure # 4
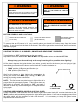
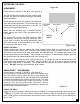
1” MAXIMUM
3
/
8
” MAXIMUM
FLAME SIZE
! WARNING
NEVER ADJUST THE BURNER SO LOW
THAT IT MAY GO OUT DURING USE. DO
NOT OPERATE THE GRILL WITH THE LOW
HEAT SCREW REMOVED.
GAS CAN ESCAPE AND CAUSE A
POTENTIALLY HAZARDOUS CONDITION.
! AVERTISSEMENT
NE JAMAIS AJUSTER LE BRÛLEUR SI BAS QU'IL
PEUT S'ÉTEINDRE PENDANT L'UTILISATION.
N'UTILISEZ PAS LE GRIL AVEC LA VIS À
CHALEUR BASSE RETIRÉE.
LE GAZ PEUT S'ÉCHAPPER ET PROVOQUER
UNE CONDITION POTENTIELLEMENT
DANGEREUSE.