
Installation Sheet


3
GAS PRESSURE REGULATOR CONVESION:
STEP 4:
The AGSB-2 Side Burner is equipped with a Maxitrol™ pressure
regulator that is suitable for LP or NG fuel regulation. To convert
the regulator to proper fuel, remove the brass cap located in it’s
center.
CAUTION: There are several components in this regulator as-
sembly. Be careful with the gas sealing washer, the plunger and
plunger’s spring located inside the regulator.
STEP 5:
Locate the black plastic plunger inside the brass cap. The plunger provides the right pressure setting at
the regulator outlet by changing the spring pressure.
Pull (pop-out) the plunger out of the brass cap, reverse it’s direction and re-insert into the cap with the
proper fuel desired pointing TOWARDS the regulator spring and body.
Reattach the brass cap into the regulator body and tighten securely with the gasket.
STEP 6:
If the unit is being converted from NG to LP, the LP kit will include a 1/2” NPT X 3/8” ODF reducer (hose
adapter) that needs to be installed on the gas inlet elbow attached to the regulator. Install with reducer
with a gas approved plumbing seal Teflon® paste or gas approved yellow Teflon® tape.
NOTE: The conversion is now complete. Pressurize the gas line with the correct fuel for the application
and check for leaks before lighting up the side burner.
Before using the side burner, all the burners will need to be adjusted for proper combustion and low
flame settings. Refer to the following steps for adjustment.
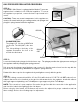
PLUNGER DETAIL:
The plunger LP side has a WIDE disk
on the end. The NG (NAT) side does
not.
The side pointing to the body of the
regulator determines the fuel to be
used in the side burner
BRASS
CAP
GASKET PLUNGER
SPRING
REDUCER