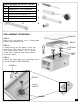
TOOLS REQUIRED TO INSTALL THIS KIT: A ITEM DESCRIPTION: A SCREWDRIVER - FLAT 1/8” WIDE TIP B RATCHETING SOCKET WRENCH C SOCKET EXTENSION DRIVER - 3 in. D 10 mm SOCKET E 7/8” WRENCH - OPEN TYPE B C E D REPLACEMENT PROCEDURE: COVER STEP 1: Remove the side burners’ cover, cooking grate, burner exterior and inner cap. STEP 2: Looking directly over the burner, locate and remove the orifice from the bottom of the cone-shaped burner body.
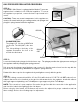
GAS PRESSURE REGULATOR CONVESION: STEP 4: The AGSB-2 Side Burner is equipped with a Maxitrol™ pressure regulator that is suitable for LP or NG fuel regulation. To convert the regulator to proper fuel, remove the brass cap located in it’s center. CAUTION: There are several components in this regulator assembly. Be careful with the gas sealing washer, the plunger and plunger’s spring located inside the regulator. SPRING PLUNGER DETAIL: The plunger LP side has a WIDE disk on the end.
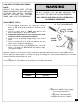
LOW HEAT SETTING ADJUSTMENT: NOTE: ADJUST THE LOW HEAT SETTING WHEN CHANGING FUELS OR WHEN ALTITUDE OR OTHER ENVIRONMENTAL FACTORS ARE CAUSING POOR, LOW HEAT, PERFORMANCE. WARNING NEVER ADJUST THE BURNER SO LOW THAT IT MAY GO OUT DURING USE. DO NOT OPERATE THE GRILL WITH THE LOW HEAT SCREW REMOVED. GAS CAN ESCAPE AND CAUSE A POTENTIALLY HAZARDOUS CONDITION. ADJUSTMENT STEPS: 1. Follow lighting instructions by setting the control knob on “HI” and allow the burner to preheat for 10 minutes. 2.