® USER GUIDE Aleratec 1:3 DVD/CD RoboRacer MultiDrive SA™ Part No.
Copyright/Model Identification The content of this manual is for informational purposes only and is subject to change without notice. This manual is copyright with all rights reserved. Under copyright laws, this manual and the software described within may not be copied, except in the normal use of the product(s) described within or to make a backup copy. Copyright© 2013 Aleratec, Inc. 9851 Owensmouth Avenue Chatsworth, CA 91311 U.S.A. www.aleratec.
Radio/TV Interference Statement The equipment described in this guide emits radio frequency energy. If it is not installed in accordance with the manufacturer’s instructions, it may cause interference with radio or television reception. This equipment has been tested and found to comply with the limits for a Class B digital device, pursuant to Part 15 of the FCC Rules. These limits are designed to provide reasonable protection against harmful interference in a residential installation.
Safety Regulations WARNING To prevent fire or shock hazard, do not expose the unit to rain or moisture. To avoid electrical shock, do not open the cabinet. Refer servicing to authorized personnel only. CAUTION As the laser beam in these DVD/CD Duplicators is harmful to the eyes, do not attempt to disassemble the cabinet. Refer servicing to authorized personnel only. The use of optical instruments with this product will increase eye hazard. This DVD/CD Duplicator is classified as a CLASS 1 LASER PRODUCT.
Table of Contents Introduction........................................................................................... 1 Included Items.............................................................................................1 Key Items – 1:3 DVD/CD RoboRacer MultiDrive SA...............................2 1:3 DVD/CD RoboRacer MultiDrive SA Display Panel............................3 Precautions........................................................................................... 4 Installation.....
® www.aleratec.
Introduction Thank you for purchasing this 1:3 DVD/CD RoboRacer MultiDrive SA. Please read this User Guide thoroughly before using this product. • • Page 2 shows the Key Features of the 1:3 DVD/CD RoboRacer MultiDrive SA Page 3 shows the Duplicator LCD Display Panel. Included Items • • • • • • • • • • • 1 1:3 DVD/CD RoboRacer MultiDrive SA 1 Disc Output Bin Holder 1 Side Disc Output Bin Holder 1 150-Disc Capacity Disc Output Bin 1 50-Disc Capacity Disc Output Bin 4 150-Disc Capacity Guide Rods 1 USB 2.
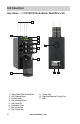
Introduction Key Items – 1:3 DVD/CD RoboRacer MultiDrive SA 1 5 2 3 6 B 4 7 C 8 1. 2. 3. 4. 5. 6. 7. 8. 2 Clear Plastic Disc Guide Rods LCD Display Panel Control Panel Disc Burning Drives Disc Input Bin Protective Cover Disc Bin Holder Disc Output Bin A A. Power Plug B. High Performance Cooling Fan C. USB www.aleratec.
Introduction 1:3 DVD/CD RoboRacer MultiDrive SA Display Panel 1 2 3 4 Disc Duplicate ESC 6 ENT 5 1 Display shows all functions and messages 2 Power Indicator - this LED also doubles as an activity LED and changes colors when a disc is being burned etc. 3 LEFT Scroll Button 4 RIGHT Scroll Button 5 ENTER Button The left and right scroll buttons are used to navigate through the operating menu, while the enter and escape buttons are used to select or cancel menu settings. 6 ESCAPE Button www.
Precautions Before installing your 1:3 DVD/CD RoboRacer MultiDrive SA, please read the following. Installation Avoid placing the 1:3 DVD/CD RoboRacer MultiDrive SA in a location subject to: • • • • • • High humidity High temperature Excessive dust Mechanical vibration Direct sunlight Electromagnetic radiation Operation Do not move the 1:3 DVD/CD RoboRacer MultiDrive SA during operation. This may cause it to malfunction during operations. Note: Choose a Good Location 1.
Overview Main Menu This section provides a listing of the functions on the 1:3 DVD/CD RoboRacer MultiDrive SA. Detailed descriptions of each function are given in the next section. There are 5 main menu items that will display in the 1:3 DVD/CD RoboRacer MultiDrive SA Display Panel. These are: Disc Duplicate Compare Image USB Mode Setup www.aleratec.
Overview Subfunctions The main menu “Image” function has 4 subfunctions. These are: Image Load Image Image Delete Image Burn Image Compare 6 www.aleratec.
Overview Subfunctions The main menu “Setup” function has 16 subfunctions. These are: Copy Mode Disc At Once Track At Once Demo Run Load Firmware Max Disc Errors Reset Robot Input Bin Pointer 1 Pointer 2 Software ID Setup Erase Disc Full Quick System Sound Test Mode Set Copy Test Test + Copy Format Hard Disk Default Reload DVD Burn Speed CD Burn Speed Auto Verify Read Error Skip Over Burn Mode www.aleratec.
Using the DVD/CD Duplicator Main Menu: Disc Duplicate This is the default mode of the 1:3 DVD/CD RoboRacer MultiDrive SA controller. This function will activate the duplication process. Disc Duplicate 1. Load a source disc in the input bin and load blank discs for the number of copies needed. 2. Press ENTER (ENT), then select the quantity of discs you wish to duplicate from the quantity menu, (make sure the number of blanks loaded is equal to or greater than, the number entered.
Using the DVD/CD Duplicator Main Menu: Compare Compare will perform a bit by bit comparison of the disc copies loaded on the input bin to the source disc. 1. Press the LEFT/RIGHT arrow keys ( ) to navigate to the “Compare” function. Compare 2. Load the disc to be checked. 3. Press ENTER (ENT) to begin compare. Compare Check SourceDisc 4. Use the ESCAPE (ESC) key to return to the Main Menu. Main Menu: Image Four image subfunctions manage the disc images on the built in hard disk drive.
Using the DVD/CD Duplicator Main Menu: Image - continued Image Load “Image Load” will copy an image of a source disc loaded in the input bin to a chosen hard drive partition. 1. Press ENTER (ENT) key to enter the subfunction menu. Image Load 2. Press ENTER (ENT) and use the LEFT/RIGHT arrow keys ( ) to select the partition location. Select Partition No Image If there is a file size being displayed in the chosen partition, the image will be overwritten. The partitions are labeled alphabetically. 3.
Using the DVD/CD Duplicator 4. Press ENTER (ENT) and select the partition to be compared. Select Partition A 4174MB 5. Press ENTER (ENT) to start. 6. Use the ESCAPE (ESC) key to return to the Main Menu. Image Burn This function will select the source image from the hard drive and burn the desired number of copies. 1. Press the LEFT/RIGHT arrow keys ( ) to navigate to the “Image” function. 2. Press ENTER (ENT) key to enter the subfunction menu. 3.
Using the DVD/CD Duplicator Main Menu: Image - continued Image Delete Using this function you can select a partition to be deleted from the hard drive. 1. Press the LEFT/RIGHT arrow keys ( ) to navigate to the “Image” function. 2. Press ENTER (ENT) key to enter the subfunction menu. 3. Press the LEFT/RIGHT arrow keys ( ) to navigate to the “Image Delete”. Image Delete 4. Press ENTER (ENT) and select the partition to be deleted. Select Partition A 4174MB 5.
Using the DVD/CD Duplicator Main Menu: USB Mode The “USB mode” activates the connection from the 1:3 DVD/CD RoboRacer MultiDrive SA built in hard disk drive to a PC. 1. Press the LEFT/RIGHT arrow keys ( ) to navigate to the “USB Mode” function. USB Mode 2. Press ENTER (ENT) and the system will ask you if you want to enter the “USB mode”. Enter USB Mode Are you sure ? 3. Press ENTER (ENT) again to make the connection.
Using the DVD/CD Duplicator Main Menu: USB Mode - continued First install the Image Manager software included on the Software/User Guide CD. Using Image Manager 1. Once the Image Manager software is installed, put the RoboRacer MultiDrive SA into USB Mode and connect the device to your PC. 2. After Windows has finished registering the device you will have access to the HDD through the Image Manager software. 3.
Using the DVD/CD Duplicator 6. Click on the table row to choose which partition you will load the image onto. The row selected will be highlighted in blue. The letter you see in the Index column is the same as the letter used to locate the image when you return the duplicator back to stand alone mode (USB Mode off). WARNING - Please DO NOT USE the first partition when loading files. This partition will be used by the duplicator as temporary storage. a. Click the Load From .CPM file to load a .
Using the DVD/CD Duplicator Main Menu: USB Mode Using Image Manager - continued 8. Once you click Open you will see the Information screen appear. Click the OK button to begin loading the disc image. 9. The Manage Images screen will appear and display the status of the image load. The screen will then disappear when the transfer is completed. 10. You will now see the image file you just loaded onto the duplicator’s HDD in the partition that you chose. 16 www.aleratec.
Using the DVD/CD Duplicator 11. If you would like to edit the image information so that you can easily find the image, select the “Edit Title” button at the top of the Manage Images screen to add a description to the selected image file. 12. If you would like to export the image files on the duplicator’s HDD onto the PC, select the image that you would like to export. Then click the Export to (ISO, CPM, DVM) file button.
Using the DVD/CD Duplicator Troubleshooting Image Manager 1. If the Image manager is not starting and the screen displays this Error message, please make sure that the duplicator is in USB Mode. The duplicator’s screen will display as “Leave USB Mode, Press ESC Key” while it is in USB Mode. 2. To make sure the duplicator has been properly installed in Windows, go to Device Manager and check to make sure that the devices highlighted below are being displayed without errors.
Using the DVD/CD Duplicator Main Menu: Setup 1. Press the LEFT/RIGHT arrow keys ( ) to navigate to the “Setup” function. The Setup function has 16 subfunctions. These are: Copy Mode Disc At Once Track At Once Demo Run Load Firmware Max Disc Errors Reset Robot Input Bin Pointer 1 Pointer 2 Software ID Setup Erase Disc Full Quick System Sound Test Mode Set Copy Test Test + Copy Format Hard Disk Default Reload DVD Burn Speed CD Burn Speed Auto Verify Read Error Skip Over Burn Mode www.aleratec.
Using the DVD/CD Duplicator Main Menu: Setup - continued Copy Mode 1. Press the LEFT/RIGHT arrow keys ( ) to navigate to the “Setup” function. Setup 2. Press ENTER (ENT) key to enter the subfunction menu “Copy Mode”. Setup Copy mode 3. Press the ENTER (ENT) key to navigate to the first option “DAO” (Disc at Once). 4. Press the LEFT/RIGHT arrow keys ( ) to navigate to the second option “TAO” (Track at Once). 5. Press ENTER (ENT) to select the option you are viewing.
Using the DVD/CD Duplicator Main Menu: Setup - continued Demo Run This function activates a demo mode in which the 1:3 DVD/CD RoboRacer MultiDrive SA automatically cycles discs without simulating or burning any data on them. The mode can be run with or without discs being loaded in the device. When the Demo Run mode is running, every sixth disc will be rejected. 1. Press the LEFT/RIGHT arrow keys ( ) to navigate to the “Setup” function. Setup 2. Press ENTER (ENT) key to enter the subfunction menu. 3.
Using the DVD/CD Duplicator Main Menu: Setup - continued Max Disc Errors This function specifies the number of disc failures allowed before the duplicator will cancel the job. For example, if max disc errors is set to three, then a copy job will cancel once three target discs fail due to error. Reset Robot This menu manually controls the duplicators motor movements. 1. Press the LEFT/RIGHT arrow keys ( ) to navigate to the “Setup” function. Setup 2. Press ENTER (ENT) key to enter the subfunction menu.
Using the DVD/CD Duplicator Main Menu: Setup - continued Erase Disc This function erases DVD-RW and CD-RW discs. 1. Press the LEFT/RIGHT arrow keys ( ) to navigate to the “Setup” function. Setup 2. Press ENTER (ENT) key to enter the subfunction menu. 3. Press the LEFT/RIGHT arrow keys ( ) to navigate to the “Erase Disc” function. Setup Erase Disc 4. Press the ENTER (ENT) key to navigate to the first option “Full*”. 5.
Using the DVD/CD Duplicator Main Menu: Setup - continued System Sound This function turns the button sounds ON or OFF. 1. Press the LEFT/RIGHT arrow keys ( ) to navigate to the “Setup” function. Setup 2. Press ENTER (ENT) key to enter the subfunction menu. 3. Press the LEFT/RIGHT arrow keys ( ) to navigate to the “System Sound” function. Setup System Sound 4. Press the ENTER (ENT) key to navigate to the first option “ON*”. System Sound ON* 5.
Using the DVD/CD Duplicator Main Menu: Setup - continued Test Mode Set In test mode the duplicator will simulate burning but will not actually write data to the disc. 1. Press the LEFT/RIGHT arrow keys ( ) to navigate to the “Setup” function. Setup 2. Press ENTER (ENT) key to enter the subfunction menu. 3. Press the LEFT/RIGHT arrow keys ( ) to navigate to the “Test Mode Set”. Setup Test Mode Set 4. Press the ENTER (ENT) key to navigate to the first option “Copy*”. 5.
Using the DVD/CD Duplicator Main Menu: Setup - continued Format Hard Disk 1. Press the LEFT/RIGHT arrow keys ( ) to navigate to the “Setup” function. Setup 2. Press ENTER (ENT) key to enter the subfunction menu. 3. Press the LEFT/RIGHT arrow keys ( ) to navigate to the “Format hard disc”. Setup Format hard disc 4. Press the ENTER (ENT) key to format the hard disc. Format hard disc Formatting 5. 26 Use the ESCAPE (ESC) key to return to the Main Menu. www.aleratec.
Using the DVD/CD Duplicator Main Menu: Setup - continued Default Reload Selecting “Yes” will return all settings to the factory default. 1. Press the LEFT/RIGHT arrow keys ( ) to navigate to the “Setup” function. Setup 2. Press ENTER (ENT) key to enter the subfunction menu. 3. Press the LEFT/RIGHT arrow keys ( ) to navigate to the “Default Reload”. Setup Default Reload 4. Press the ENTER (ENT) key to navigate to the first option “No*”. 5.
Using the DVD/CD Duplicator Main Menu: Setup - continued DVD Burn Speed The “DVD burn speed” function allows adjustment of burn speed to increase yield and quality of copies. 1. Press the LEFT/RIGHT arrow keys ( ) to navigate to the “Setup” function. Setup 2. Press ENTER (ENT) key to enter the subfunction menu. 3. Press the LEFT/RIGHT arrow keys ( ) to navigate to the “DVD burn speed”. Setup DVD burn speed 4. Press the ENTER (ENT) key to navigate to the first option “Maximum*”. 5.
Using the DVD/CD Duplicator Main Menu: Setup - continued CD Burn Speed The “CD burn speed” function allows adjustment of burn speed to increase yield and quality of copies. 1. Press the LEFT/RIGHT arrow keys ( ) to navigate to the “Setup” function. Setup 2. Press ENTER (ENT) key to enter the subfunction menu. 3. Press the LEFT/RIGHT arrow keys ( ) to navigate to the “CD burn speed”. Setup CD burn speed 4. Press the ENTER (ENT) key to navigate to the first option “Maximum*”. 5.
Using the DVD/CD Duplicator Main Menu: Setup - continued Auto Verify The “Auto Verify” function will test a disc for its readability in a ROM drive. This is not the same as “Compare”. Enabling “Auto Verify” will perform “Verify” on all disc copies loaded in the input bin. 1. Press the LEFT/RIGHT arrow keys ( ) to navigate to the “Setup” function. Setup 2. Press ENTER (ENT) key to enter the subfunction menu. 3. Press the LEFT/RIGHT arrow keys ( ) to navigate to the “Auto Verify”.
Using the DVD/CD Duplicator Main Menu: Setup - continued Read Error Skip If the source disc is damaged or of poor quality, enabling this function may allow making a useable copy. With Read error skip disable, burning will continue even if errors are detected. When enabled, the duplicator will stop if errors are detected. 1. Press the LEFT/RIGHT arrow keys ( ) to navigate to the “Setup” function. Setup 2. Press ENTER (ENT) key to enter the subfunction menu. 3.
Using the DVD/CD Duplicator Main Menu: Setup - continued Over Burn Mode When enabled, this function will burn data to a normally unused area along the outer diameter of the disc. This feature can increase the disc capacity by a small amount. 1. Press the LEFT/RIGHT arrow keys ( ) to navigate to the “Setup” function. Setup 2. Press ENTER (ENT) key to enter the subfunction menu “Over burn Mode”. Setup Over burn mode 3. Press the ENTER (ENT) key to navigate to the first option “Disable”. 4.
Using the DVD/CD Duplicator Nero Essentials Installation 1. Insert the Nero 7 Essentials CD into your PC. If Autoplay is enabled on your computer, you will automatically be taken to the Nero Essentials installer menu. If Autoplay is not enabled, navigate to your PC’s optical disc drive in My Computer, and either double-click the drive to explore the CD and run Setup.exe, or right click on the drive icon and click “Autoplay”. 2.
Using the DVD/CD Duplicator Creating an Image with Nero 1. Start the Nero Express Essentials program. 2. The screen below will be displayed. For this example choose “Data” and “Data CD”. 34 www.aleratec.
Using the DVD/CD Duplicator Creating an Image with Nero - continued 1. Add any data file by using the “Add” option or by dragging and dropping a file or files into the large white area. When finished adding files, click the “Next” button. 2. In the final display before creating an image, make sure that “Image Recorder” in the dropdown menu to the right of “Current Recorder” is selected. Fill out the disc name if needed, and when ready, press the “Burn” button at the lower right. www.aleratec.
Using the DVD/CD Duplicator 1. After the burn button is pressed, the “Save Image File” screen will appear. In the lowest dropdown menu called “Save as type:” select “ISO Image Files (.iso)”. Nero NRG files are not supported. Type in the name you would like the image file to be called. Take note or choose where the file is to be saved so that it can be found for later use and then click the “Save” button. 2. 36 After clicking the “Save” button the “Write Progress Screen” will appear. www.aleratec.
Using the DVD/CD Duplicator Creating an Image with Nero - continued 1. The image process is successful when Nero displays this screen. www.aleratec.
Specifications Supported Media Types • • • • • Supported Formats • Most Industry Standard DVD and CD Formats Recording Modes • Disk At Once • Track At Once Copy Speeds • Selectable Power Requirements • 100-240 VAC (Universal Power Supply) Dimensions (length x width x height) • 365 mm x 200 mm x 452 mm • 14 3/8” x 7 7/8” x 17 4/5” Weight • 8.5 kg (18.85 lbs) Warranty • Limited 1 Year Parts and Labor 38 DVD-R/RW DVD+R/RW (Single Layer) DVD+R DL/DVD-R DL (Dual Layer) CD-R CD-RW www.aleratec.
Technical Support After reading this User Guide, if you need additional assistance with this product, please contact Aleratec Technical Support. Our technical staff will be happy to assist you, but they may need your help to better assist you. Calling Aleratec Technical Support without all the necessary information can be both time consuming and frustrating. Therefore, please try to have the following information ready before calling: 1.
Service and Support Aleratec, Inc., Limited Warranty This Limited Warranty covers defects encountered in the course of normal use of this product and does not apply to damage from improper use, abuse, accidents, unauthorized service, or inadequate packaging when shipping the product to Aleratec, Inc. Aleratec, Inc. provides the following limited warranty for this product only if the product was originally purchased for use, not re-sale, from Aleratec, Inc., an Aleratec, Inc.
Service and Support Please Note: This Warranty is valid only within the United States and Puerto Rico, and applies only to products that are new and unopened on the date of purchase. For areas outside the United States and Puerto Rico, contact the authorized dealer from whom you purchased this product to determine what dealer warranty, if any, applies. THIS LIMITED WARRANTY CONSTITUTES YOUR SOLE AND EXCLUSIVE REMEDY, AND THE SOLE AND EXCLUSIVE LIABILITY OF ALERATEC, INC.
Service and Support To Obtain Warranty Service: You must ship your product to the authorized dealer where your product was purchased within the one year warranty period and no later than thirty days after discovery of claimed defect, whichever occurs first. In either case, you must provide proof of original purchase before any warranty service can be performed.
Technical Support FAX Back Form Aleratec, Inc. Technical Support Fax Back Form Please record the following information to help expedite any warranty claim: Model No.:_ _____________ Serial No.
Document Number: 280118_280118EU_ENG_Rev. A Specifications subject to change without notice. Copyright © 2013 Aleratec, Inc. 9851 Owensmouth Avenue Chatsworth, CA 91311 U.S.A. www.aleratec.