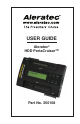
USER GUIDE Aleratec® HDD PortaCruiser™ Part No.
Copyright/Model Identification The content of this manual is for informational purposes only and is subject to change without notice. This manual is copyright with all rights reserved. Under copyright laws, this manual and the software described within may not be copied, except in the normal use of the product(s) described within or to make a backup copy. Copyright© 2009 Aleratec, Inc. 9851 Owensmouth Avenue Chatsworth, CA 91311 U.S.A. www.aleratec.
Radio/TV Interference Statement The equipment described in this guide emits radio frequency energy. If it is not installed in accordance with the manufacturer’s instructions, it may cause interference with radio or television reception. This equipment has been tested and found to comply with the limits for a Class B digital device, pursuant to Part 15 of the FCC Rules. These limits are designed to provide reasonable protection against harmful interference in a residential installation.
Safety Regulations WARNING To prevent fire or shock hazard, do not expose the unit to rain or moisture. To avoid electrical shock, do not open the housing. Refer servicing to authorized personnel only. www.aleratec.
Table of Contents Introduction....................................................................................................1 Product Features....................................................................................................1 Key Items..............................................................................................................2 HDD PortaCruiser Display Panel and Buttons.....................................................3 Precautions.................................
Table of Contents Using the HDD PortaCruiser .....................................................................30 Duplicator Mode.................................................................................................30 Advanced Setup Menu................................................................................30 Advanced Setup Menu: 8-01 ReScan Bus Delay.......................................31 Advanced Setup Menu: 8-02 Read Error Skip...........................................
Introduction Thank you for purchasing the HDD PortaCruiser. Please read this User Guide thoroughly before using this product. Product Features The HDD PortaCruiser is a Hard Disk Drive Duplicator and Dual Disk RAID Controller.
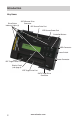
Introduction Key Items Drive Status Indicator Lights (4) SATA Source Drive Connector IDE Source Drive Port IDE Source Power Port Controller Buttons USB Connector Power Switch Power Connector IDE Target Power Port Display Panel (see page 3) IDE Target Drive Port SATA Target Drive Connector 2 www.aleratec.
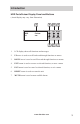
Introduction HDD PortaCruiser Display Panel and Buttons (Actual display may vary from illustration) 1 4 6 HDD 1-1 2 ENT RESET ESC MUTE 3 5 7 Cruiser ver: 1. LCD display shows all functions and messages 2. UP arrow is used to scroll backward through functions or menus 3. DOWN arrow is used to scroll forward through functions or menus 4. ENT button is used to execute a selected function, or enter a menu 5. ESC button is used to cancel a selected function, or exit a menu 6.
Precautions Before installing your HDD PortaCruiser, please read the following. Installation Avoid placing the HDD PortaCruiser in a location subject to: • High humidity • High temperature • Excessive dust • Mechanical vibration • Direct sunlight • Electromagnetic radiation Choose a Good Location 1. Allow adequate clearance for moving parts. 2.
Overview Power Up Sequence During the normal power-up sequence of the HDD PortaCruiser, the following information will be displayed. Figure 1 shows the firmware version HDD Duplicator 1-1 ver: 0.92C ESC MUTE ENT RESET ESC MUTE ENT RESET ESC MUTE Figure 4 shows the number of drives loaded. Detect Drives Found 0 Devices ENT RESET ESC MUTE Figure 5 shows the first function.
Overview Understanding RAID RAID (Redundant Array of Independent Disks) is a system composed of many hard drives; that is, multiple physical drives form a single virtual drive to be recognized by the system. Different RAID modes have different advantages and disadvantages. RAID 0 (Striping) RAID 0 must be composed of a pair of hard drives at least. When data is written into the whole hard drive, it will be equally striped and written into each hard drive of the array. Thus the access speed becomes quicker.
Overview Duplicator Main Menu In Duplicator mode, there are eight main menu items that can be seen in the HDD PortaCruiser Copy Controller Display Panel. These are: 8. Adv Setup ESC MUTE ENT RESET ESC MUTE ENT RESET ESC MUTE ENT RESET ESC MUTE ENT RESET ESC MUTE ENT RESET ESC 8. 7. USB RAID Mode 7. 6. Setup ENT RESET 6. 5. Source Size MUTE 5. 4. ReScan Bus ESC 4. 3. PreScan Source 3. 2. Compare HDD ENT RESET 2. 1. Copy HDD 1.
Overview Duplicator Subfunctions The “Setup” menu has eight (8) subfunctions. These are: 6-01 Language 6-02 DMA Mode 6-03 Copy Size 6-04 Startup Menu 6. Setup ENT RESET ESC 6-05 Auto Compare MUTE 6-06 Copy with Detect 6-07 Button Sound 6-08 Device Info 6-09 System Info 8 www.aleratec.
Overview The Duplicator “Advanced Setup” menu has eight (8) subfunctions. These are: 8-01 ReScan Bus Delay 8-02 Read Error Skip 8-03 Quick Erase HDD 8-04 H/W Diagnostic 8. Adv Setup ENT RESET ESC MUTE 8-05 Load Default 8-06 Link Option (for USB Mode) 8-07 USB Auto Link 8-08 Copy HPA www.aleratec.
Overview Dual Disk RAID (USB) Mode Main Menu In USB mode, the options seen in the HDD PortaCruiser Display Panel depend on the RAID mode of the system. These are: Normal Mode 5. D2 Drive Select MUTE ENT RESET ESC MUTE ENT RESET ESC MUTE ENT RESET ESC MUTE 5. 4. D1 Drive Select ESC 4. 3. Change RAID Mode 3. 2. Information ENT RESET 2. 1. Duplicator Mode 1. ENT RESET ESC MUTE JBOD Mode 10 4.
Overview RAID0 Mode 4. Initial RAID0 ESC MUTE ENT RESET ESC MUTE ENT RESET ESC MUTE 4. 3. Change RAID Mode 3. 2. Information ENT RESET 2. 1. Duplicator Mode 1. ENT RESET ESC MUTE RAID1 Mode 4. Initial RAID1 ESC MUTE ENT RESET ESC MUTE ENT RESET ESC 4. 3. Change RAID Mode 3. 2. Information ENT RESET 2. 1. Duplicator Mode 1. ENT RESET ESC MUTE MUTE www.aleratec.
Using the HDD PortaCruiser Loading the Hard Drives IDE Drives 1. 2. Use an IDE cable (not included) to connect the source/target hard drive’s IDE port to the HDD PortaCruiser’s Source/Target IDE port. Use an IDE cable (not included) to connect the source/target hard drive’s power port to the HDD PortaCruiser’s Source/Target port. SATA Drives 1. Position the HDD PortaCruiser on a flat surface with enough area around it to place the source/target hard drive. 2.
Using the HDD PortaCruiser Removing Hard Drives 1. Remove the IDE and power cables (for IDE drives) or slide the hard drive away from the HDD PortaCruiser unit (for SATA drives). Note: Do not attempt to remove the hard drive if the drive activity LED is on or the unit is in the middle of a process. www.aleratec.
Using the HDD PortaCruiser Duplicator Mode Main Menu: Copy HDD The “Copy HDD” function performs an actual copy from the source HDD to the target HDD. The target HDD must be at least as large as the source. The HDD PortaCruiser will copy every block of capacity on the source HDD. Load the source HDD and the target HDD into the HDD PortaCruiser. The system will auto-detect the hard drives. After the drives have been detected, a screen similar to the one below will be displayed. 1. Copy HDD 1.
Using the HDD PortaCruiser Duplicator Mode Main Menu: Compare HDD The “Compare HDD” function performs a comparison of data from the source hard drive to the data on the target hard drive. With the source and target HDDs loaded use the arrow buttons (or) to select “Compare HDD”. The following screen will be displayed. 2. Compare HDD ENT RESET ESC MUTE Press ENT to begin the comparison. The system will auto-detect the hard drives. Detect Drives Please wait... 2. 1.
Using the HDD PortaCruiser Duplicator Mode Main Menu: PreScan Source The “PreScan Source” scans the source hard drive to determine if it can be read correctly. With the source HDD loaded, use the arrow buttons (or) to select “PreScan Source”. The following screen will be displayed. 3. PreScan Source ENT RESET ESC MUTE Press ENT to begin the scan. The system will auto-detect the hard drives. Detect Drives Please wait... 2. 1.
Using the HDD PortaCruiser Duplicator Mode Main Menu: ReScan Bus The “ReScan Bus” function causes the HDD PortaCruiser to redetect connected hard drives. This can be used when you change drives without restarting the system. Use the arrow buttons (or) to select “ReScan BUS”. The following screen will be displayed. 4. ReScan BUS RESET ESC MUTE Press ENT to select. The system will prompt you to confirm that you wish to proceed.
Using the HDD PortaCruiser Duplicator Mode Main Menu: Source HDD Size The “Source Size” function is used to display the capacity of the source hard drive. With the source HDD loaded, use the arrow buttons (or) to select “Source size”. The following screen will be displayed. 5. Source size RESET ESC MUTE Press ENT to display the capacity of the source hard drive. Total: 232.5GB 18 ENT 2. 1. ENT RESET ESC MUTE www.aleratec.
Using the HDD PortaCruiser Duplicator Mode Main Menu: USB RAID Mode This function allows you to switch to the Dual Disk RAID Controller mode. Use the arrow buttons (or) to select “USB RAID Mode”. The following screen will be displayed. 7. USB RAID Mode RESET ESC MUTE Press ENT to select. The system will prompt you to confirm that you wish to change modes. Switch USB Mode? No ENT RESET ESC MUTE Use the arrow buttons (or) to select “YES” and press ENT to select.
Using the HDD PortaCruiser Duplicator Mode Setup Menu The “Setup” menu contains configuration options for the HDD PortaCruiser. It is suggested to use the factory defaults for optimum performance. Use the arrow buttons (or) to select “Setup”. The following screen will be displayed. 6. Setup 1. ENT RESET ESC MUTE Note: After changing any of the configuration options, you must press ENT to accept the change. 20 www.aleratec.
Using the HDD PortaCruiser Duplicator Mode Setup Menu: 6-01 Language This option allows you to select the language that is used for the display. Use the arrow buttons (or) select “Setup”. The following screen will be displayed. 6. Setup ESC MUTE ENT RESET ESC MUTE Press ENT to display the current language selection (the default language is English). Language English 4. RESET Press ENT and use the arrow buttons () to scroll to “Language”. The following screen will be displayed. 6-01.
Using the HDD PortaCruiser Duplicator Mode Setup Menu: 6-02 DMA Mode This function is used to specify the Ultra DMA mode. Use the arrow buttons (or) select “Setup”. The following screen will be displayed. 6. Setup ESC MUTE ENT RESET ESC MUTE ENT RESET ESC MUTE Use the arrow buttons () to toggle through the available modes (1-4). Once you change a setting, remember to press ENT to save it. DMA Mode UDMA 1 – UDMA 4 (MB) 22 Press ENT to display the current configuration setting.
Using the HDD PortaCruiser Duplicator Mode Setup Menu: 6-03 Copy Size This function is used to specify the amount of source disk data to copy to the target drive. Use the arrow buttons (or) select “Setup”. The following screen will be displayed. 6. Setup ESC MUTE ENT RESET ESC MUTE Press ENT to display the current configuration setting. 6. Setup ALL ENT RESET ESC MUTE Use the arrow buttons () to toggle through the available copy sizes (1%-100%).
Using the HDD PortaCruiser Duplicator Mode Setup Menu: 6-04 Startup Menu This option lets you select any of the functions (except “Setup”) as the initial function that appears when the HDD PortaCruiser is powered on. Use the arrow buttons (or) select “Setup”. The following screen will be displayed. 6. Setup ESC MUTE ENT RESET ESC MUTE 24 Press ENT to display the current configuration setting. The default setting is “1. Copy HDD”. Startup Menu 1. Copy HDD 4.
Using the HDD PortaCruiser Duplicator Mode Setup Menu: 6-05 Auto Compare This option allows you to choose whether or not to automatically compare the source and target hard drive after every copy operation. Use the arrow buttons (or) select “Setup”. The following screen will be displayed. 6. Setup ESC MUTE ENT RESET ESC MUTE Press ENT to display he current configuration setting. The default setting is “Off”. Auto Compare Off 4.
Using the HDD PortaCruiser Duplicator Mode Setup Menu: 6-06 Copy with Detect This option allows you to choose whether or not to automatically rescan for connected drives immediately before a copy operation. Use the arrow buttons (or) select “Setup”. The following screen will be displayed. 6. Setup ESC MUTE ENT RESET ESC MUTE 26 Press ENT to display he current configuration setting. The default setting is “Off”. 6. Setup Off 4.
Using the HDD PortaCruiser Duplicator Mode Setup Menu: 6-07 Button Sound This option allows you to enable or disable the beeping sound heard when you press a button. Use the arrow buttons (or) select “Setup”. The following screen will be displayed. 6. Setup ESC MUTE ENT RESET ESC MUTE Press ENT to display the current configuration setting. The default is “On”. Button Sound On 4. RESET Press ENT and use the arrow buttons () to scroll to “Button Sound”.
Using the HDD PortaCruiser Duplicator Mode Setup Menu: 6-08 Device Info This option displays information about any hard drives connected to the HDD PortaCruiser. Use the arrow buttons (or) to scroll to “Setup”. The following screen will be displayed. 6. Setup ESC MUTE ENT RESET ESC MUTE CH: 0 149.1GB ENT RESET ESC MUTE Use the arrow buttons (or) to show information about any additional hard drive that is connected. The following screen will be displayed. CH: 1 149.
Using the HDD PortaCruiser Duplicator Mode Setup Menu: 6-09 System Info This function displays information about the HDD PortaCruiser, including the current firmware version. Use the arrow buttons (or) to select “Setup”. The following screen will be displayed. 6. Setup RESET ESC MUTE After selecting “Setup” use the arrow keys () to toggle between the subfunctions. Press ENT to select. “System Info”. The following information will be displayed. 6-09.
Using the HDD PortaCruiser Duplicator Mode Advanced Setup Menu The “Adv Setup” menu contains additional configuration options for the HDD PortaCruiser. Press and hold the ESC button for 3 seconds to enter Adv Setup. The following screen will be displayed. 8. Adv Setup 1. ENT RESET ESC MUTE Note: After changing any of the configuration options, you must press ENT to accept the change. Once all changes are complete, press ESC to exit the Adv Setup menu. The following screen will be displayed.
Using the HDD PortaCruiser Duplicator Mode Advanced Setup Menu: 8-01 ReScan Bus Delay This function is used to set the time interval between the system’s re-scans of all connected HDD devices. Press and hold ESC for about 3 seconds to access the “Adv Setup” menu. The following screen will be displayed. 8. Adv Setup RESET ESC MUTE Use the arrow buttons (or) to scroll to “ReScan Bus Delay”. The following screen will be displayed.
Using the HDD PortaCruiser Duplicator Mode Advanced Setup Menu: 8-02 Read Error Skip This function can be enabled to ignore any error that occurs during copying. By default, the HDD PortaCruiser will halt the copy operation when it encounters an unreadable area of the source hard disk and display an error. Enabling this option will ignore any bad sectors on the source hard drive by skipping over them. Warning: Setting this function to “On” may result in corrupt data on copied hard drives.
Using the HDD PortaCruiser Duplicator Mode Advanced Setup Menu: 8-03 Quick Erase HDD This function is used to erase the data of a hard drive quickly. Warning: Backup any important data before using this function. Press and hold ESC for about three seconds to access the “Adv Setup” menu. The following screen will be displayed. 8. Adv Setup ESC MUTE ENT RESET ESC MUTE Press ENT, and you will be prompted whether you wish to proceed. Use the arrow keys () to select “Yes” or “No”.
Using the HDD PortaCruiser Duplicator Mode Advanced Setup Menu: 8-04 H/W Diagnostic This function is used to test various components of the HDD PortaCruiser. Press and hold ESC for about three seconds to access the “Adv Setup” menu. The following screen will be displayed. 8. Adv Setup RESET ESC MUTE Use the arrow buttons (or) to select “H/W Diagnostic”. The following screen will be displayed. 8-04. Adv Setup H/W Diagnostic 3. ENT 2. 1.
Using the HDD PortaCruiser Duplicator Mode Advanced Setup Menu: 8-05 Load Default This function is used to restore all factory settings of the HDD PortaCruiser back to their original defaults. Press and hold ESC for about three seconds to access the “Adv Setup” menu. The following screen will be displayed. 8. Adv Setup RESET ESC MUTE Use the arrow buttons (or) to select “Load Default”. The following screen will be displayed. 8-05.
Using the HDD PortaCruiser Duplicator Mode Advanced Setup Menu: 8-06 Link Option This function is used to decide if “7.USB RAID Mode” will be displayed in the display panel. Press and hold ESC for about three seconds to access the “Adv Setup” menu. The following screen will be displayed. 8. Adv Setup RESET ESC MUTE Use the arrow buttons (or) to select “Link Option”. The following screen will be displayed. 8-06.
Using the HDD PortaCruiser Duplicator Mode Advanced Setup Menu: 8-07 USB Auto-Link This function sets the HDD PortaCruiser to immediately enter Dual Disk RAID Controller (USB) mode on startup. This allows direct control of the unit from a PC. Press and hold ESC for about three seconds to access the “Adv Setup” menu. The following screen will be displayed. 8. Adv Setup ESC MUTE ENT RESET ESC MUTE Press ENT to display the available options. The default is “OFF”.
Using the HDD PortaCruiser Duplicator Mode Advanced Setup Menu: 8-08 Copy HPA If the source hard disk contains a Host Protected Area (HPA), this option allows you to choose whether or not to copy data within the HPA. Press and hold ESC for about three seconds to access the “Adv Setup” menu. The following screen will be displayed. 8. Adv Setup ESC MUTE ENT RESET ESC MUTE Press ENT to display the current configuration setting. A screen similar to the following will be displayed.
Using the HDD PortaCruiser Dual Disk RAID Controller (USB) Mode Main Menu: Duplicator Mode Option This function allows you to switch to the Duplicator mode. Use the arrow buttons (or) to select “Duplicator Mode”. The following screen will be displayed. Duplicator Mode RESET ESC MUTE Press ENT to select. The system will prompt you to confirm that you wish to change modes. Back to Stand Alone Mode? No ENT RESET ESC MUTE Use the arrow buttons () to select “Yes” and press ENT to select.
Using the HDD PortaCruiser Dual Disk RAID Controller (USB) Mode Main Menu: Information Option This function displays information about the HDD PortaCruiser and any attached hard drives. Use the arrow buttons (or) to select “Information”. The following screen will be displayed. Information RESET ESC MUTE Press ENT to select. The system will prompt you to choose the desired device. Information System 3. ENT 2. 1.
Using the HDD PortaCruiser Dual Disk RAID Controller (USB) Mode Main Menu: Change RAID Mode Option This function allows you to choose the RAID mode for the Dual Disk RAID Controller. Use the arrow buttons (or) to select “Change RAID Mode”. The following screen will be displayed. Change RAID Mode RESET ESC MUTE Press ENT to select. The system will prompt you to choose the desired mode.
Using the HDD PortaCruiser Dual Disk RAID Controller (USB) Mode Main Menu: Change RAID Mode Option Changing to Normal Mode - continued Use the arrow buttons () to select “Yes” and press ENT to select. The new main screen will be shown which displays the new mode and capacity. USB Mode: Normal D1:HDD D2:HDD 6. ENT RESET ESC MUTE Changing to JBOD Mode The system will prompt you to confirm that you wish to change modes.
Using the HDD PortaCruiser Changing to RAID0 Mode The system will prompt you to confirm that you wish to change modes. Change to RAID0 Mode? No RESET ESC MUTE Use the arrow buttons (or) to select “Yes” and press ENT to select. The system will then prompt you to confirm that you understand data may be lost. Data May Be Lost Continue? No ENT RESET ESC MUTE Use the arrow buttons () to select “Yes” and press ENT to select.
Using the HDD PortaCruiser Dual Disk RAID Controller (USB) Mode Main Menu: Change RAID Mode Option Changing to RAID1 Mode - continued Use the arrow buttons () to select “Yes” and press ENT to select. The system will then ask you whether or not you want to preserve the Source drive’s data. Keep Source Data? No RESET ESC MUTE If you would like to keep the Source drive’s data, use the arrow buttons () to select “Yes” and press ENT to select.
Using the HDD PortaCruiser Dual Disk RAID Controller (USB) Mode – Normal Only Main Menu: D1 Drive Select Mode Option This function allows you to enable or disable the Source drive. Use the arrow buttons (or) to select “D1 Drive Select”. The following screen will be displayed. D1 Drive Select RESET ESC MUTE Press ENT to select. The system will prompt you to choose the desired mode. D1 Drive Select HDD 3. ENT 2. 1.
Using the HDD PortaCruiser Dual Disk RAID Controller (USB) Mode – JBOD Only Main Menu: Initial JBOD Option This function allows you to initialize your disks for JBOD. Use the arrow buttons (or) to select “Initial JBOD”. The following screen will be displayed. Initial JBOD ESC MUTE ENT RESET ESC MUTE Use the arrow buttons (or) to select “Yes” and press ENT to select. The new main screen will be shown which displays the new mode and capacity. USB Mode: JBOD RAID Cap: 228.
Using the HDD PortaCruiser Dual Disk RAID Controller (USB) Mode – RAID0 Only Main Menu: Initial RAID0 Option This function allows you to initialize your disks for RAID0. Use the arrow buttons (or) to select “Initial RAID0”. The following screen will be displayed. Initial RAID0 RESET ESC MUTE Press ENT to select. The system will then prompt you to confirm that you understand data may be lost.
Using the HDD PortaCruiser Dual Disk RAID Controller (USB) Mode – RAID1 Only Main Menu: Initial RAID1 Option This function allows you to initialize your disks for RAID1. Use the arrow buttons (or) to select “Initial RAID1”. The following screen will be displayed. Initial RAID1 ESC MUTE ENT RESET ESC MUTE Use the arrow buttons (or) to select “Yes” and press ENT to select. The new main screen will be shown which displays the new mode and capacity. USB Mode: RAID1 RAID Cap: 228.
Specifications Power Requirements Voltage: 100-240V Current: 50-60Hz Dimensions (depth x width x height) D: 150mm W: 116mm H: 27mm (5.9” x 4.6” x 1.0”) Weight 235g (0.5 Lbs.) Note: Specifications subject to change without notice. Troubleshooting If your HDD PortaCruiser is not performing as expected, refer to the symptoms below, and follow the suggested corrective action.
Technical Support After reading this User Guide, if you need additional assistance with this product, please contact Aleratec Technical Support. Our technical staff will be happy to assist you, but they may need your help to better assist you. Contacting support without all the necessary information can be both time consuming and frustrating. Therefore, please try to have the following information ready before calling: 1. Part Number - the part number is located on the bottom of the HDD PortaCruiser. 2.
Service and Support Aleratec, Inc., Limited Warranty This Limited Warranty covers defects encountered in the course of normal use of this product and does not apply to damage from improper use, abuse, accidents, unauthorized service, or inadequate packaging when shipping the product to Aleratec, Inc. Aleratec, Inc. provides the following limited warranty for this product only if the product was originally purchased for use, not re-sale, from Aleratec, Inc., an Aleratec, Inc.
Service and Support Please Note: This Warranty is valid only within the United States and Puerto Rico, and applies only to products that are new and unopened on the date of purchase. For areas outside the United States and Puerto Rico, contact the authorized dealer from whom you purchased this product to determine which warranty, if any, applies. THIS LIMITED WARRANTY CONSTITUTES YOUR SOLE AND EXCLUSIVE REMEDY, AND THE SOLE AND EXCLUSIVE LIABILITY OF ALERATEC, INC.
Service and Support To Obtain Warranty Service: You must ship your subsystem to the authorized dealer where your subsystem was purchased within the one year warranty period and no later than thirty days after discovery of claimed defect, whichever occurs first. In either case, you must provide proof of original purchase before any warranty service can be performed.
Technical Support FAX Back Form Aleratec, Inc. Technical Support Fax Back Form Please record the following information to help expedite any warranty claim: Model No.:_ _________________ Serial No.
Notes: www.aleratec.
Document Number: 9399065_ENG_Rev. C Specifications subject to change without notice. Copyright © 2009 Aleratec, Inc. 9851 Owensmouth Avenue Chatsworth, CA 91311 U.S.A. www.aleratec.