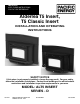
IMPORTANT: KEEP THESE INSTRUCTIONS FOR FUTURE REFERENCE. Alderlea T5 Insert, T5 Classic Insert INSTALLATION AND OPERATING INSTRUCTIONS SAFETY NOTICE If this stove is not properly installed, a house fire may result. For your safety, follow the installation instructions. Contact local building or fire officials about restrictions and installation inspection requirements in your area. MODEL: ALT5 INSERT SERIES - D 150714-24 ©PACIFIC ENERGY FIREPLACE PRODUCTS LTD. - 2014 ALT5.ASCINSB 5055.
Contents Maintenance Checks.......................................................................... 3 Maintenance ...................................................................................... 4 Baffle Removal ........................................................................... 4 Creosote ............................................................................................ 5 Formation and Need for Removal .............................................. 5 Chimney Fires ................
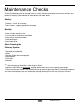
Maintenance Checks Check the following parts for damage such as cracks, excessive corrosion, burned out sections and excessive warping: (See website for descriptions and more detail) Weekly: - Firebrick - Visual, for cracking. - Door Gasket - sagging, placement, damage. Monthly - Brick rail tabs and brick rails. - Air riser tube in the back of the firebox. - Back side of airwash chamber. - Baffle locking pin. - Boost tube cover. When Cleaning the Chimney System: - Top baffle board/blanket. - Baffle.
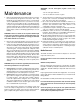
WARNING: carefully. Maintenance 1. Burn wood only, dry and well seasoned. The denser or heavier the wood when dry, the greater its heat value. This is why hardwoods are generally preferred. Green or wet wood will cause a rapid buildup of creosote. If you feel it is necessary to burn wet or unseasoned wood, do so only with the air inlet set open enough to maintain a good strong fire and fairly high chimney temperatures. Do not attempt to burn overnight using green or wet wood.
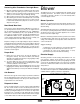
Creosote Formation and Need for Removal When wood is burned slowly, it produces tar and other organic vapours, which combine with expelled moisture to form creosote. The creosote vapours condense in the relatively cool chimney flue of a slow burning fire. As a result, creosote residue accumulates on the flue lining. When ignited, this creosote makes an extremely hot fire.
Operation Wood Selection This heater is designed to burn natural wood only. Higher efficiency and lower emissions generally result when burning air-dried seasoned hardwoods, as compared to softwoods or too green or freshly cut hardwoods. Wood should be properly air dried (seasoned) for six months or more. Wet or undried wood will cause the fire to smoulder and produce large amounts of creosote. Wet wood also produces very little heat and tends to go out often.
Restarting After Extended or Overnight Burns 1) Open door and rake hot embers towards the front of the heater. Add a couple of dry, split logs on top of embers, close door. 2) Adjust air control to “H” (high) position (pushed to the far left) and in just a few minutes, logs should begin burning. 3) After wood has charred, reset air control to desired setting.
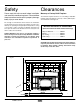
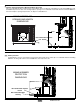
Safety Clearances Please read this entire manual before installation Masonry or Factory Built Fireplace and use of this wood burning insert. Failure to follow The minimum required clearances to surrounding combustible these instructions could result in property damage, materials when installed into a masonry or factory built fireplace bodily injury or even death. are listed below and in figure #1. We strongly recommend that smoke detectors be installed.
* Fireplace hearth requirements: (Measured without the insert) The non-combustible fireplace hearth must be raised 50mm above an adjacent combustible floor and extend 400mm in front and 200mm beyond each side of the existing fireplace opening. A non-combustible hearth that extends a minimum 600mm in front of the fireplace opening may be flush to an adjacent combustible floor.
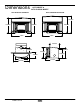
Dimensions ALT5 INSERT & ALT5 CLASSIC INSERT WITH REGULAR SURROUND WITH OVERSIZED SURROUND 867mm 772mm 746mm 841mm 1.08m 1.08m 448mm 241mm 530mm 546mm 448mm 270mm 606mm 854mm 10 ©PACIFIC ENERGY FIREPLACE PRODUCTS LTD. 721mm ALT5.
Installation Warning: Under no circumstances is this heater to be installed in a makeshift or “temporary” manner. It may be fired only after the stove is installed properly. DO NOT ATTEMPT TO CONNECT THIS HEATER TO ANY AIR DISTRIBUTION DUCT. Fireplace Specifications Your fireplace is required to have the following minimum sizes: WIDTH (at front) 622mm WIDTH (at rear) 610 mm HEIGHT 533 mm DEPTH 464 mm Chimney height 4.
be removed from the smoke shelf and adjacent damper frame if necessary to accommodate a chimney liner, provided that their removal will not weaken the structure of the fireplace and chimney, and will not reduce protection for combustible materials to less than that required by the National Building Code. The Insert must be installed in accordance with local and or national building codes. The two methods of flue connection that are acceptable in most areas are: Fig.
Chimney and Connector WARNING: INSTALL CHIMNEY AND ALL COMPONENTS OF CHIMNEY SYSTEM ACCORDING TO CHIMNEY MANUFACTURER’S INSTRUCTIONS. Connect to a listed chimney complying with the requirements of AS/NZS2918/2001 and a chimney suitable for use with solid fuel that is lined and in good condition and meets local building codes. The chimney flue size should be the same as the stove outlet for optimal performance. Reducing or increasing the flue size may adversely affect stove performance.
Fig. # 6 two ways: 1) Outside air (O/A) supply: Remove cover from ash clean out in existing fireplace. Place a rodent screen in place of the cover. Install the Insert as described in the installation section, making sure not to cover the opening of the air inlet. When installation is complete, seal surround to fireplace and anywhere else air may enter. This will ensure combustion air is drawn from outside the house and into the 229mm x 51mm intake at the lower rear of the appliance.
2) Remove Top(A) and Shields(B). (Fig. #8) Fig. # 10 3) Remove Surround Top and Sides from Packaging. F 4) Remove the surround brackets from the stove(Fig. #9) and attach to the Surround sides as shown in Fig. #10. Use the bolts and washers in the mounting hardware kit found with the Surround Top. (Fig #10) 5) Lay Surround sides flat on floor and align with Surround Top(H). Square the surround by aligning edges(I) on each side. Fasten bolts (J) to attach bracket.(Fig.
sliding it under the surround top, and settling it over the fan shields. (Fig #14). 9) Be sure to engage fan shield tops in the slots on the underside of the cast decorative top. (Fig. #15) Fig. # 15 SLOT Fan Removal/Installation 1) Remove Decorative Top and both Fan shields as specified in “Fan Speed Control Relocation” section on page 11. Fig. # 13 AIR INLET SURROUND SIDE 2) Disconnect fan wires as shown in Fig #16 from appropriate fan that is being replaced. Remove Thermal switch if needed.
side by following the instructions below. To make this as easy as possible, it is suggested that this be done prior to fitting the surround and installation into the fireplace: 1) Remove the decorative top by tilting up slighty and lifting away from the unit. (Fig #18) Fig. # 22 Fig. # 18 5) Loosen the screws on the wire support tabs and turn to remove the wires (Fig #23). BOLTS 2) Lift up on each fan shield and remove. Set aside to prevent damage. (Fig #19) Fig. # 23 SCREWS Fig.
is important to prevent damage to wires. Surround Assembly and Installation 1) Remove crate and all plastic packaging. Fig. # 25 SPEED CONTROL ASHLIP BRACKET Fig. # 28 8) Route cable from speed control to fan and reattach wire support tabs on the underside of the ash lip. Note wire positions. (Fig.26 & Fig.27) 9) Reconnect the wires to the fans (Fig.28) and re-attach thermal snap switch (Fig.29). Refit ash lip, sides and top.
Replacement Parts, Alderlea T5 (WHEN ORDERING, INCLUDE PART NUMBER WITH DESCRIPTION) ITEM DESCRIPTION PART NO. 1............Regular Surround ............................. ALT5.SMBKA ..............Surround, Black Enamel...................... ALT5.PBKA ..............Surround, Majolica Brown Enamel ...... ALT5.PBNA ..............Oversized Surround .................... ALT5.SMBKOSA ..............O/S Surround, Black Enamel ......... ALT5.PBKOSA ..............O/S Surround, Majolica Brown Enamel ..................
Replacement Parts, Alderlea T5 Classic (WHEN ORDERING, INCLUDE PART NUMBER WITH DESCRIPTION) ITEM DESCRIPTION PART NO. 1............Surround, Black Enamel....................ALT5.SPBKA ..............Surround, Majolica Brown Enamel ....ALT5.SPBNA ..............O/S Surround, Black Enamel .......ALT5.SPBKOSA ..............O/S Surround, Majolica Brown Enamel .................. ALT5.SPBNOSA 2............Fan Shield, Left Black Enamel .... ALT5.P4728BKA ..............Fan Shield, Left Majolica Brown Enamel ........
Troubleshooting Problem Cause Cure Excessive Creosote Buildup 1) Wood is too wet - Use dry wood 2) Turning down air control too soon - Do not turn down until: a) there is a good bed of coals b) the wood is charred 3) Draft too low - Improper chimney height and/or diameter - Chimney plugged or restricted, check flue - Provide outside air for combustion Glass is Dirty Low Heat Output 1) See 1, 2, and 3 above 2) Door Gasket leakage - Replace gasket - Check latch 1) Wood is wet - Use dry wood 2)
Firebrick Installation Alderlea T5 Insert This package contains 18 full-size firebricks, as well as 1 cut-size brick. With the heater in the upright position, install firebricks as follows: - Place firebricks on the bottom of the heater first. Total of 7 full-size and 1cut brick. - Next, install the side firebricks, 4 full-size each side. - Lastly, install 3 full-size firebricks against the rear wall.
Label PACIFIC ENERGY FIREPLACE PRODUCTS LTD. 2975 ALLENBY RD., DUNCAN, BC V9L 6V8 Model: ALDERLEA T5 Series: D Type: FIREPLACE INSERT Tested by: HRL TECHNOLOGY PTY LTD TRAMWAY ROAD, MORWELL, VICTORIA Tested to: AS/NZS 4013:1999 Test report no: HCMG/13/048 1/OCT/2013 MAXIMUM AVERAGE HEAT OUTPUT BURNING HARDWOOD - 10.
PACIFIC ENERGY FIREPLACE PRODUCTS LTD. www.pacificenergy.net Technical Support: 1-250-748-1184 2975 Allenby Rd., Duncan, B.C. V9L 6V8 Printed in Canada ©PACIFIC ENERGY FIREPLACE PRODUCTS LTD.