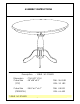
ASSEMBLY INSTRUCTIONS Description Dimension Cube Size (TOP) : TABLE 36" ROUND : ∅36”x29”1/2.H : 38”x38”x4.9” Cube Size : 24.8”x6.7”x6.7” (PEDESTAL) TABLE 36" ROUND -1- NW: 26.4 LBS GW: 33 LBS NW: 4.4 LBS GW: 6.
BEFORE ASSEMBLY Thank you for purchasing this quality product. This product has been designed for easy assembly and constructed for durability. Please take the time to read and follow the assembly instructions carefully. Be sure to check all packing material carefully for small parts which may have come loose inside the carton during shipment. Please separate, identify, and count all parts and metal hardware. Compare with part list to be sure all parts are present.
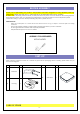
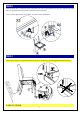
STEP 1 Attach legs (B) to the pedestal (C) with washers (1), (2) and nuts (3). Tighten with wrench (4). B x4 1 2 3 4 C STEP 2 Put the cross piece (D) on top of the pedestal, and attach with bolts (7), washers (5), (6). Tighten with Allen key (8).
STEP 3 Carefully place the cross frame (from Step 2) on bottom side of the table top (A), attach with bolts (7), washers (9), (6). Tighten with Allen key (8).
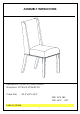
ASSEMBLY INSTRUCTIONS Description: PARSON CHAIR Product Dimension: 25”Wx19.25"Dx40.5"H Cube Size : 42.2”x20”x18.5” NW: 39.6 LBS GW: 46.
BEFORE ASSEMBLY Thank you for purchasing our product. This product has been designed for easy assembly and long lasting use. Please take the time to read and follow the assembly instructions carefully Be sure to check all packing material carefully for small parts which may have come loose inside the carton during shipment. Please separate, identify, and count all parts and metal hardware. Compare with part list to be sure all parts are present.
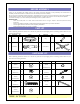
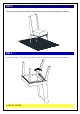
HARDWARE LIST When unpacking, please be careful not to discard any parts with the packaging. Before continuing, please make sure you have all of the following hardware: NO Description Qty Sketch NO Long bolt 1 (M6x60mm) 11 4 (∅6.5x9) Flat Washer Allen Key 6 11 (∅6.5x19) Dowel (∅10x30) 4 Lock Washer 3 (M6x40mm) 7 Sketch (M6x55mm) Short bolt 5 Qty Medium bolt 2 4 3 Description 1 (4mm) 1 STEP 1 Remove bottom out seat frame (B ) as shown below.
STEP 2 Attach frame (B) to the back (A) by using bolts (2) and (3) and washers (4) and (5). Tighten with Allen Key (6). Squeeze frame seat and Chair back when assembly Note: DO NOT tighten any of the bolts, until the chair is assembled. STEP 3 Attach front legs (C) to the seat frame. Use bolts (1), washers (4) and (5).Tighten with Allen Key (6). . o ly. e tw ed.
STEP 4 Put the chair on a flat level surface to make sure the chair is level and then tighten the all bolts. STEP 5 Attach the bottom cover (removed on step 1) back on the seat frame and finish the assembly.