
User`s manual


Alcorn McBride Digital Video Machine DVM-7400 User’s Manual Rev 1.5
60
GPS sensors need a
“line-of-sight” to the
sky in order to receive
strong satellite
signals. For the sake
of reliability, operation
indoors or in long
underground tunnels
is not recommended.
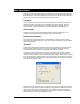
6. You’re now ready to begin entering GPS trigger points. Get in your vehicle!
Place the GPS sensor on the roof (or other mounting location recommended
by the GPS sensor manufacturer). Click on the first entry in your GPS
playlist. Drive to the first desired trigger point and hit the Space Bar when
you reach it. GPS Builder will record the coordinate and advance to the next
line. After this point all you need to do is hit the Space Bar each time you
want to log another coordinate.
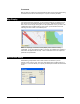
7. Drive to the next trigger point and hit the Space Bar again. GPS Builder will
record the next coordinate. Keep doing this until all of your coordinates have
been entered.
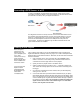
8. Click on File…Save…to save your file. Make a backup!
9. Copy the playlist to the Compact Flash card you’re going to use in the DVM,
along with all of the videos referenced in the playlist.
Proceed to the next section to learn how to use this playlist in your DVM.
Configuring the DVM for GPS Operation
Now that you have your playlist file with the GPS coordinates, you can use it in the
DVM. Here’s how.
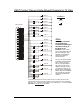
First, make sure that the DVM GPS Mode DIP switch is in the OFF (UP) position. It’s
DIP Switch #2 on the 2-key DIP switch block.
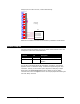
Connect the Alcorn McBride GPS harness (comes with the DVM GPS kit) to the DB-
37 port and the RS-232 port of the DVM.
Connect the GPS sensor to the mini DIN connector of the GPS harness.