
User`s guide


Networking Your DVM4 59
8. Unless you are using Windows XP or Windows 2000, your computer will
require you to reboot to change the settings. Click the Yes button to do so.
9. Once your computer has finished rebooting, launch a Web Browser
(Netscape, Internet Explorer, etc.).
10. In the address box, type “http://” followed by the IP address of your DVM4.
If this is your first time connecting to your DVM4, or you have not changed
the IP address, the correct entry should be:
http://192.168.0.254
11. Upon hitting the Enter key on your keyboard, you should be presented with
the introductory WebPage from your DVM4.
12. When you are finished configuring your DVM4, follow steps 3-8 to restore
your computer’s TCP/IP settings.
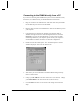
Note: If you are unable to connect to the DVM4 over Ethernet after following
the above procedure, the problem may be a result of internal conflicts in
Windows TCP/IP settings. To avoid this Windows problem, right-click on the
Network Neighborhood icon and select Properties. Select each reference to
TCP/IP and click Properties. Write down the old settings and then delete all
references to TCP/IP by highlighting them individually and selecting Remove.
Then click Add, select Protocol and click Add. Select Microsoft on the left
side of the Select Network Protocol dialog. Now select TCP/IP from the right
side of the Select Network Protocol dialog and press OK. Windows may ask
you to insert the Windows installation disk(s) to complete the process. This
procedure will eliminate any conflicts with other TCP/IP entries in Windows.
You will need to perform the above procedure again to connect to the DVM4.