Speed Touch 510 Setup and User's Guide 3EC 36511 AAAA TCZZA Ed.
Status Change Note Released BD F aa 39812 Short Title CD-UG AST510 All rights reserved. Passing on and copying of this document, use and communication of its contents not permitted without written authorization from Alcatel. 2 / 34 3EC 36511 AAAA TCZZA Ed.
Contents Contents 1 Alcatel Speed Touch 510 Installation . . . . . . . . . . . . . . . . . . . . . . . . . . . . . . . . . . 1.1 1.2 1.3 Get Acquainted with the Alcatel Speed Touch 510 . . . . . . . . . . . . . . . . . . Alcatel Speed Touch 510 Wiring . . . . . . . . . . . . . . . . . . . . . . . . . . . . . . . . . Alcatel Speed Touch 510 Configuration Setup . . . . . . . . . . . . . . . . . . . . . . 1.3.1 Configuration Setup for MS Windows OSs . . . . . . . . . . . . . . . 1.3.
Contents 4 / 34 3EC 36511 AAAA TCZZA Ed.
1 Alcatel Speed Touch 510 Installation 1 Alcatel Speed Touch 510 Installation Introduction In this User's Guide Terminology Safety instructions Documentation and software updates 3EC 36511 AAAA TCZZA Ed. 02 Thank you for purchasing the Alcatel Speed Touch510 ADSL router ! With the Alcatel Speed Touch510 residential Asymmetric Digital Subscriber Line (ADSL) router, surfing the Internet will become a whole new experience.
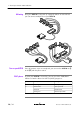
1 Alcatel Speed Touch 510 Installation 1.1 Get Acquainted with the Alcatel Speed Touch 510 Delivery check Check your AST510 package for the following items: The Alcatel Speed Touch510 1 Power supply adapter with connecting cable Cat.5 straight through Ethernet cable (RJ45/RJ45) DSL cable (RJ11/RJ11, RJ14/RJ14) The AST510 Setup CD rom (with included User's Guide). Damaged or missing items In the event of damaged or missing items, contact your local product dealer for further instructions.
1 Alcatel Speed Touch 510 Installation Front panel LEDs The AST510 is equipped with 5 LEDs on its front panel, indicating the state of the device: Indicator Description p Name Color State LAN Green Flashing Data is flowing from/to the port(s). Off No activity on Ethernet port(s). Flashing ATM cells are being sent over the DSL line. Off No transmission activity. Flashing ATM cells are being received via the DSL line. Off No reception activity. Flashing Initialization of the DSL line.
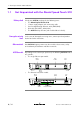
1 Alcatel Speed Touch 510 Installation 1.2 Alcatel Speed Touch 510 Wiring Two AST510 router variants Two ADSL variants of Alcatel's Speed Touch510 routers exist: The Alcatel Speed Touch510 : The ADSL/POTS variant connecting to an analog POTS(*) line The Alcatel Speed Touch510i : The ADSL/ISDN variant connecting to a digital ISDN(**) line.
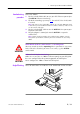
1 Alcatel Speed Touch 510 Installation Standard wiring procedure Proceed as follows: 1. Use the included LAN cable to wire your PC's Ethernet port to (one of) AST510's Ethernet interface(s). 2. For local networking, repeat step 1. for each PC. Use a hub/switch if needed. Note: You may use the (switchable) uplink" or cascade" MDI port which is sometimes present on Ethernet hubs or switches. However, make sure to use the correct cable type. 3. 4.
1 Alcatel Speed Touch 510 Installation LAN wiring Turn on your AST510 POST phases 10 / 34 Using the AST510's hub/switch (if equipped) and/or an external hub you can connect multiple PCs to your AST510: Once all previous steps are completed, you can turn the AST510 on (I) or off (O) with the power switch. As soon your AST510 is turned on, you can check the PWR/Alarm" LED to see how the Power On Self Test (POST) progresses.
1 Alcatel Speed Touch 510 Installation 1.3 Alcatel Speed Touch 510 Configuration Setup Internet connectivity As soon as the AST510 is wired and powered as described in section 1.2 you are able to prepare the AST510 for Internet connectivity. What you need from your SP You must have a user account at an Internet Service Provider (ISP) for Internet access: For this user account, it will provide you: A user name (logon ID) A password.
1 Alcatel Speed Touch 510 Installation 1.3.1 Configuration Setup for MS Windows OSs Microsoft Windows TCP/IP The AST510 Setup Wizard The detection procedure One of the following OSs must be readily installed on your PC(s): Microsoft Windows 95 Microsoft Windows 98 or 98SE Microsoft Windows ME Microsoft Windows NT4.0 Microsoft Windows 2000 Microsoft Windows XP. You may need the Windows installation CD rom during installation. Make sure that TCP/IP (*) is readily installed on your PC(s).
1 Alcatel Speed Touch 510 Installation 3. The Welcome to the Alcatel Speed Touch Setup Wizard window pops up: Click 4. 5. 3EC 36511 AAAA TCZZA Ed. 02 to proceed. The Software License Agreement for Alcatel Speed Touch window pops up: Click to accept the terms of the agreement and to continue with the Setup wizard. The Setup wizard will continue with searching the AST510 on the network.
1 Alcatel Speed Touch 510 Installation 6. The setup wizard should find your AST510 device on the local network. This is indicated by following window: Note: In case the Setup wizard does not find any AST510 on the network an error window pops up.
1 Alcatel Speed Touch 510 Installation 2. The following window invites you to select the appropriate connection profile for your Internet connectivity: Select the connection profile and click 3. Note: In case the Service Provider included a separate disk with a to navigate to the dedicated connection profile, click location of the appropriate connection profile file. Subsequent screens will guide you through the configuration setup of both your AST510 and/or your PC.
1 Alcatel Speed Touch 510 Installation 1.3.2 Configuration Setup for other OSs Supported OSs As the AST510 is OS independent, this configuration setup can be used by any computer system Note: In fact the following procedure may equally be used on MS Windows OSs for configuring the AST510. TCP/IP Procedure Make sure that TCP/IP is installed on your computer(s). Configure every PC with a static Net10 private IP address, e.g. 10.0.0.1. Make sure though NOT to use the 10.0.0.
1 Alcatel Speed Touch 510 Installation 1.4 Alcatel Speed Touch 510 Internet Connectivity Surfing the Internet As soon as the AST510 and the PC(s) are configured according the previous section, you are able to establish connectivity to the Internet. Access methods The AST510 supports two access methods: Direct access Once initial configuration is done, continuous and immediate access is available via the DSL line. Dial in access Access must be explicitly established, e.g.
1 Alcatel Speed Touch 510 Installation AST510's embedded Dial in application Via the AST510 user friendly web interface you are able to establish dial in connections, pre configured by the AST510 Setup wizard configuration profile or via upload of the appropriate configuration file. Note: The following provides only an example on how you can establish your Internet connection. The actual implementation depends on the preferences of your Service Provider. To open a dial in connection: 1.
2 Alcatel Speed Touch Web Interface 2 Alcatel Speed Touch Web Interface Introduction The AST510 comes with integrated local configuration capabilities. The local configuration via the AST510 web interface, is based on the HTTP server/Web browser concept. It allows configuration of your AST510 via a Web browser through HTML pages from any local PC attached to the Ethernet interface(s).
2 Alcatel Speed Touch Web Interface Procedure Result 1. 2. Start the web browser on your PC or computer. Contact the AST510 by entering its IP address (in most cases 10.0.0.138) in the URL field 3. If a system password was set an authentication window will pop up. Enter user name and System password in the appropriate fields. As a result the Configuration & Line Status page pops up: From now on the AST510 acts as a Web server sending HTML pages/forms at your request.
2 Alcatel Speed Touch Web Interface Topic links On each of the AST510 web pages a set of Topic links can be found in the left side frame. Each of these links leads you to a configuration aspect of the AST510. The following table lists all Topic links: Click ... To ... Status Overview the current configuration profile. Overview the current ADSL line status. Connect Establish dial in connections. Overview the AST510 connection information.
2 Alcatel Speed Touch Web Interface Status Clicking this link pops up the Configuration & Line Status page. This page is also the AST510 home"page. It allows to: Overview which configuration profile/file is currently loaded, including information for which Region and ISP this configuration applies: Connect Overview the current physical status of the ADSL line: Clicking this button pops up the Connections page. This page allows to: Establish dial in connections, if applicable: See section 1.
2 Alcatel Speed Touch Web Interface System Clicking this button pops up the System Setup page. This page allows to: To configure a System password to restrict access to the AST510: Upgrade 3EC 36511 AAAA TCZZA Ed. 02 Alcatel highly advises you to configure a System password. To protect the AST510 you should change the System password on a regular basis. However, never use an obvious password as your name, birth date, etc.
2 Alcatel Speed Touch Web Interface Therefore: 1. Make sure no passive software resides on the AST510. If needed click Remove passive to remove a passive software version. 2. Browse to the location where the AST510 upgrade system software resides via . Note: Upgrade software may be made available from your Service Provider. Contact your Service Provider for more information. 3. Click Upload. As a result the AST510 upgrade system software name will appear in the 'Passive software version' field.
2 Alcatel Speed Touch Web Interface Routing Clicking this button pops up the IP Address and Routing Tables page. This page allows to: Overview or add/delete specific IP address entries for AST510's interfaces: You can add a static IP address for one of AST510's interfaces by clicking New. Specify the IP address, (sub)netmask, whether NAPT should be applied on this address or not, and select the interface for which the IP address applies (use eth0 for the Ethernet interface).
2 Alcatel Speed Touch Web Interface NAPT Clicking this button pops up the Network Address and Port Translation (NAPT) page. This page allows to: Overview or add/delete specific static NAPT entries: You can add static NAPT entries by clicking New. Specify the outside address and inside address for the entry as well as the protocol and port on which the entry applies. In case the NAPT entry should be applied on a dynamically assigned local peer IP address of a connection, you should specify 0.0.0.
2 Alcatel Speed Touch Web Interface DHCP Clicking this button pops up the Dynamic Host Configuration Protocol (DHCP) page. This page allows to: Enable/disable the AST510 (Auto)DHCP server: The AST510 features a DHCP server which allows the PCs/computers on your local network to automatically obtain an IP address (select DHCP server). In case no DHCP is used on your local network, the AST510 DHCP server can be disabled (select No DHCP).
2 Alcatel Speed Touch Web Interface Overview the current AST510 DHCP client status : Via this table you can also manually add static AST510 DHCP client entries for specific interfaces, if applicable. Note: Do not forget to save your changes to persistent memory by clicking Save all. DNS Clicking this button pops up the Dynamic Name System (DNS) page.
AppendixA AppendixA Introduction Configuration problems Trouble solving table Troubleshooting and Specifications Troubleshooting and Specifications This appendix provides information on how to identify and correct some common problems you may encounter when using and configuring the AST510. If the following troubleshooting tips have not resolved the problem contact the company from which you purchased the AST510 for assistance.
AppendixA Troubleshooting and Specifications How to perform a hardware reset to factory defaults Proceed as follows: 1. Make sure your AST510 is powered on. 2. Use a pencil to press the push button at the back of the AST510 until the all front LEDs start flashing. 3. Release the button. You will notice that the AST510 reboots. The AST510 will come online with factory default settings. 4. As a reset to factory default settings also includes a deletion of the configuration profile settings.
AppendixB AppendixB Read all instructions Directive Trademarks CAUTION WARNING 3EC 36511 AAAA TCZZA Ed. 02 Safety and Agency Regulatory Notices Safety and Agency Regulatory Notices Follow all warnings and instructions marked on the product.
AppendixB B.1 Safety and Agency Regulatory Notices Safety Instructions Climatic conditions Cleaning Water and moisture Power supply adapter The Speed Touch equipment is intended for: In house stationary desktop use; the maximum ambient temperature may not exceed 40ºC (104ºF). It must not be mounted in a location exposed to direct or excessive solar and/or heat radiation. It must not be exposed to heat trap conditions and must not be subjected to water or condensation.
AppendixB Overloading Safety and Agency Regulatory Notices Do not overload wall (mains) outlets and extension cords as this increases the risk of fire or electric shock. Servicing To reduce the risk of electric shock, do not disassemble this product. None of its internal parts are user replaceable; therefore, there is no reason to access the interior. Opening or removing covers may expose you to dangerous voltages. Incorrect reassembly could cause electric shock if the appliance is subsequently used.
AppendixB B.2 Safety and Agency Regulatory Notices Safety and Compliancy Statements Radio Frequency Interference Statement Notification of Canadian RF Interference Statements 34 / 34 This device has been tested and found to comply with the limits for a Class B digital device, pursuant to Part 15 of the FCC Rules. These limits are designed to provide reasonable protection against such interference in a residential installation. This equipment generates, uses and can radiate radio frequency energy.