Alcatel Mobile Reflexes™ Alcatel OmniPCX Office OK ARCHITECTS OF AN INTERNET WORLD
Precautions for use howtoc This approved DECT telephone is intended to be used with an ALCATEL cordless PBX. The following conditions must be respected, notably concerning the use of radioelectric frequencies: 2 • DECT equipment can only be used to establish links between fixed points if these links are temporary and the equivalent isotropically radiated power at the antenna is less than 250 mW.
Contents Toc 1. Precautions for use . . . . . . . . . . . . . . . . . . . . . . 2 Your telephone . . . . . . . . . . . . . . . . . . . . . . . . . 4 Display and corresponding icons . . . . . . . . . . . 6 Status icons. MENU icons. Call icons. How to read this guide. 2. Getting started . . . . . . . . . . . . . . . . . . . . . . . . . 10 Charging the telephone. Switching on your telephone. Accessing the MENU and navigating. Accessories. 3. Using your telephone . . . . . . . . . . . . . . . . .
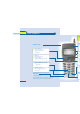
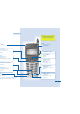
Your telephone Telephone To fi v Headset socket Erase a character Return to previous menu Delete an entire field (long press) Hang up Return to first screen Switch off ringer Lock/unlock keypad (long press) Activate/disable the vibrator (1) (long press) Company directory Customizing your telephone Light • Ex (r A A N A L R B (d A lo A ch (long press) (2) Microphone S (1) R ( (2) Depending on model Special case: from the personal directory
Telephone et socket se a character urn to previous menu ete an entire field g press) ng up urn to first screen tch off ringer k/unlock keypad (long press) tivate/disable the vibrator (long press) To find out more about this, visit www.alcatel.
1 Display and corresponding icons Other Features 1 line of status icons and 3 lines of 16 alphanumeric characters. The Mobile 200 also has a back-lit display and keypad. 1.1 Status icons The status icons are displayed on the welcome screen and indicate the status of the telephone.
1.2 Display and corresponding icons 1 MENU icons The MENU is accessible from the welcome screen by pressing the OK key. (OK : ) It provides access to all the functions available on your system. Directories: manage your personal directory and access the company directory. Redial: call back the last number dialled. Diversion: divert your calls to another number. Mailbox: consult and send voice and text messages. 7 Call pick-up: answer a call intended for another telephone.
1 1.3 Call icons Making a call Answering a call* In conversation* Call on hold* Accessing the directories Transferring a call Switching to DTMF signals 8 Setting up a conference Putting on common hold Parking an external communication * In the event of a multiple call, the icons are given indices to represent the different correspondents.
1.4 Display and corresponding icons 1 How to read this guide Press briefly on the navigation key to access the MENU and to confirm. Move the navigation key up or down. Move the navigation key to the left or right. Use the keypad to enter digits and letters. 9 Description of an action or context Important information. These symbols can be supplemented by small icons or texts. All default or customized function codes are given in the table of codes in the appended sheet.
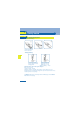
2 Getting started Other 2.1 Charging the telephone • Install the battery Position the battery in the slide following the mark on the label Slide it until it clicks into place • Charge battery 10 Connect the charger and place the telephone in the charging holder Battery charging time Mobile 100: ~ 5 h 00 Mobile 200: ~ 3 h 00 Additional battery: ~ 2 h 30 Characteristics of the mains power adapter Entry : 230 V - 50 Hz Output: 12 V DC - 500 mA Charge the telephone regularly.
2.2 Switching on your telephone MARTIN Paul Wed 24 May 16:30 Switch on (long press) Wait a moment (about 3 seconds) Your telephone is switched on • Switch off your phone Getting started 2 Press the switch on/off key (long press). (switch on/off : 2.3 11 ) Accessing the MENU and navigating MARTIN Paul Wed 24 May 16:30 Confirm • Access the functions mbx greeting OK? Select a function in the MENU 2.
3 Using your telephone Other 3.1 Making a call John in conversation Transfer Dial Send the call Speak Hang up To make an external call, dial the outside line access code before dialling your correspondent's number. 3.2 Calling from your personal directory (Individual number) Pers Sp Dial Directory 12 Select the 'Directories' function Confirm 1-JOHN 2-PAUL 3- Select the name of the person you wish to call 3.
Type surname : Enter the first letter of your correspondent's surname* Select the desired name Send the call If several names come up, you can refine the search by entering the successive letters (second, third, etc.) of the name you are looking for.Press 1 when you do not know one of the letters of the name. 3.4 Answering a call Sophie is calling 13 You are receiving a call Using your telephone 3 Sophie in conversation Transfer Off-hook Speak Hang up The ringer does not ring if: .
3 3.
4 Using your voice mailbox Other 4.1 Initializing your voice mailbox You can use the Voice mailbox initialization icon on the welcome screen to initialize your voice mailbox. (Voice mailbox initialization : ) Init your voice mail Confirm Enter your password and record your name in accordance with the spoken instructions Your personal code is used to access your voice mailbox and to lock your telephone. 15 4.
4 4.3 Consulting your voice mailbox When you have received a message, the Voice mailbox initialization icon is displayed on the welcome screeen. (Voice mailbox initialization : ) 1 voice mail OK? Confirm access to the 'Mail' function Confirm access to the voice mailbox display number of new and old messages Confirm 01/05 107 10 May 9:15 Play new? Confirm • To access voice mail functions 16 You can move horizontally along the various icons.
5 Customizing your telephone Other Programming your personal directory (Individual number) 5.1 Your personal directory can contain up to 10 numbers. Pers Sp Dial Directory Select the 'Directories' function Confirm Confirm access to 'Pers Sp Dial' Name? MARTIN 1-............ 2-............ 3-............
5 5.3 Rapid customizing of the ringer Depending on your activity, the ringer settings can be modified via a quick press on the switch on/off key followed by the OK key. (switch on/off : , OK : ) Switch off the set? Switch off the telephone Activate/disable the vibrator (Mobile 200) Activate/disable the ringer Activate/disable meeting mode (progressive ringing) Lock the keypad 18 Confirm the option of your choice using the OK key. (OK : 3EH 21011 BSAA Ed.
Guarantee and clauses howtoc 19 Independently of the legal warranty that covers this appliance, it is guaranteed for 1 year, parts and labour, counting from the date indictated on your invoice. Nevertheless, if the legal warranty in effect in your coutry exceeds 1 year, then the legal warranty is the sole warranty applicable The invoice will be demanded if making a claim under the warranty.