
User Guide


Appendix B. Configuring IPX Routing 253
Appendix B. Configuring IPX Routing
IPX Routing Concepts
To establish IPX Routing, you will need to enter all remote routers in the remote router database to which your
router will connect.
1. For each remote router, enter the network addresses and services that may be accessed beyond the remote
router.
2. Also enter a network number for the WAN link.
3. After you have specified the route addressing and services, you can then enable IPX routing across the
Ethernet LAN.
Static Seeding:
When IPX traffic is destined for network segments and servers beyond the remote router, the
target router’s routing information table must be statically seeded. Static seeding ensures that the target router
connects to the appropriate remote router. After the link is established, RIP broadcast packets will dynamically
add to the target router’s routing table. Seeding the routing table is not necessary for target routers that never
connect; they will discover remote networks beyond the calling router as soon as RIP updates arrive (provided the
remote router supports RIP). However, for watchdog spoofing to work, you will need to define the remote IPX
routes for network segments and servers.
Configure IPX Routing
Configuring your router for IPX routing can be rather complex. The following section will guide you through the
configuration process. Remember that PPP authentication configuration must be completed
before
you attempt
IPX routing configuration. The full router configuration for simple IPX routing includes the following:
• PPP authentication
• IPX routing (this section)
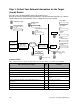
The following section, Step 1: Collect Your Network Information for the Target (Local) Router, on page 254
,
provides a configuration diagram and a command table to assist you with the configuration of the target router.
Step 2: Review your Settings, on page 255
lists the commands used to review the IPX configuration and provides
a configuration example.