
User Guide


222 Chapter 6. Managing the Router
the network into the router’s FLASH memory. When it first connects to the router, the GUI backs up all the files
to a directory called Sxxxxx, where x is the router’s serial number.
Note:
We strongly recommend that you use the Configuration Manager’s
Upgrade/Backup
tool to upgrade or
back up the kernel. The Configuration Manager’s tool is more convenient to use than the Command Line
Interface.
Upgrade Instructions
Read the following steps very carefully before you perform an upgrade:
1.
Warning:
Before performing this procedure, make sure that you can successfully boot from the network
using the manual boot procedure option 3 or 4. Refer to the section Option 3: Boot from Network, on
page 218.
2. Copy the router software file KERNEL.F2K to a directory where it can be accessed by a TFTP server.
The TFTP server must
be on the same LAN as the target router; i.e., there must
not be a router or
gateway between the target system and the TFTP server. If the TFTP sever is not on the same network as
the target router, enter the gateway in the boot menu as described in the previous section.
3. Log into the Command Line Interface.
4. Enter
reboot
using the Command Line Interface to synchronize the file system and reboot the router.
Since the kernel is no longer stored in FLASH memory, the router will try to boot from the network. If
you have never set permanent boot parameters, the router attempts to locate a BOOTP or RARP server. If
the router successfully reboots from the server, go to step 7.
5. Select option
4
to boot router software from the TFTP server using temporary network boot parameters.
You will be prompted for: the router’s boot LAN IP address, the TFTP server’s IP address, the load
address, and the filename of the router’s kernel saved on the server. Note that the LAN IP address is the
proper address to use during the network boot and this may differ from the IP address ultimately assigned
to the router. Enter the temporary network boot parameters (hit the
return
key
for the load address). If all
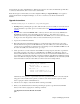
entered information is valid, the router will boot from the network. An example follows:
Alternatively, select option
5
to set
permanent network boot parameters and then boot from the network
using option
3
. You would use this option if you wish to boot from the network for a period of time
before copying the software to FLASH memory.
6. After the boot is complete, verify that the kernel is running successfully.
7. When you are satisfied that the new kernel is performing as expected, copy the kernel into FLASH
memory in the router by typing the two following commands:
copy tftp@xxx.xxx.xxx.xxx:sfilename kernel.f2k
sync
Enter selection: 4
Enter my IP address:
128.1.210.65
Enter server IP address:
128.1.210.70
Enter load address [80100]:
Enter file name: kernel.f2k