
User Guide


OmniVista SafeGuard Manager Administration Guide
49
Chapter 3: General Navigation
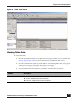
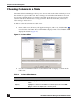
The Table Preview panel (bottom of the Editor window) gives you a preview of
your table as you make these selections.
3 Click OK to apply the changes. When you go into the table view, the columns are
displayed in the order you selected here.
4 Click Reset to reset the columns to the previous settings.
5 Click Cancel to exit out of the Column editor without making any changes.
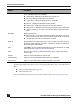
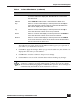
Hide Select a column in the Displayed Columns panel and click Hide
to remove it from the display list. This will hide the column from
the table view.
Hide All Select Hide All to hide all the columns from the table view.
Top Select a column in the Display Columns panel and click Top to
move the selected column to the top of the list. This will be the
first column displayed in your table view.
Up Select a column in the Display Columns panel and click Up to
move the selected column one level up in the list.
Down Select a column in the Display Columns panel and click Down to
move the selected column one level down in the list.
Bottom Select a column in the Display Columns panel and click Bottom
to move the selected column to the bottom of the list. This will be
the last column in the table view.
NOTE: When in table view, you can also change the display order of the
columns in a table by selecting and dragging a column. You can also change
the column width by dragging the column header separator. These settings are
remembered by the Windows client machine for each user.
Table 6 Column Editor Buttons (continued)
Button Name Function