
User Guide


OmniVista SafeGuard Manager Administration Guide
196
Chapter 7: Managing the Server
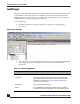
4 Click Import Image Version Matrix if you want to import the matrix that gives
image version and bootloader compatibility matrix.
5 From the dropdown list, select a Free Disk Space Warning Threshold.
6 Select an action for Critical Threshold. Valid choices are Purge Data and Stop
Server.
7 Specify an Unprocessed Flow and Layer7 Data Threshold.
8 If you want to use only internal destinations for the dashboard, select this
checkbox.
9 Enter the IP prefixes that these attributes are applicable to.
10 Click OK to apply the settings.
Starting OmniVista SafeGuard Manager Server in a Multiple Interface
Scenario
When OmniVista SafeGuard Manager is installed on a system that has multiple IP
addresses and the OmniVista SafeGuard Manager server is started for the first time, it
binds itself to the IP address chosen by Windows OS. However, if this default IP address
is not accessible from the OmniVista SafeGuard Manager client and the SafeGuard
devices, then this address needs to be changed.
Use the following procedure to ensure that the correct interface is used when starting the
OmniVista SafeGuard Manager server:
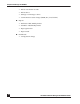
1 Login to OmniVista SafeGuard Manager using the local client installed on the
OmniVista SafeGuard Manager server using the desktop shortcut.
2 Go to To ol s >Server Settings, General Tab. For more information, see General.
3 Select the IP address that is accessible from both the OmniVista SafeGuard
Manager clients and the SafeGuard devices using the dropdown list in the Server
IP field.
4 Click OK to apply the settings.
5 Exit out of the client.
6 Restart the server.