Quick Start Guide OmniAccess 600series Routers T1 and E1 products
Related Guides Installation Guide: OmniAccess 600-series Routers Refer to this guide for more detailed information about safety and how to install, configure, operate, and troubleshoot this product. Command Reference Guide This guide provides detailed information and examples about how to use CLI commands in an E1/J1 network environment.
The Alcatel OmniAccess 601, OmniAccess 602, and OmniAccess 604 multi-scalable router is designed to provide WAN to LAN networking connectivity for branch office communication and primary Internet access for medium-size businesses. The OmniAccess 601, OmniAccess 602, and OmniAccess 604 provides one or two WAN ports, two 10/100 Fast Ethernet ports, an AUX port, and a local/remote management Console port. Alternatively, WAN ports 1 and 2 can be utilized as a DSX interface for connecting to a PBX or key system.
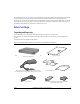
DC power cable retainer bracket Console cable Wall-Mounting Option An optional wall-mounting assembly is available for mounting the OmniAccess 601, OmniAccess 602, and OmniAccess 604 router on a vertical surface. The wall-mount components are shipped in the same box with the OmniAccess 601, OmniAccess 602, and OmniAccess 604 router and are shown in the following figure.
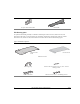
Rack-Mounting Option An optional rack-mounting tray is available for installing the OmniAccess 602 and OmniAccess 604 router in an equipment rack. The following items are shipped in a separate carton: Figure 3 Rack-Mount Components (2) Rack Carriage Assemblies Rack Tray (4) Velcro Tie Wraps (2) Mounting Brackets (4) 10-24 x .5 Phillips Pan Head Screws for Equipment Rack Alcatel (4) 12-32 x .5 Phillips Pan Head Screws for Equipment Rack (2 sets) Velcro Mounting Pads (6) 6-32 x .
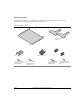
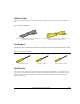
Additional Cables The following additional cables are required for installing the OmniAccess 601, OmniAccess 602, and OmniAccess 604. Figure 4 Additional Cables Required One or two RJ-45, male/male, category 5, twisted-pair cable (Ethernet LAN connection) One to two RJ-48C, male/male, 26 AWG (minimum) category 5, straight-through cable (WAN connection) Tools Required The following tools are required for installing the OmniAccess 601, OmniAccess 602, and OmniAccess 604.
Important Notice NOTE: Be sure to read this page before installing your router. OmniAccess Wide Area Network (WAN) software releases are customized to support individual platforms. Please refer to the sections below to see which software release is supported on your OmniAccess WAN router. You can download the software at: http://eservice.ind.alcatel.com/public/oa600.cfm For information on contacting Alcatel for further assistance, see Contacting Alcatel.
OmniAccess 601 Router Components The following section identifies and describes the OmniAccess 601 router network ports and LEDs. The 601 routers also support a Web User Interface which can be used to configure basic operational and security features. For more information on the Web UI, refer to the OmniAccess 600-series Router Web User Interface User Guide.
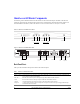
Front Panel LEDs The Alcatel OmniAccess 601 router front-panel LEDs indicate real-time unit status. Table 2 provides information about how to interpret the LED states. For more detailed LED information and troubleshooting tips, refer to the OmniAccess 600-series Installation Guide.
OmniAccess 602 Router Components The following section identifies and describes the OmniAccess 602 router network ports and LEDs. The 602 series routers also support a Web User Interface which can be used to configure basic operational and security features. For more information on the Web UI, refer to the OmniAccess 600-series Router Web User Interface User Guide.
Front Panel LEDs The Alcatel OmniAccess 602 router front-panel LEDs indicate real-time unit status. Table 4 provides information about how to interpret the LED states. For more detailed LED information and troubleshooting tips, refer to the OmniAccess 601, OmniAccess 602, and OmniAccess 604 Installation Guide.
OmniAccess 604 Router Components The following section identifies and describes the OmniAccess 604router network ports and LEDs. The 604 series routers also support a Web User Interface which can be used to configure basic operational and security features. For more information on the Web UI, refer to the OmniAccess 600-series Router Web User Interface User Guide.
Front Panel LEDs The Alcatel OmniAccess 604 router front-panel LEDs indicate real-time unit status. Table 4 provides information about how to interpret the LED states. For more detailed LED information and troubleshooting tips, refer to the OmniAccess 601, OmniAccess 602, and OmniAccess 604 Installation Guide.
Installing the OmniAccess 600-Series Router The OmniAccess 601, OmniAccess 602, and OmniAccess 604 router can be installed on a table top, in a Telco equipment rack (using the optional rack-mounting tray), or on a vertical surface (using the optional wall-mounting assembly). The router ships with a Console cable. You will need to obtain additional cables for your specific application. Refer to Figure 4 for more information.
Wall-Mount Installation Figure 13 Wall Mounting the OmniAccess 601 Router Alcatel Quick Start Guide: OmniAcces 600-Series Routers 15
Figure 14 Wall Mounting the OmniAccess 602 and OmniAccess 604 Router Follow this procedure to mount the Alcatel OmniAccess 601, OmniAccess 602, and OmniAccess 604 router on a vertical surface. Refer to Figure 14. 1 Attach the router to the wall mount bracket using the four (provided) Phillips pan head 4-40 x .250 inch screws. Ensure that the router is oriented in a manner that allows the LEDs to be visible.
Rack-Mount Installation Figure 15 Rack Mounting the OmniAccess 602 and OmniAccess 604 Router Follow this procedure to install the Alcatel OmniAccess 602 and OmniAccess 604 router in an equipment rack using the optional rack tray assembly. Refer to Figure 15. 1 Determine the mounting position for the rack tray in the equipment rack (front or mid-mount). Attach the mounting brackets using the six provided 6-32 x .25 inch flat head Phillips screws.
9 Position the populated rack tray in the equipment rack. 10 Secure the rack tray to the equipment rack with either set of the four provided screws. (Select the screw set that is compatible with the equipment rack hole threads.) 11 Complete the cable dressing. Coil the excess power cord and secure it on the tray behind the router using the provided Velcro tie wraps. 12 Plug the AC power cord into a standard 110/220 VAC outlet.
Figure 17 Connecting the WAN Cable Connect to Service Provider’s Demarcation Point WAN Port 1 Follow this procedure to connect a WAN port to the network. Refer to Figure 17. 1 Connect the RJ-48C connector of a WAN cable to an active license-enabled WAN port. 2 Connect the other end of the WAN cable to the service provider’s demarcation point. Make sure that the cable connectors are locked and secure in the ports.
For information about configuring drop and insert, refer to the OmniAccess 601, OmniAccess 602, and OmniAccess 604 Installation Guide and the Command Reference Guide. Management Interface To configure and manage the OmniAccess 601, OmniAccess 602, and OmniAccess 604 router using the Alcatel command line interface (CLI), an operator console must be connected to the router. Refer to “Connecting the Ethernet Cable” on page 18 for connection details.
Figure 20 Connecting the OmniAccess 601, OmniAccess 602, and OmniAccess 604 to a Modem Follow this procedure to connect the OmniAccess 601, OmniAccess 602, and OmniAccess 604 to a modem. Refer to Figure 20. 1 Connect the male end of the DB-25 adapter to the female DB-25 port on the modem. 2 Connect one end of a supplied RJ-45 cable to the RJ-45 port in the DB-25 adapter. 3 Connect the other end of the RJ-45 cable to the Console port on the OmniAccess 601, OmniAccess 602, and OmniAccess 604.
re-enter password: new_pass Passwords are case-sensitive and must be a minimum of three to a maximum of eight characters. For future reference, make a note of the password that you use. Changing the Administrator Account Name You can change the administrator login name (Level 1 access) to a user-specified name. The default is Alcatel.
Interface Port Configuration The following are examples of T1, CT3, and DS3 interface configurations. To scroll through the options available at any command prompt, press the Tab key. For descriptions of the options available at any command prompt, type help and press Enter.
Bundle Configuration Alcatel systems support PPP, MLPPP, FR, MFR, and Cisco-compatible HDLC for WAN data transmission. NOTE: Bundle names cannot exceed eight characters. E1/PPP Bundle Router> configure term Router/configure> interface bundle HongKong Router/configure/interface/bundle HongKong> link e1 4 Router/configure/interface/bundle HongKong> encapsulation ppp Router/configure/interface/bundle HongKong> ip address 199.1.1.1 255.255.255.
Router/configure/interface/bundle London> encapsulation hdlc Router/configure/interface/bundle London> hdlc keepalive 20 Router/configure/interface/bundle London> ip address 192.168.2.1 255.255.255.
Router/configure/interface/bundle Seattle/fr/pvc 16> shaping cir 3072000 bcmax 30720000 bcmin 1536000 Router/configure/interface/bundle Seattle/fr/pvc 16> exit Router/configure/interface/bundle Seattle/fr> enable interface Router/configure/interface/bundle Seattle/fr> exit 4 Frame Relay Bundle Router> configure term Router/configure> interface bundle Rome Router/configure/ interface/bundle Rome> link e1 3 Router/configure/ interface/bundle Rome> encapsulation fr Router/configure/ interface/bundle Rome> fr
Router/configure/interface/bundle Dallas> link ct3 1 1-10 Router/configure/interface/bundle Dallas> encapsulation ppp Router/configure/interface/bundle Dallas> ip address 20.20.20.1 24 Router/configure/interface/bundle Dallas> exit 2 Router/configure> router routerid 10.10.10.
Saving Configurations Execute the following command to save new configurations to system memory. Alcatel> write memory NOTE: Before powering down the OmniAccess 601, OmniAccess 602, and OmniAccess 604, execute a write memory command to save the router configuration. Execute the following command to save new configurations to a network host. You must identify the host name or IP address, the host directory that the file is being transferred to, and the new file name. Alcatel> write network 10.1.100.
Copyright Copyright © 2002-2005, Alcatel All rights reserved. No part of this document may be reproduced in any form or by any means without prior written authorization from Alcatel Alcatel reserves the right to revise this document without obligation to provide notification of such changes. Alcatel provides this documentation without warranty expressed, implied, statutory, or otherwise, and specifically disclaims any warranty of merchantability or fitness for a particular purpose.
Software upgrades (bug fixes and feature enhancements not listed as separate cost options of the Alcatel price list) from the Alcatel website for the first ninety (90) days after shipment from Alcatel. Technical Support Online, phone, and email Technical Support is provided free of charge for a period of ninety (90) days from the Date of Shipment. Technical Support is available online at the Alcatel website: www.alcatel.
Limitation of Liability Alcatel and its suppliers exclude themselves from any liability for any lost revenue or profit, loss of business, loss of information or data, or for special, indirect, consequential, incidental, or punitive damages of any kind caused out of or in connection with the sale, installation, maintenance, use, performance, failure, or interruption of its products, even if Alcatel and its authorized resellers have been advised of the possibility of such damages.
Quick Start Guide: OmniAcces 600-Series Routers Alcatel