
Use and Care Manual


40391 Assembly Instructions
Page 9
WARNING!
The threads on the nozzle holder and set screws must be inspected each time the nozzle is
secured to the holder. Check the threads for wear, and make sure nozzle set screw securely
grips the nozzle. The nozzle washer must also be inspected for wear. Worn nozzle washers
cause erosion. A loose-fitting nozzle may eject from the holder under pressure and could
cause severe injury.
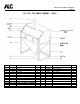
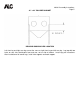
MOUNTING INSTRUCTIONS FOR THE ECONOMY LIGHT KIT
1. Using drill dimension sheet, drill 1.467 (1-7/16) hole in left
side of cabinet. Drill (2) 0.187 (3/16) holes 1.625 (1-5/8) from
center of large hole, one above and one below.
2. Unscrew ceramic lampholder and install base through hole
from outside and attach gasket and socket from inside.
3. Attach electrical box to outside of cabinet using 8-32 x 1/2”
machine screws and nut. NOTE: Attach ground wire (green)
to one of the screws that holds the box to the cabinet.
4. Attach neutral wire (white) from power cord to silver screw on
socket base.
5. Attach black wire from socket base to one of the screws on
the side of the switch.
6. Attach black lead from power cord to the other screw on the
side of the switch.
7. Attach switch to box and install cover.
8. Install light bulb (not included) maximum 60 watts.