
Use and Care Manual


40389 Assembly Instructions
Page 5
ASSEMBLY INSTRUCTIONS
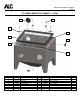
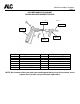
1. Take gloves and slip over circular flanges inside the cabinet. Secure
gloves to flanges with glove clamps. If cabinet is supplied with 18” rubber
gloves, help may be required to stretch gloves over the flanges. This is
normal.
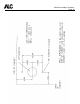
2. Attach abrasive blast hose to pick-up tube on inner portion of pick-up
tube leaving 1/4” gap between hose end and outer tube. Lay pick-up
tube in bottom of cabinet with hose end towards right rear of cabinet.
Attach other end of hose to suction head of gun.
3. Attach pressure inlet hose (not supplied) to 1/4” threaded inlet on gun. If
using whip hose inside cabinet, run threaded end through 9/16” diameter
hole on lower right side of cabinet and attach quick disconnect nipple to
hose end and tighten. If using shop hose directly through inlet hole to
gun, the hole may need to be opened to accommodate hose diameter.
WARNING!
Disconnecting hose while Unit is under pressure could cause serious injury or death. Use
safety lock pins and safety cables in all coupling connections to help prevent hose couplings
from accidental disconnection.
If twist-on type air hose couplings are used, they must be secured by safety lock pins or wires
to prevent accidental disconnection while under pressure. Hose disconnection while under
pressure could cause serious injury
OPERATING INSTRUCTIONS
1. Maximum operating pressure is 110 PSI. Air consumption with medium
nozzle supplied with cabinet is 15 CFM at 80 PSI.
2. To change abrasive, remove plug at bottom front of cabinet and drain into
suitable container. Reinstall plug and pour new abrasive into cabinet.