
Product Manual
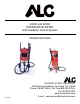


40000 & 40002 Assembly Instructions
Page 3
ASSEMBLY INSTRUCTIONS
NOTE: Refer to diagrams on pages 14 and 15 when assembling.
1. Attach wheel assemblies to wheel support as shown in inset #1 (p. 15). Do not tighten nut
snugly against wheel hub, as some movement is required to allow free rolling of wheels.
Tighten hex nut directly against wheel support housing to lock wheel assembly in place.
2. Abrasive regulator valve has been preassembled and attached to the bottom of the tank. Pipe
dope has been used on all fittings for positive sealing. Apply pipe dope on the bottom of the
plumbing. Connect hose assemblies as shown in illustration with enclosed hose stems and
hose clamps.
3. Attach abrasive hose and air by-pass hose to tank base. Proceed with assembly of air intake,
choke valve, and pressure gauge assembly as shown in diagram. Optional air filter assembly
as shown in diagram should be attached during this step. Manufacturer recommends the use
of pipe dope on all fittings for positive sealing. Several subassemblies have been completed at
the factory for your convenience. Be certain all pipe fittings and hose clamps are tight before
using blaster.
WARNING!
Disconnecting hose while Unit is under pressure could cause serious injury or death. Use
safety lock pins and safety cables in all coupling connections to help prevent hose couplings
from accidental disconnection.
If twist-on type air hose couplings are used, they must be secured by safety lock pins or wires
to prevent accidental disconnection while under pressure. Hose disconnection while under
pressure could cause serious injury.
4. The Deadman Valve Assembly has been preassembled and attached to the abrasive hose. It
allows single-handed operation with safety shut-off when operator’s hand is removed or valve
is dropped. (Do not over-tighten retainer nut against ceramic nozzle. Excessive tightening
may cause damage to nozzle.) IMPORTANT: The 40164/40165 sealing block/nut and bolt
assembly must be adjusted after inserting ceramic nozzle. Note: The Deadman Valve is
adaptable to any blaster using 1/2” I.D. blast hose. Inspect and replace nozzle washer as
needed or when replacing nozzles.
5. Recheck all pipe fittings and hose clamps to ensure they are securely tightened.