
Installation manual

26 031-171-C0-003 Rev. C
3.0 Installation, cont.
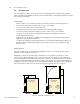
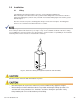
3.2 Enclosure Installation
The RMB-E-911 is provided with either a 7” riser or 14” riser/battery module. These two configurations
require somewhat different mounting considerations and procedures. The 7” riser is shipped loose (not
bolted to the enclosure) for use as a template to mark the pad for hardware and position. Mounting
holes are provided in the base of the battery compartment or riser to accommodate the pad’s anchor
bolts.
The enclosure is shipped from Alpha Technologies bolted to a wooden pallet. It will be necessary to
perform the following prior to and after lifting the enclosure from the pallet and positioning it on the pad.
Installation Procedure, ‘C’ Configuration
Remove all packing material from the enclosure and inspect for damage. Continue with the following
steps:
1. Unwrap the pallet and remove the 7” riser. Identify and remove the Riser Hardware Kit taped to the
inside of the riser. It contains the bolts that will secure the enclosure to the riser.
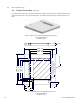
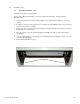
2. Position the riser on the pad and use as template to mark drilling locations. Ensure the pad is
smooth, level and free of bumps.
3. Remove the 7” riser from the pad and drill and install pad mounting anchor bolts in accordance with
manufacturer’s instructions.
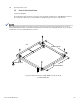
4. Place the riser over the pad mounting bolts and tighten the bolts to their required torque
specification.
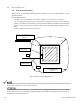
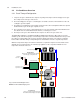
5. Verify all cabling that passes through the riser is bundled and placed within the cutout area of the
enclosure (site dependant).
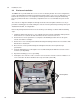
6. Reposition the lifting eyes to accept cabling.
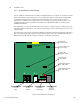
7. Lift and place the enclosure on the secured 7” riser. Fasten the enclosure to the riser with the 1/2”-
13 X 1 1/4” bolts in the Riser Hardware Kit. Torque to 23 ft-lbs (52.5 N-M)
Mounting Bolts