
Instructions


Device configuration
akYtec GmbH · Vahrenwalder Str. 269 A · 30179 Hannover · Germany · Tel.: +49 (0) 511 16 59 672-0 · www.akytec.de
25
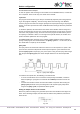
Fig. 4.2
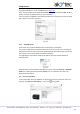
To synchronize the device clock with the PC clock, check the checkbox Synchronize
with PC. In this case the fields Date and Time become inactive. To set the device clock
to the new values click the button Save in the section Date/Time.
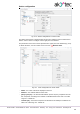
Fig. 4.3
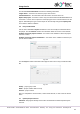
Specify the clock error in seconds per month in the field Deviation to set the clock correc-
tion. Enter a negative value if the device clock is too fast.
Fig. 4.4
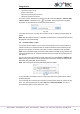
To save the clock correction in the device, click the button Save in the section Correc-
tion.
The button Read can be used to read the current time settings from the connected de-
vice.
4.3 Interfaces
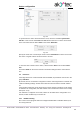
If the target device has a serial network interface RS485, its parameters can be set in the
group Interfaces.
By default, there is one interface configured as a slave and assigned to the hardware slot
1 with the following settings: master device with the name PR and the network address
16.
If the number of interfaces on the target device can be changed, interfaces can be added
or deleted in the configuration, but their number cannot exceed the number of the existing
slots (sect. 4.3.2).
If an interface is configured as a master, slaves can be added to the configuration or re-
moved, but their number may not exceed 16.
4.3.1 Modbus working
ALP can be used to program devices that support Modbus-RTU or Modbus-ASCII (mas-
ter / slave) protocols.