Installation instructions Akrapovič Product: Slip-On for the Ducati Scrambler 1100 *508324* EN Revision 1.0 09/2021 www.akrapovic.com D250.1.00.
www.akrapovic.com Congratulations on purchasing the Akrapovič product. The Akrapovič product is made by Akrapovič d.d., Malo Hudo 8a, 1295 Ivančna Gorica, Slovenia (“Akrapovič”). Please read this entire installation manual carefully prior to installing and using the Akrapovič product. Akrapovič product should only be installed by persons skilled in motorcycle exhaust system or other motorcycle parts installation and performance.
SAFETY AND COMPLIANCE WARNING, PLEASE READ CAREFULLY BEFORE REMOVING THE STOCK PARTS AND BEGINNING THE INSTALLATION OF YOUR NEW AKRAPOVIČ PRODUCT, PLEASE MAKE SURE THAT ALL ITEMS LISTED BELOW ARE VERIFIED: THIS MANUAL IS SPECIFIC TO THE MOTORCYCLE INDICATED ON THE COVER PAGE, FOR WHICH IT IS DESIGNED. INSTALLATION PROCEDURES VARY DEPENDING ON THE TYPE OF MOTORCYCLE. PLEASE VERIFY THAT THE AKRAPOVIČ PRODUCT AND THIS INSTALLATION MANUAL CORRESPOND TO THE TYPE OF YOUR MOTORCYCLE.
www.akrapovic.com NOISE AND EMISSION WARNINGS General warning Because of the world-wide distribution of Akrapovič d.d. products, neither Akrapovič d.d. nor any of its subsidiaries make any representation that the products comply with the air and/or noise emissions laws, or labeling laws, of any jurisdiction. The purchasers are entirely responsible for informing themselves of the applicable laws where the products are to be used and to comply with those law.
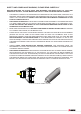
Tools & equipment • • • • • • • Mechanic gloves T-handle 5 mm hexagon wrench T-handle 6 mm hexagon wrench Torx 40 wrench Torx 45 wrench T- handle swivelling 10 mm wrench Combination 13 mm wrench PARTS LIST The packaging box should contain one or more of the following items: • • • • • Akrapovič product Homologation certificate/ compliance documents if applicable Warranty Fitting material Installation Manual Detailed list of parts can be found on the Akrapovič website (please use the QR code on the front
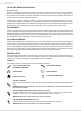
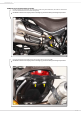
www.akrapovic.com REMOVAL OF STOCK EXHAUST SYSTEM: 1. 2. Put the motorcycle on a side stand, we recommend a central racing stand. Make sure, that surface is solid and flat. Unscrew marked bolt and loosen marked clamp (F 01). CAUTION: be careful not to injure yourself or damage any part of the motorcycle during this procedure! F 01 3. Unscrew marked bolts and carefully remove stock exhaust off the motorcycle (F 02).
4. Unscrew marked bolts and remove the bracket off the motorcycle (F 03). CAUTION: be careful not to injure yourself or damage any part of the motorcycle during this procedure! F 03 5. Remove the rubber grommet off the stock bracket (F 04). CAUTION: be careful not to injure yourself or damage any part of the rubber grommet during this procedure! INSTALLATION TIP: for easier removal, lubricate the stock rubber grommet (WD-40®)*. *WD-40® is a trademark of the WD-40 Company.
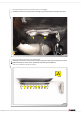
www.akrapovic.com INSTALLATION OF AKRAPOVIČ EXHAUST SYSTEM: 1. Install the stock rubber grommet into the Akrapovič exhaust collector as shown (F 05). CAUTION: be careful not to injure yourself or damage any part of the rubber grommet during this procedure! INSTALLATION TIP: for easier installation, lubricate the stock rubber grommet (WD-40®)*. *WD-40® is a trademark of the WD-40 Company. F 05 2. Install the clamp from Akrapovič installation kit onto the collector as shown (F 06).
3. Install the collector onto the outlet of stock headers and hand tighten the bracket using stock bolts and bushes (F 07). CAUTION: be careful not to injure yourself or damage any part of the motorcycle during this procedure! F 07 4. Install the mufflers bracket and hand tighten it using bolts, washers and spacer bushes from Akrapovič installation kit (F 08).
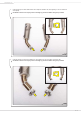
www.akrapovic.com 5. Install the clamps with heat shield brackets from Akrapovič installation kit, hand tightening it onto the mufflers as shown (F 09). CAUTION: be careful not to injure yourself or damage any part of the mufflers during this procedure! F 09 6. Install the clamps from Akrapovič installation kit, hand tightening it onto the mufflers as shown (F 10).
7. Install the mufflers onto the motorcycle position them correctly and hand tighten them using bolts, washers and nuts from Akrapovič installation kit as shown (F 11). CAUTION: be careful not to injure yourself or damage any part of the motorcycle during this procedure! F 11 8. Tighten the collector’s bracket bolts an clamp to the specified torques (F 12, 13).
www.akrapovic.com 14Nm 10ftlb F 13 9. Position the mufflers in respect to each other, tighten all the brackets bolts and clamps to the specified torques (F 14, 15, 16).
2x 22Nm 16ftlb F 15 14Nm 10ftlb F 16 13 / 18
www.akrapovic.com 10. Screw Akrapovič heat shield’s bolts and heat-resistant washers (Akrapovič installation kit) onto Akrapovič heat shields as shown (F 17, 18).
11. Position both heat shields correctly, make sure that the gap between the heat shields and mufflers is at least 3mm, than tighten the clamps and heat shield bolts on both sides to the specified torques (F 19, 20). CAUTION: be careful not to injure yourself or damage any part of the muffler during this procedure!! 4.9 N 3.6 m ftlb F 19 2x 9.
www.akrapovic.com FINAL INSTALLATION: 1. Clean grease spots off all Akrapovič product’s surfaces, when installation is finished. Cleaning will prevent spots from burning onto the surface. Do not use aggressive chemical cleaners, because they can damage the surface or stickers: • Titanium surfaces (titanium muffler’s outer sleeve, titanium pipes etc): use a soft cloth sprayed with a multipurpose spray lubricant (WD-40® or equivalent)*, then wipe with a soft dry cloth.
TROUBLESHOOTING: Problem Possible cause Solution loosened clamp tighten the clamp to specified torque connection is not completely joined tap the connection into place and tighten the clamp to specified torque Exhaust gas leaks out of the muffler/pipe clamp connections 17 / 18
www.akrapovic.