
Installation Guide

GUIDELINES
FOR UNIT
INSTALLATION
Water Resistant
Underlayment
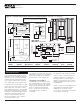
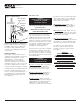
Figure 4 - Wall Finishing
Furring Strip or
Shim Material
Nailing
Flange
Wall Framing
Waterproof
Sealant
Page 5
Water Supply and Drain Connections
Refer to, and follow, the assembly and
installation instructions provided with
the supply valves and drain system.
Carefully check all fittings and connec-
tions for leaks.
Finishing Guidelines
Furring strips or filler material may be
required over the framing to ensure the
underlayment will lie flush over the
nailing flanges. A water resistant
underlayment is recommended on
areas surrounding the unit. Stop the
underlayment 1/16 to 1/8 inch from the
unit surface, and fill the space with a
continuous bead of waterproof sealant.
Carefully fasten the underlayment near
the unit to avoid damaging the unit
surface. Seal the seams and edges of
the underlayment, as required, and
install the finish material to specifica-
tions. (Figure 4)
Unit Surface Care
WARNING!
NEVER USE ABRASIVE MATERIALS
OR ABRASIVE CLEANERS
ON THE UNIT SURFACE!
EXTREME CAUTION is urged regarding
the use of any cleaner, acid or solvent
on the unit surface.
READ, AND FOLLOW ALL PACKAGE
LABELS AND INSTRUCTIONS!
Through routine use, the unit surface
can collect residues from soap, bath
additives and natural body oils. Addi-
tional deposits can also collect from
minerals or particles found in the water.
After each use, wipe the excess water
from the unit. This practice will reduce
the build-up of deposits and help
maintain the natural unit lustre.
Following a thorough surface cleaning,
an application of quality automotive
wax will help reduce major accumula-
tions. The actual schedule for cleaning,
and waxing, will depend on unit usage
and water quality.
WARNING!
AVOID APPLYING WAX
TO THE UNIT BOTTOM!
♦Routine Cleaning: Mild, non-abrasive
cleaner specifically formulated for
gelcoat and acrylic surfaces recom-
mended. (Rinse surface thoroughly)
♦Heavy Soap Deposits: Liquid ammo-
nia household cleaner, applied full
strength. (Rinse surface thoroughly)
♦Stubborn Stains: Liquid household
cleaner or hydrogen peroxide, applied
full strength. Place a saturated clean
rag directly on stain and let stand
several hours. (Rinse surface thoroughly)
For extreme cases, buff area with white
automotive polishing compound until
stain disappears, and apply a quality
automotive wax to surface.
♦Hard Water Scales: Liquid scale
remover or white vinegar, applied full
strength. (Rinse surface thoroughly)
♦Mold/Mildew: Liquid mildew remover
or baking soda and water paste. (Apply
paste and allow to fizz several minutes.)
(Rinse surface thoroughly)
♦Construction Adhesive: Soften
adhesive with hand held dryer and peel
off adhesive. (Caution is advised when
using any electrical device near water.)
For stubborn cases, apply rubbing
alcohol or nail polish remover, full
strength, to adhesive. (Rinse surface
thoroughly)
WARNING!
BATH MATS OR OTHER ITEMS
WHICH ARE HELD IN PLACE USING
SUCTION AGAINST THE UNIT SURFACE
MUST BE REMOVED FROM THE FLOOR
OF THE UNIT AFTER EACH USE.
OVER A PROLONGED PERIOD, FAILURE
TO REMOVE THESE TYPES OF ITEMS
FROM THE BOTTOM OF THE UNIT CAN
RESULT IN SURFACE DAMAGE.